Getting Started
This tutorial uses an updated version of DropCharge, from 2D Apple Games by Tutorials, as the example. Because you’ll submit test builds to Apple for Beta App Review, follow along with a project of your own.
Note: You can use DropCharge to follow along for most of this tutorial, but you’ll have to change the bundle ID and app name to upload the build for internal testing. The app will not pass app review, so you can’t use it for external testing; you’ll have to use an app of your own for that.
This tutorial assumes your app is set up for provisioning and has an app ID created in both the Developer Portal and on App Store Connect.
This setup is outside the scope of this tutorial, but you can get all the information you need on submitting an app and getting it published on the App Store in our two-part tutorial How to Submit An App to Apple: From No Account to App Store.
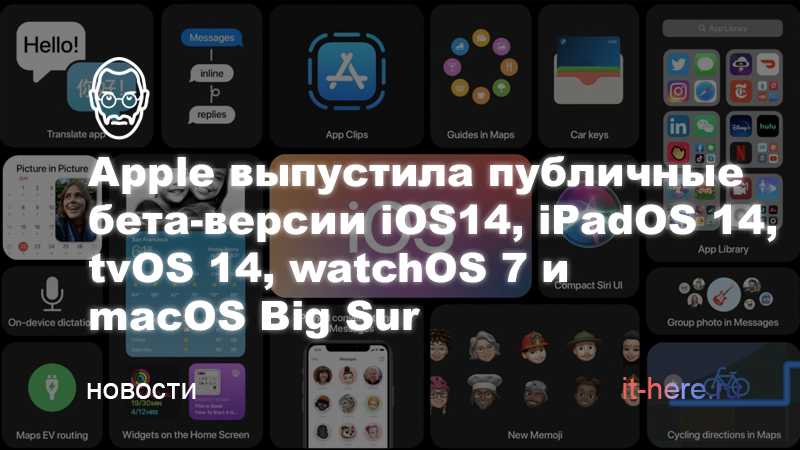
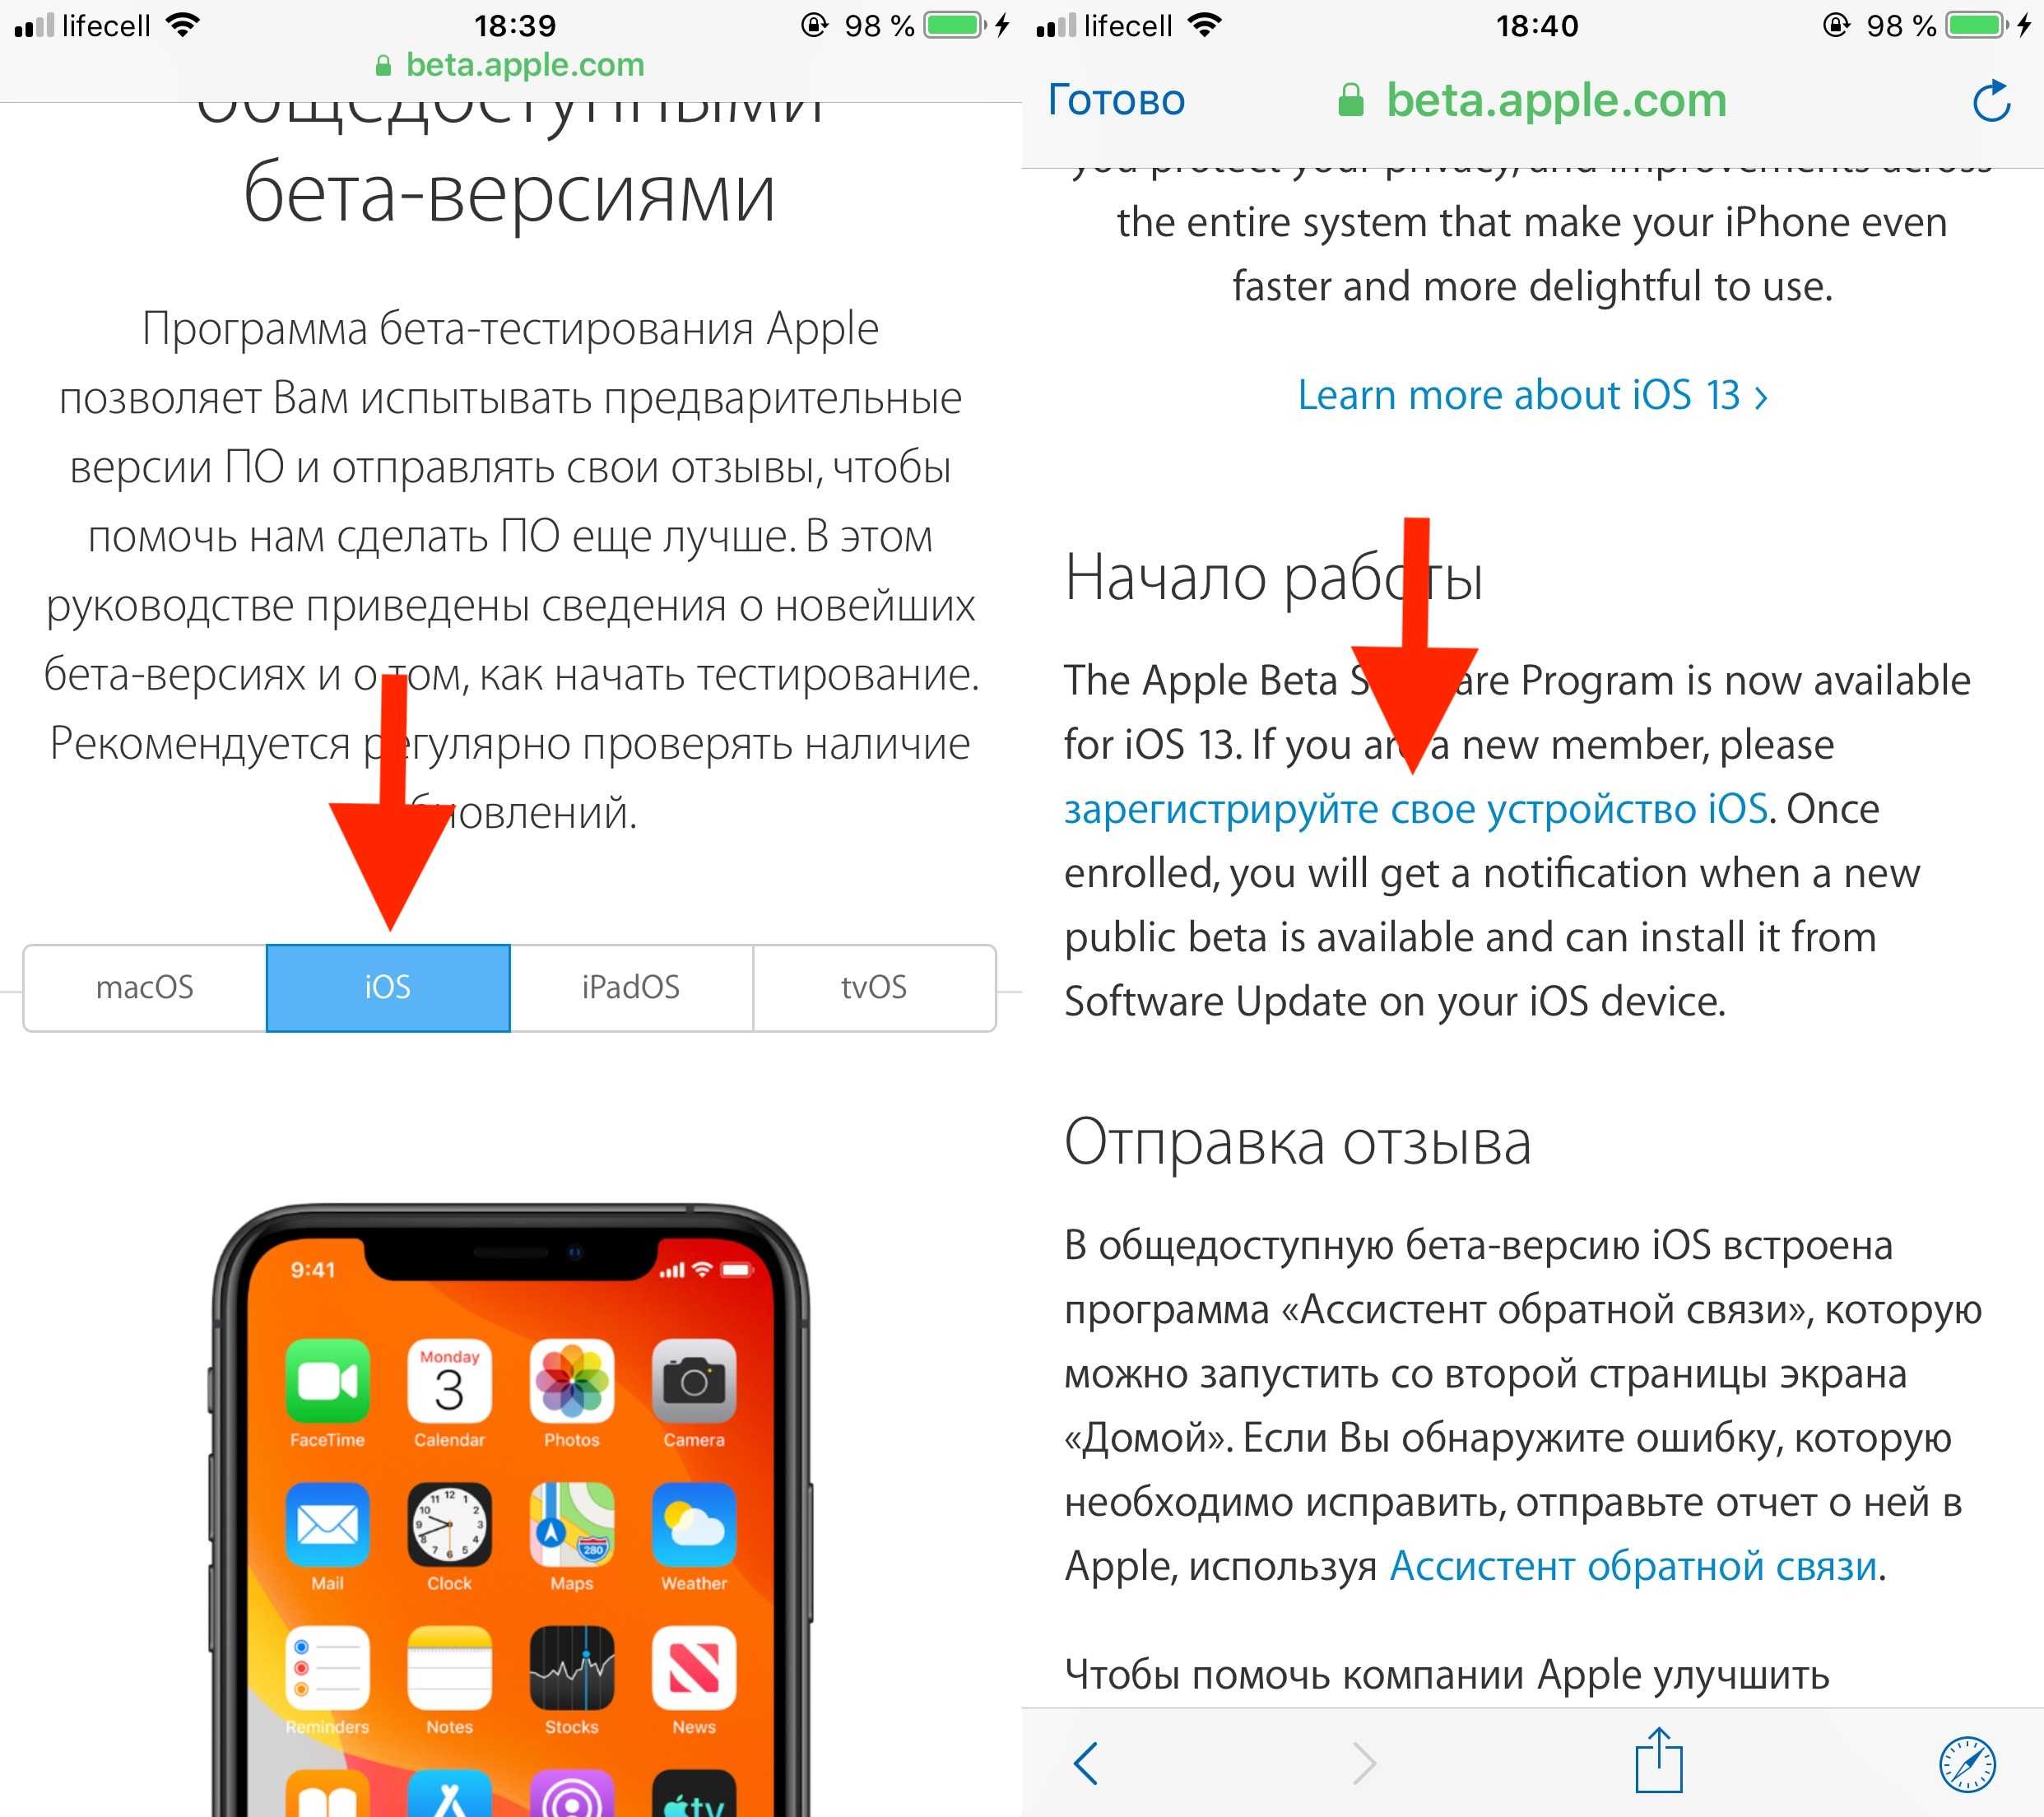
Что нового в iOS 16 beta 6 и beta 7
В последние 2 недели прошли релизы для iOS 16 beta 6 и beta 7 для разработчиков. Нововведений немного.
В альбомной ориентации в Центре уведомлений слева вернули время. Обложка Apple Music на экране блокировки стала компактнее.
Куда больше обновлений получит приложение Apple Music для Android. На данный момент тестируется 4я версия для разработчиков. И там пользователи получат избранные плейлисты, возможность следить за обновлениями артистов, а также в коде было найдено упоминание нового сервиса Apple Classical (классическая музыка). Все эти новшества уже есть в Apple Music на iOS.
В Контактах вас будет встречать большой баннер с найденными дубликатами, где их можно удалить, объединить или игнорировать.
![]()
К сожалению, точный процент заряда аккумулятора все так же недоступен в iPhone XR | 11 | 12 mini | 13 mini. Компания не объясняет свое решение.
По автономности. Beta версия iOS 16 стала лучше держать заряд. Сильно помогает при этом выгрузка всех приложений из режима многозадачности. Видимо, какие-то процессы нещадно «поджирали» заряд, и телефон разряжался к обеду.
Types of Testers
Your build is now ready for testing, but who’s going to test it?
Apple defines two types of testers for TestFlight:
- Internal Tester: This is an App Store Connect user who has an Admin, App Manager, Legal, Developer or Marketer role with access to your app. This is usually a team member or a client for whom you’re developing an app. You can add up to 100 internal testers, and each member can test on up to 30 devices.
- External Tester: This is any user outside of your team who wants to test your app. External testers have no access to your App Store Connect account, and they can only download and install the app. You can add up to 10,000 external testers.
Before your external testers can test your app, you must submit your app to Apple for review like you would with a regular App Store submission. These reviews tend to be quicker than normal app reviews, but there’s no guarantee. Once approved, you can send your app to external testers.
As soon as App Store Connect completes processing a build, it notifies all internal testers. External testers get a notification after Apple finishes performing a beta app review to make sure the app follows the App Store Review Guidelines. To control who gets specific builds, use different external test groups. You’ll learn more about external testers, and how to submit for beta app review later; for now, you’ll focus on internal testers.
Giving and Receiving Feedback
TestFlight gives testers several ways to provide feedback to you, the developer.
The first is through the screenshot mechanism. If the user takes a screenshot of the app, they’ll get a Share Beta Feedback… option. This appears either through the share action in the editing pane or right after they tap Done.
When users choose this option, they’ll get a chance to add a note — hopefully one including useful information and reproduction steps. :]
Users can also leave feedback through the TestFlight app. This brings up the same share sheet as the screenshot feedback. Through this method, users can attach any photo from their library or none at all.
Finally, the user can jump to this share mechanism in the TestFlight app with an app shortcut on the home screen.
Getting the Feedback
Once a tester submits feedback, it will appear in App Store Connect in the TestFlight tab. In the left navigation panel, there will be a Feedback section with a menu item for Screenshots. This is where all feedback sent through the TestFlight app goes, whether there’s an image attached or not.
![]()
![]()
This will provide you with enough information to start debugging, and if not, a way to contact the user to get more information.
Your Privacy and Data
Apple retains TestFlight data for one year. To view and manage your data with Apple, including your data that is sent to Apple through TestFlight, visit Data and Privacy. For more information about how the developer handles your data, consult their privacy policy. To request access to or deletion of your TestFlight data, contact the developer directly.
Information shared by using TestFlight
| Data | Description |
|---|---|
| Email Address | The email address with which you were invited to test the app. This may or may not be the same as the Apple ID associated with your device. If you were invited with a public link, your email address is not shared with the developer. |
| Name | Your first and last name as entered by the developer when they invited you to test the app using your email address. If you were invited with a public link, your name is not shared with the developer. |
| Invitation Type | Whether you were invited by email or through a public link. |
| Status | The status of your invitation: Invited, Accepted, or Installed. This status is refreshed when you accept or install a beta build. |
| Installs | The number of times you’ve installed a beta build. |
| Sessions | The number of times you’ve used a beta build. |
| Crashes | The number of crashes per beta build. |
Data shared when sending feedback
When you send feedback through TestFlight or send crash reports or screenshots from the beta app, the following additional information is shared. This information is collected by Apple and shared with developers. Apple retains the data for one year.
| Data | Description |
|---|---|
| App Name | The name of the app you are testing. |
| App Version | The most recent version and build that you have access to. This is the number that displays under the app name in the list of apps in TestFlight. |
| Installed App Version | The version and build you have installed on your device. |
| Device | The model of your device. |
| iOS Version | The version of iOS your device is running. |
| macOS Version | The version of macOS your device is running. |
| Language | Your device language. |
| Carrier | Your wireless service provider. |
| Time Zone | The time zone your device is set to. |
| Architecture | The type of Central Processing Unit (CPU) for your device. |
| Connection Type | Whether you were connected to Wi-Fi, cellular, or not connected at the time that the feedback was sent, and your network type. |
| Paired Apple Watch | The model and watchOS version of the paired Apple Watch, if applicable. |
| Screenshots | The screenshots you shared when providing feedback. |
| Comments | The comments you shared when providing feedback. |
| App Uptime | The length of time the app was open and running at the time the feedback was sent. |
| Disk Free | The amount of disk space you had available when you sent feedback. |
| Battery | Your battery level at the time the feedback was sent. |
| Screen Resolution | The screen resolution of your device. |
| Crash Logs | Symbolicated crash logs. This includes information about how long the app was running before it crashed. |
Where to Go From Here?
In this TestFlight tutorial, you learned how to upload your test build, invite internal and external testers to your app, start beta testing and gather feedback from your testers. You also saw how this process works from the testers’ point of view.
If you’re interested in learning more about App Store Connect in general, and beta testing in particular, read through Apple’s .
Apple’s Developer site also has a summary page for TestFlight, which includes links to all the relevant documentation, as well as a video, iTunes Connect: Development to Distribution, outlining the TestFlight process.
If you want to learn more about the process of submitting apps to the App Store, and not only the beta testing aspect of it, check out our two-part tutorial How to Submit An App to Apple: From No Account to App Store.
Finally, there is an App Store Connect API. This API allows you to invite testers, upload builds, set test and compliance information and more. You can use this in your CI/CD tools. Even better, if you use fastlane, all that automation is already integrated. Check out our fastlane tutorial for more information.
We hope you enjoyed this TestFlight tutorial. If you have any questions or comments, please join the forum discussion below!
Adding Internal Testers
![]()
Now, assign a role for the new user. View the privileges for each role by clicking on See Permissions and choose the appropriate one. You can also choose to either limit access to a single app via the Apps drop-down or leave the default All Apps access.
![]()
![]()
![]()
Creating a new internal beta tester is only the first part of the process. The remaining step is to invite this particular person to test your latest build.
It’s time to enable testing on your app so the tester actually has something to test! :]
Starting Beta Testing
To start beta testing your app, go to the My Apps section on the App Store Connect home page and click your app:
![]()
Select the Activity tab. This is where you’ll find the build you uploaded earlier. If it’s still marked as Processing, go make yourself a cup of coffee and come back later. :]
![]()
Next, click the TestFlight tab. You may notice a yellow warning sign next to the build you’d like to send to internal testers. If this is the case, click the warning sign and complete the required steps.
![]()
Once you’re done, the build status will change to Ready to Test:
![]()
Next, click App Store Connect Users from the menu on the left. You’ll see a searchable list of your internal testers. Select the ones you’d like to add as internal testers for this build and click Add.
![]()
But first, it’s time to learn how to add external testers.
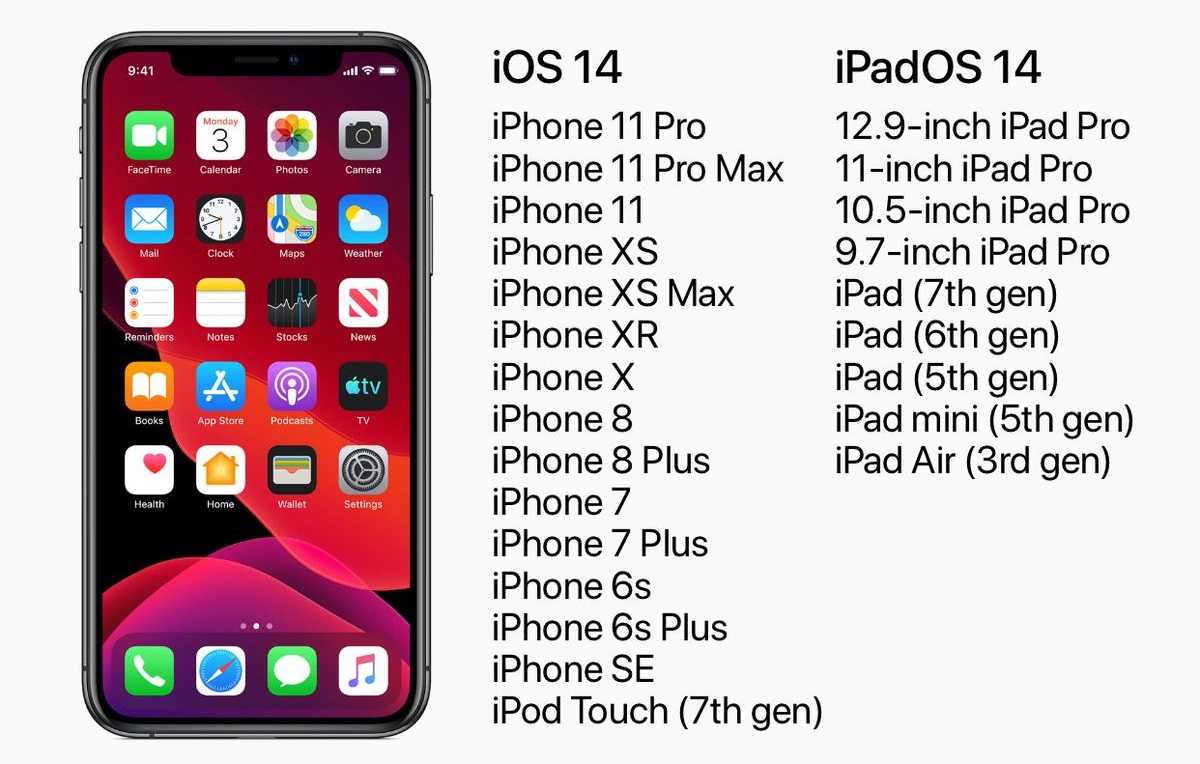
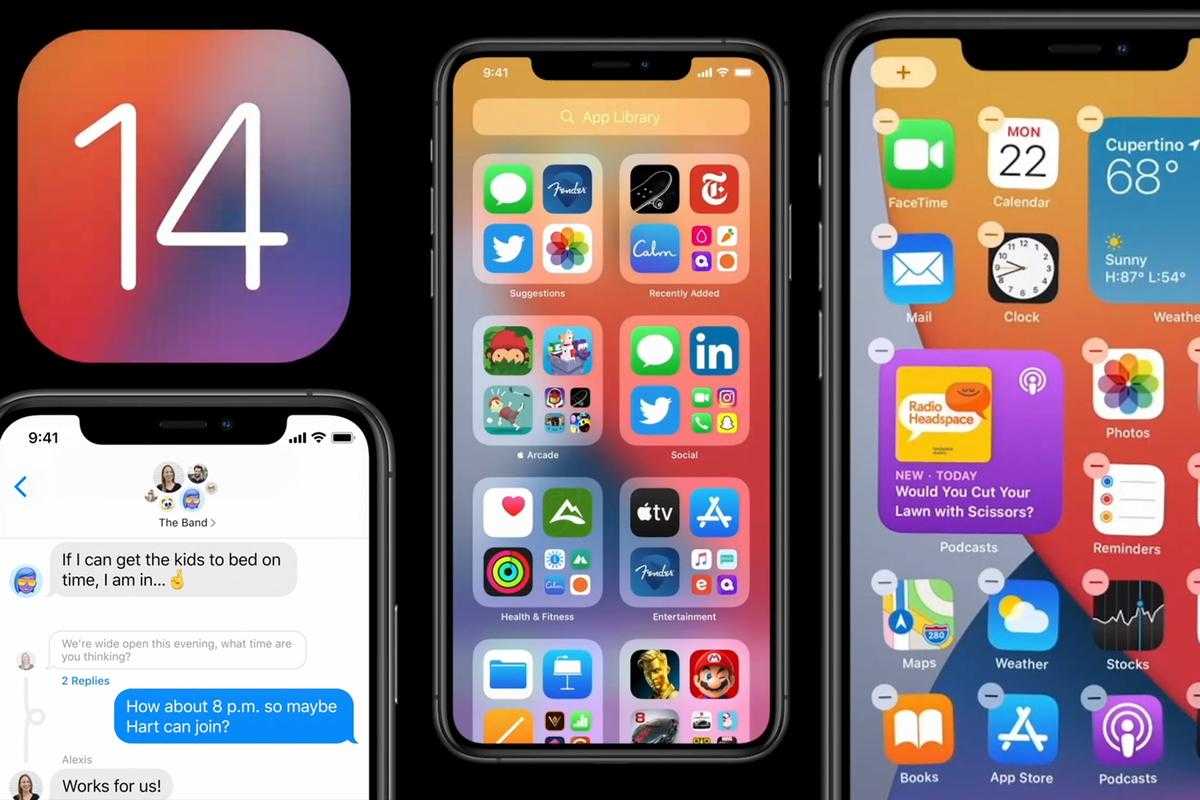
iPadOS 16
Для iPad вышла iPadOS 16.1 для разработчиков. По факту, это та же iOS 16.0 beta 7 для iPhone. Вероятнее всего, Apple ударилась в нейминг из-за того, что релиз iPadOS 16 для планшетов был отложен на октябрь.
В режиме многозадачности, если открыть все вкладки одного приложения, в левом верхнем углу появился плюсик для добавления нового окна.
![]()
В режиме в приложении, открытом на весь экран, при свайпе от левого края вправо теперь появился ярлычок — он сообщает, что рядом спряталось боковое меню со всеми активными приложениями.
![]()
В целом работа со Stage Manager стала плавнее, но все еще не идеально. Видимо поэтому и перенесли релиз на позднюю осень (октябрь).Тогда же покажут macOS Ventura.
Еще в iPadOS 16.1 были обнаружены строчки кода, которые позволят в будущем удалить приложение Wallet. Сейчас его можно только скрыть.
![]()
Adding External Testers
First, click Test Information from the menu on the left and fill in the necessary information. This includes:
- Beta App Description
- Feedback Email
- Contact Information
Providing this information is necessary when submitting a build for external testing. Once completed, click Save.
![]()
Now, click Add External Testers from the menu on the left. App Store Connect asks you to create a new testing group. It’s up to you how you choose to manage your groups. You can have one group for all your testers, different groups for different types of testers or different groups for different apps. For this tutorial, you’ll create one group called Top-Testers.
![]()
Once you’ve created the group, you can start adding external testers to it.
Click + next to Testers(0) under Top-Testers:
![]()
You can choose between adding new testers manually, adding existing testers — people already testing another one of your apps or builds — or importing testers from a CSV file. For this tutorial, you’ll add new testers manually. Choose Add New Testers and click Next.
![]()
![]()
![]()
Selecting a Build
You now need to select a build for your external testers to test. On the Builds tab, click the + button:
![]()
Then, select your build and click Next:
![]()
Note: You might be wondering why you select the build for your internal and external testers separately. Well, you may want your internal and external testers to be testing different builds.
For example, your internal testers might test your master build, while your external testers test your next release candidate. By making you select builds independently for internal and external testers, App Store Connect allows this kind of separation. You can also use this to select different builds for different testing groups.
App Store Connect may ask more questions, such as whether the app requires sign-in or not. Complete the remaining steps, including providing the testing information that’s displayed to your external testers.

![]()
Automatically notify testers is already checked. Uncheck this box if you want to manually notify testers when a build is available. Once complete, click Submit for Review.
App Store Connect adds your app to the review queue and changes its status to Waiting for Review. To get approval, your build must comply with the App Store Review Guidelines. Approval usually takes no more than 48 hours.
Once Apple approves your version of the app, subsequent builds won’t need a review until you change the version number.
Note: A build is only valid for 90 days. If you want your testers to use the app beyond that, you’ll have to upload a new build before the expiration date and your testers will have to download that new build.
Inviting by Link
Under Public Link, click Enable Public Link.
![]()
Note: If you don’t yet have a build enabled for this group, you can add one under the Builds tab above. If the build is not yet reviewed, it will prompt you to submit it for review and you’ll have to wait for approval.
![]()
This concludes your look at the developer’s perspective of app testing. Now you’ll read about what it looks like from the tester’s perspective.
Как сделать резервную копию вашего iPad в архиве
Прежде чем начать, убедитесь, что вы сделали резервную копию вашего iPad. Хотя процесс бета-тестирования довольно прост, в любое время, когда вы вносите существенные изменения в свое устройство, вы рискуете столкнуться с проблемами. А с вашими личными данными это всегда — всегда! — Лучше быть в безопасности, чем потом сожалеть. Даже если вы будете делать резервные копии каждую ночь, вам нужно убедиться, что это абсолютно актуально.
- штепсель IPad или в ваш компьютер Mac или Windows.
- запуск Itunes.
- Нажми на IPad или значок в строке меню, когда он появляется.
- Убедитесь, что резервное копирование установлено на Этот компьютер. (И включить Зашифрованное резервное копирование — это стоит того!)
- Нажмите на Резервное копирование сейчас. (Нажмите на Зашифровать резервную копию и добавь пароль — хочешь безопасности.)
- Резервное копирование приложений, если спросить
- Нажмите Команда, открыть настройки. (Или перейти к Itunes в строке меню и нажмите на предпочтения.
- Нажми на приборы Вкладка.
- Удерживая нажатой клавишу Control, Резервный и выбрать Архив.
Архивирование предотвратит перезапись вашей текущей резервной копии резервной копией iPadOS 13 в будущем, если вы захотите восстановить ее по какой-либо причине.
watchOS beta 6: Что нового?
В новом бета-обновлении watchOS 6 исправлены ошибки предыдущих, багов стало меньше, новые функции работают лучше.
![]()
Кроме того, повышена стабильность работы собственного магазина смартчасов, никак не связанного с App Store, а новые циферблаты выглядят еще более гармонично. Наконец, пользователи вправе самостоятельно решать, какие приложения они хотят видеть на Apple Watch – ненужные, даже установленные по умолчанию, теперь можно удалить.
Какие Apple Watch поддерживают watchOS 6?
Установить новую прошивку можно на все смартчасы от Apple, кроме самых первых, выпущенных в 2015 году. А именно на:
- Apple Watch Series 1
- Apple Watch Series 2
- Apple Watch Series 3
- Apple Watch Series 4
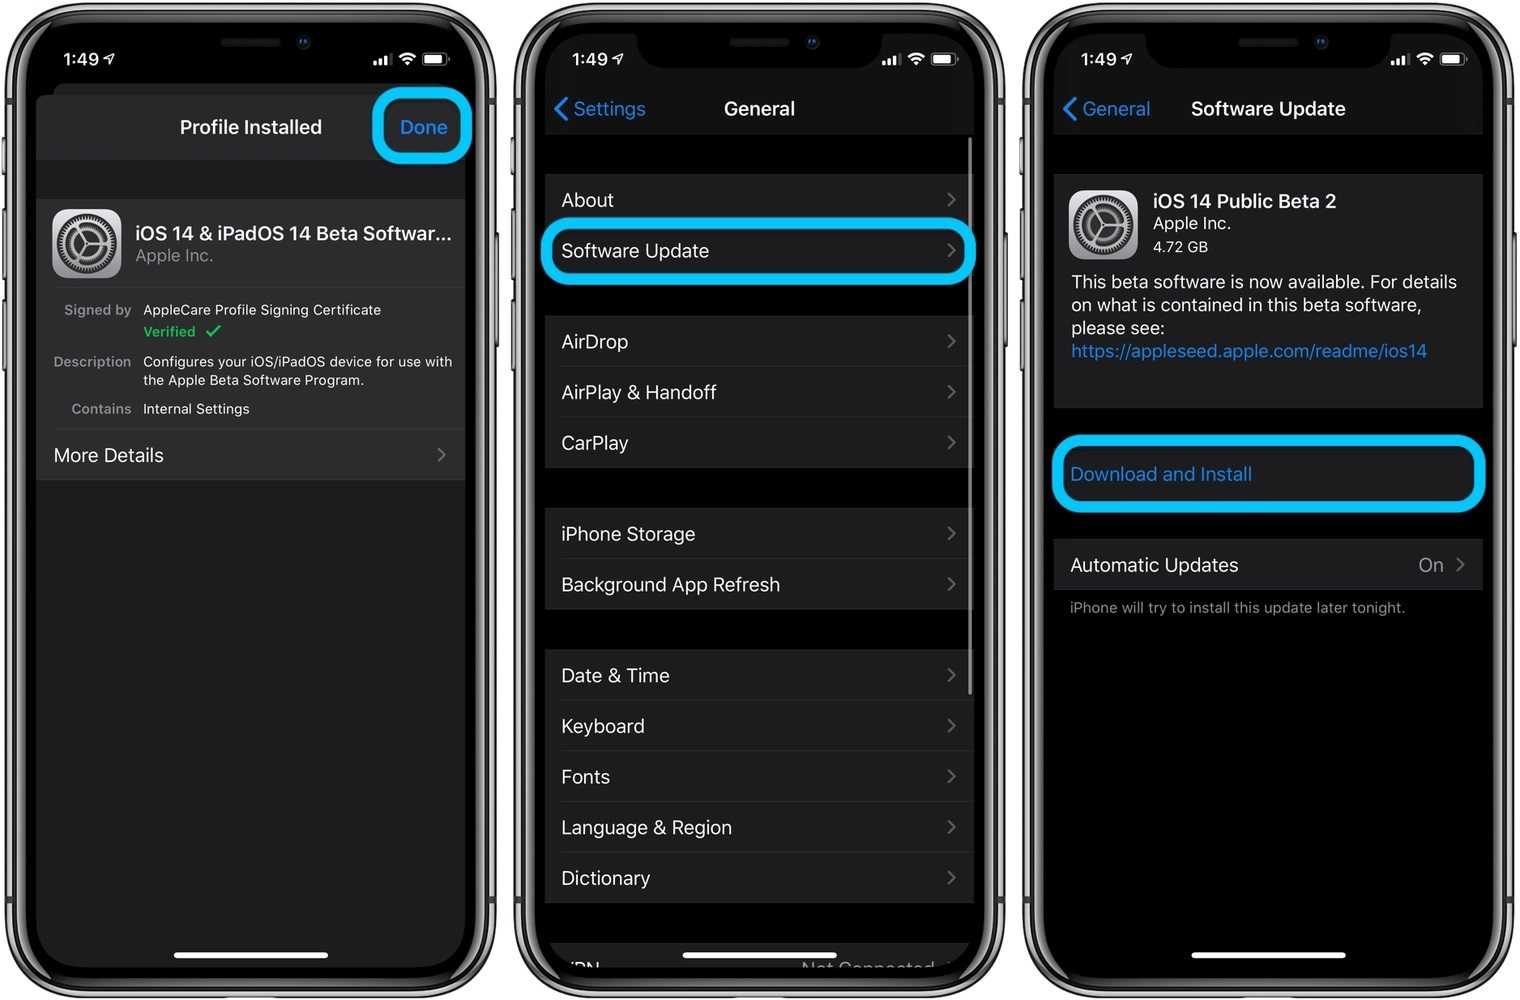
Как установить watchOS 6 beta 6?
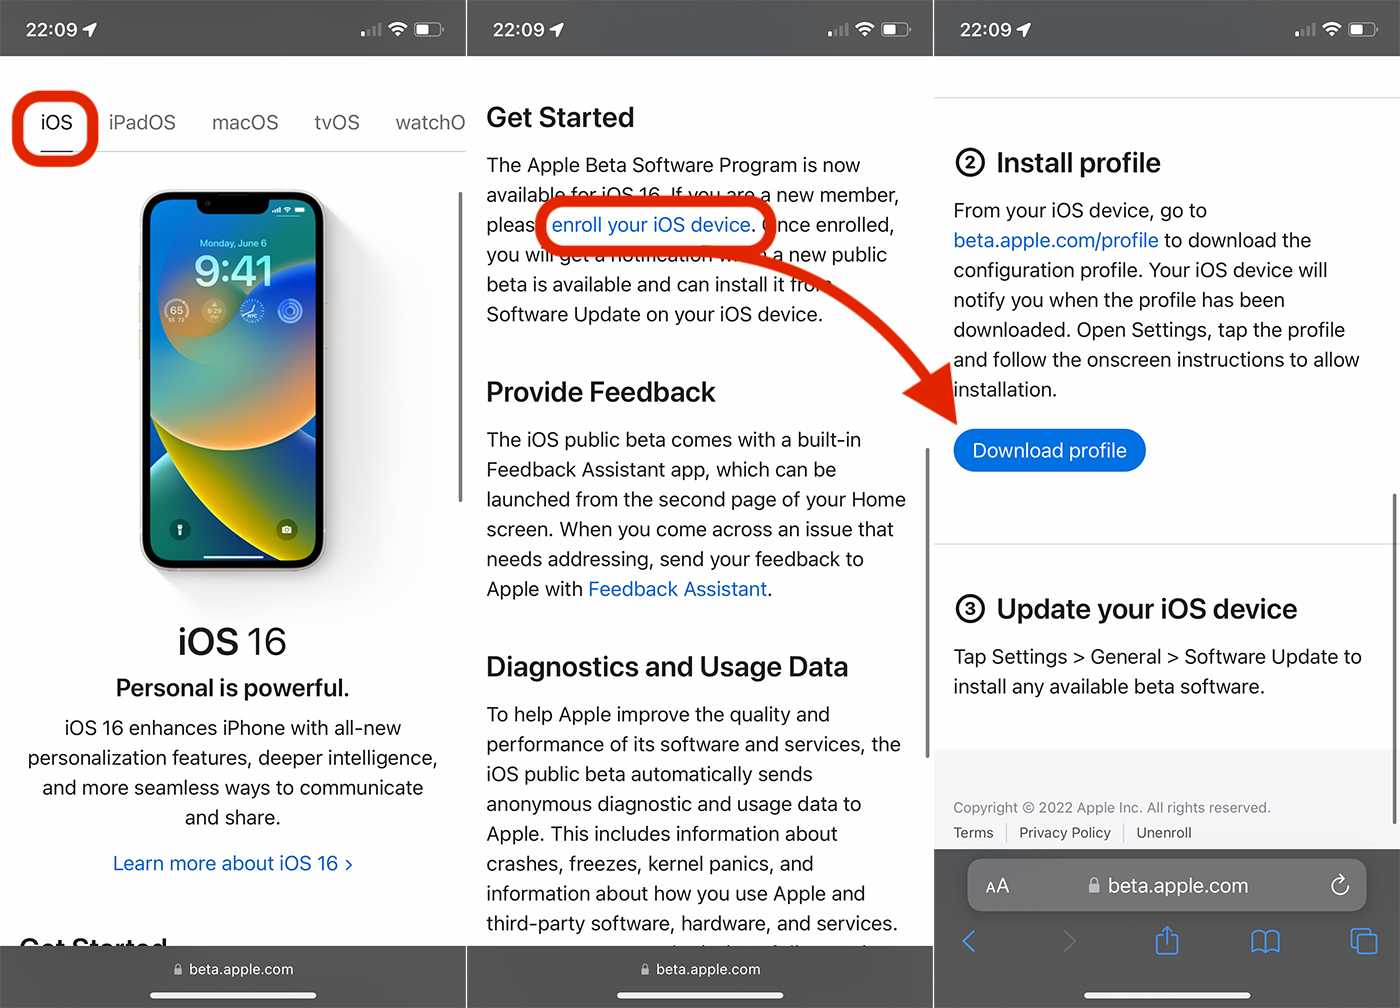
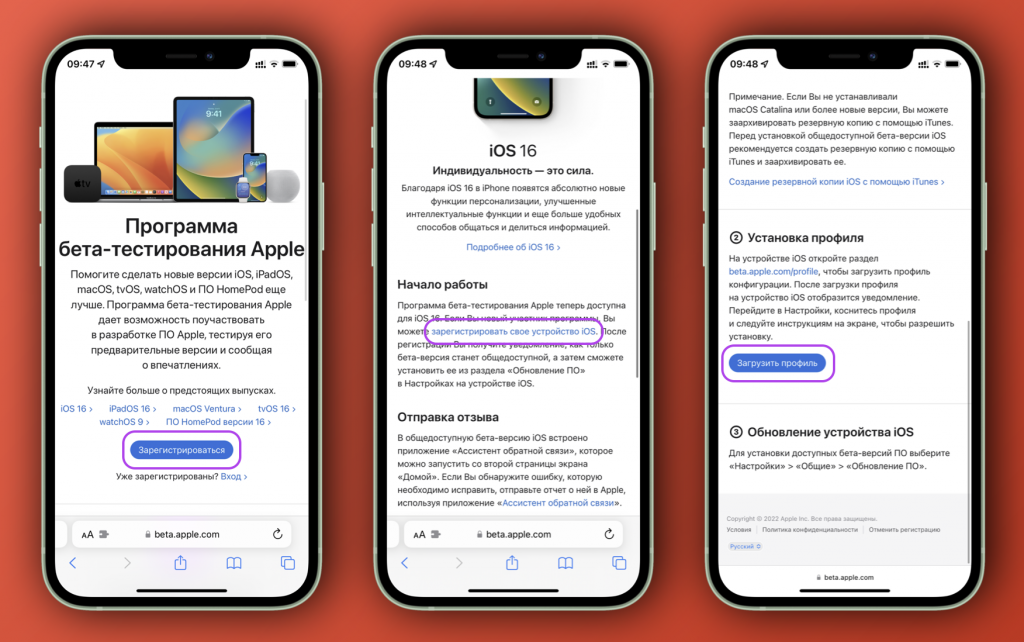
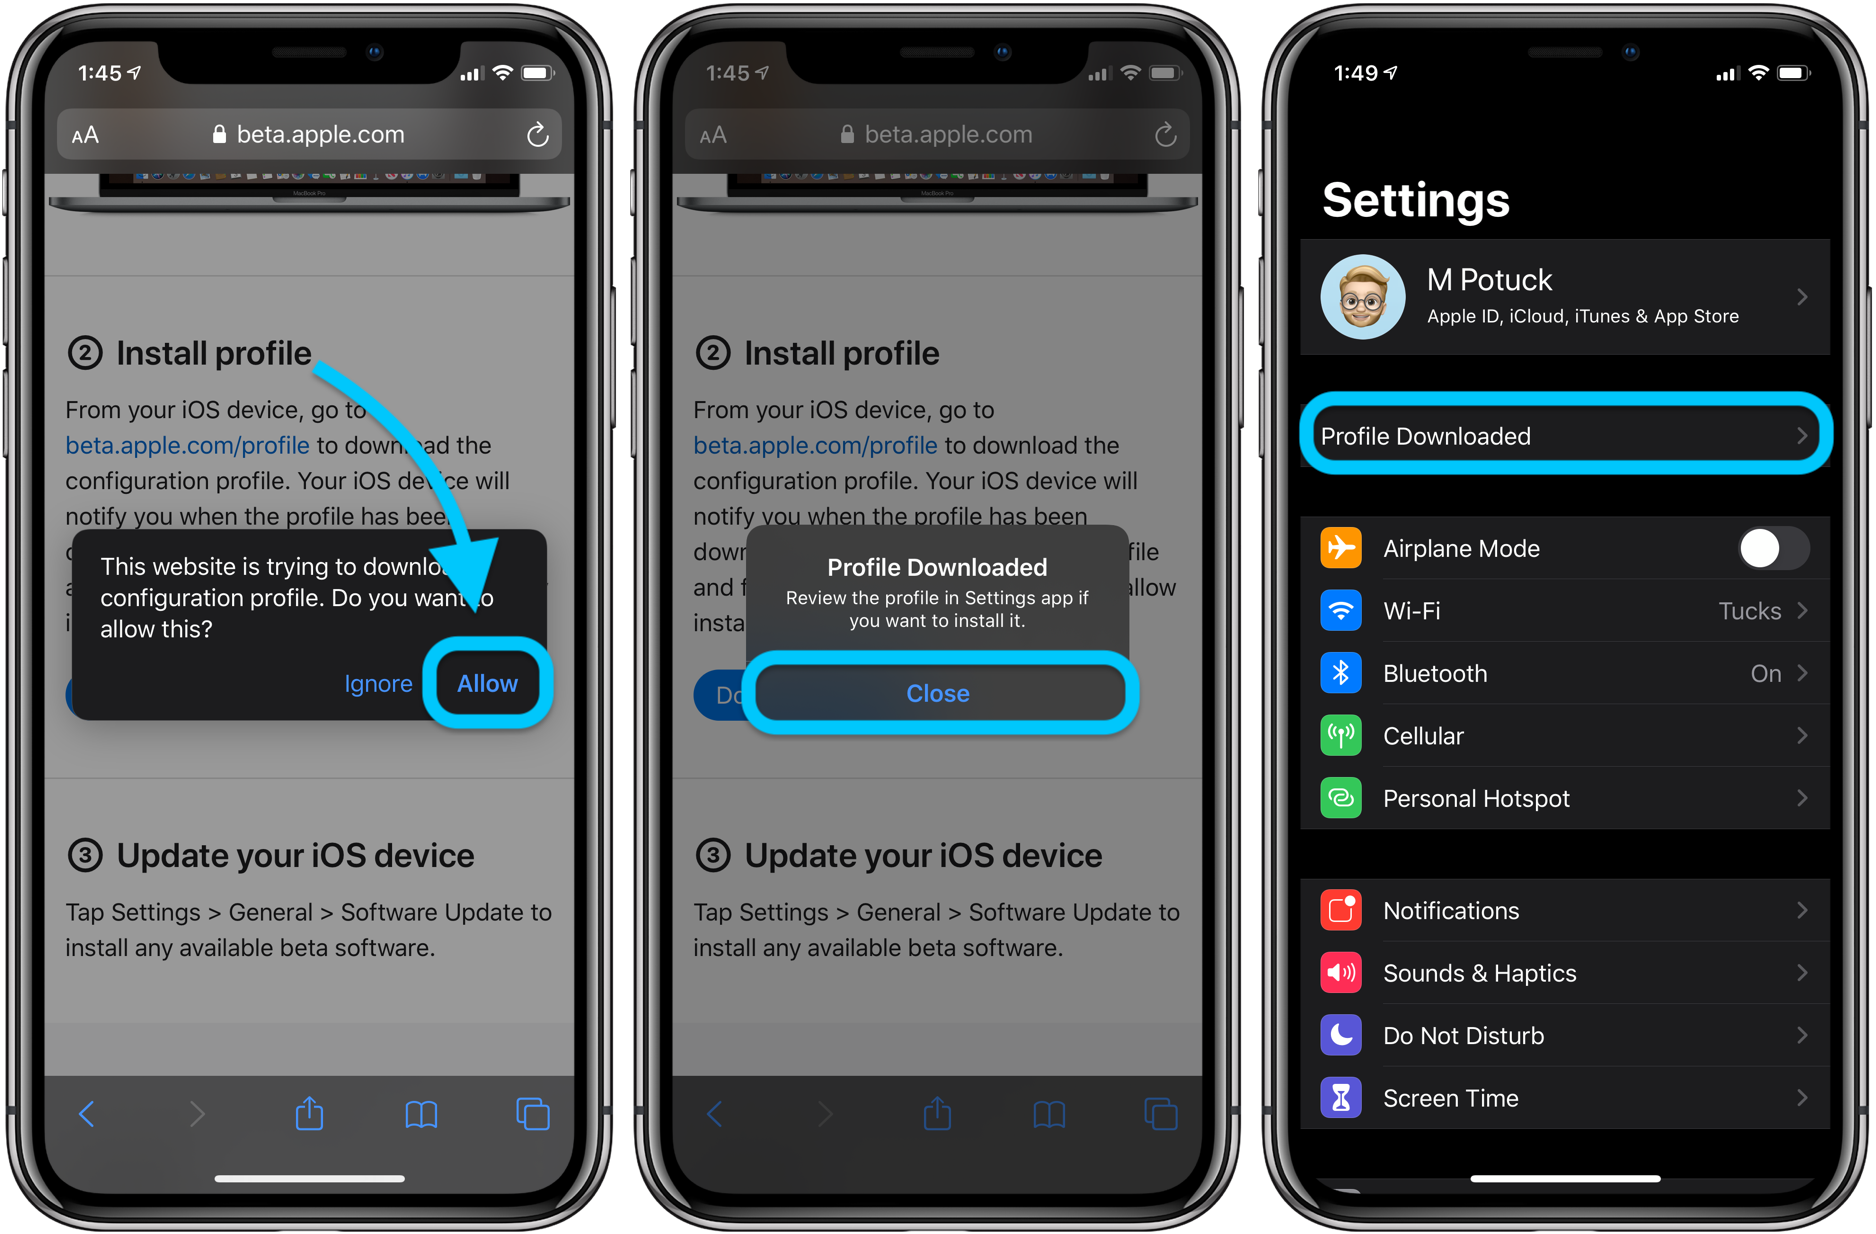
Для начала вам потребуется заполучить профиль разработчика, предварительно зарегистрировавшись в девелоперской тестовой программе Apple на официальном сайте.
Как только вы сделаете это, вам нужно будет скачать специальное приложение-компаньон на свой iPhone, пройдя по пути «Настройки» → «Основные» → «Обновление ПО».
Важно знать! Для установки новой прошивки на Apple Watch нужно, чтобы заряд аккумулятора гаджета был не менее 50%. Разумеется, Apple Watch и iPhone должны находиться рядом
iPad OS 13 beta 6: Что нового?
Большинство изменений в 6-ой бета-версии iPadOS 13 для iPad’ов аналогичны таковым в iOS 13 beta 6.
![]()
К главным нововведениям мы отнесем три.
Первое — Apple вновь изменила размер иконок в строке состояния сверху — в сравнении с «пятой» бета-сборкой они стали меньше.
Второе — в пункт управления теперь можно добавить иконку быстрого включения или выключения темной темы. Для этого достаточно пройти по пути «Настройки» → «Пункт управления» → «Настроить элементы управления», найти строку «Темное оформление», включить его.
Третье — регулятор громкости звука получил 16 делений вместо 34 ранее.
Есть и незначительные изменения, вроде обновленной заставки при первом запуске App Store и приложения «Фото».
Какие модели iPad поддерживает iPad OS 13?
Скачать новую девелоперскую бета-версию можно на следующие планшеты купертиновцев:
- 12.9-дюймовые iPad Pro третьего поколения (вышел в 2018 году)
- 12.9-дюймовые iPad Pro второго поколения
- 12.9-дюймовые iPad Pro первого поколения
- 11-дюймовые iPad Pro 2018 года выпуска
- 10.5-дюймовые iPad Pro
- 9.7-дюймовые iPad Pro
- iPad 6 поколения 2018 года
- iPad 5 поколения 2017 года
- Свежие iPad Air 3 этого года выпуска
- iPad Air 2
- Современные iPad mini 5 2019 года
- iPad mini 4
Как установить iPadOS 13 beta 6?
Если вы ранее уже скачивали бета-сборки девелоперских ОС, то достаточно включить Wi-Fi или подсоединиться к мобильной сети 4G, пройти в «Настройки» → «Основные» → «Обновление ПО» и выбрать «Загрузить и установить». После — достаточно перезагрузить планшет.
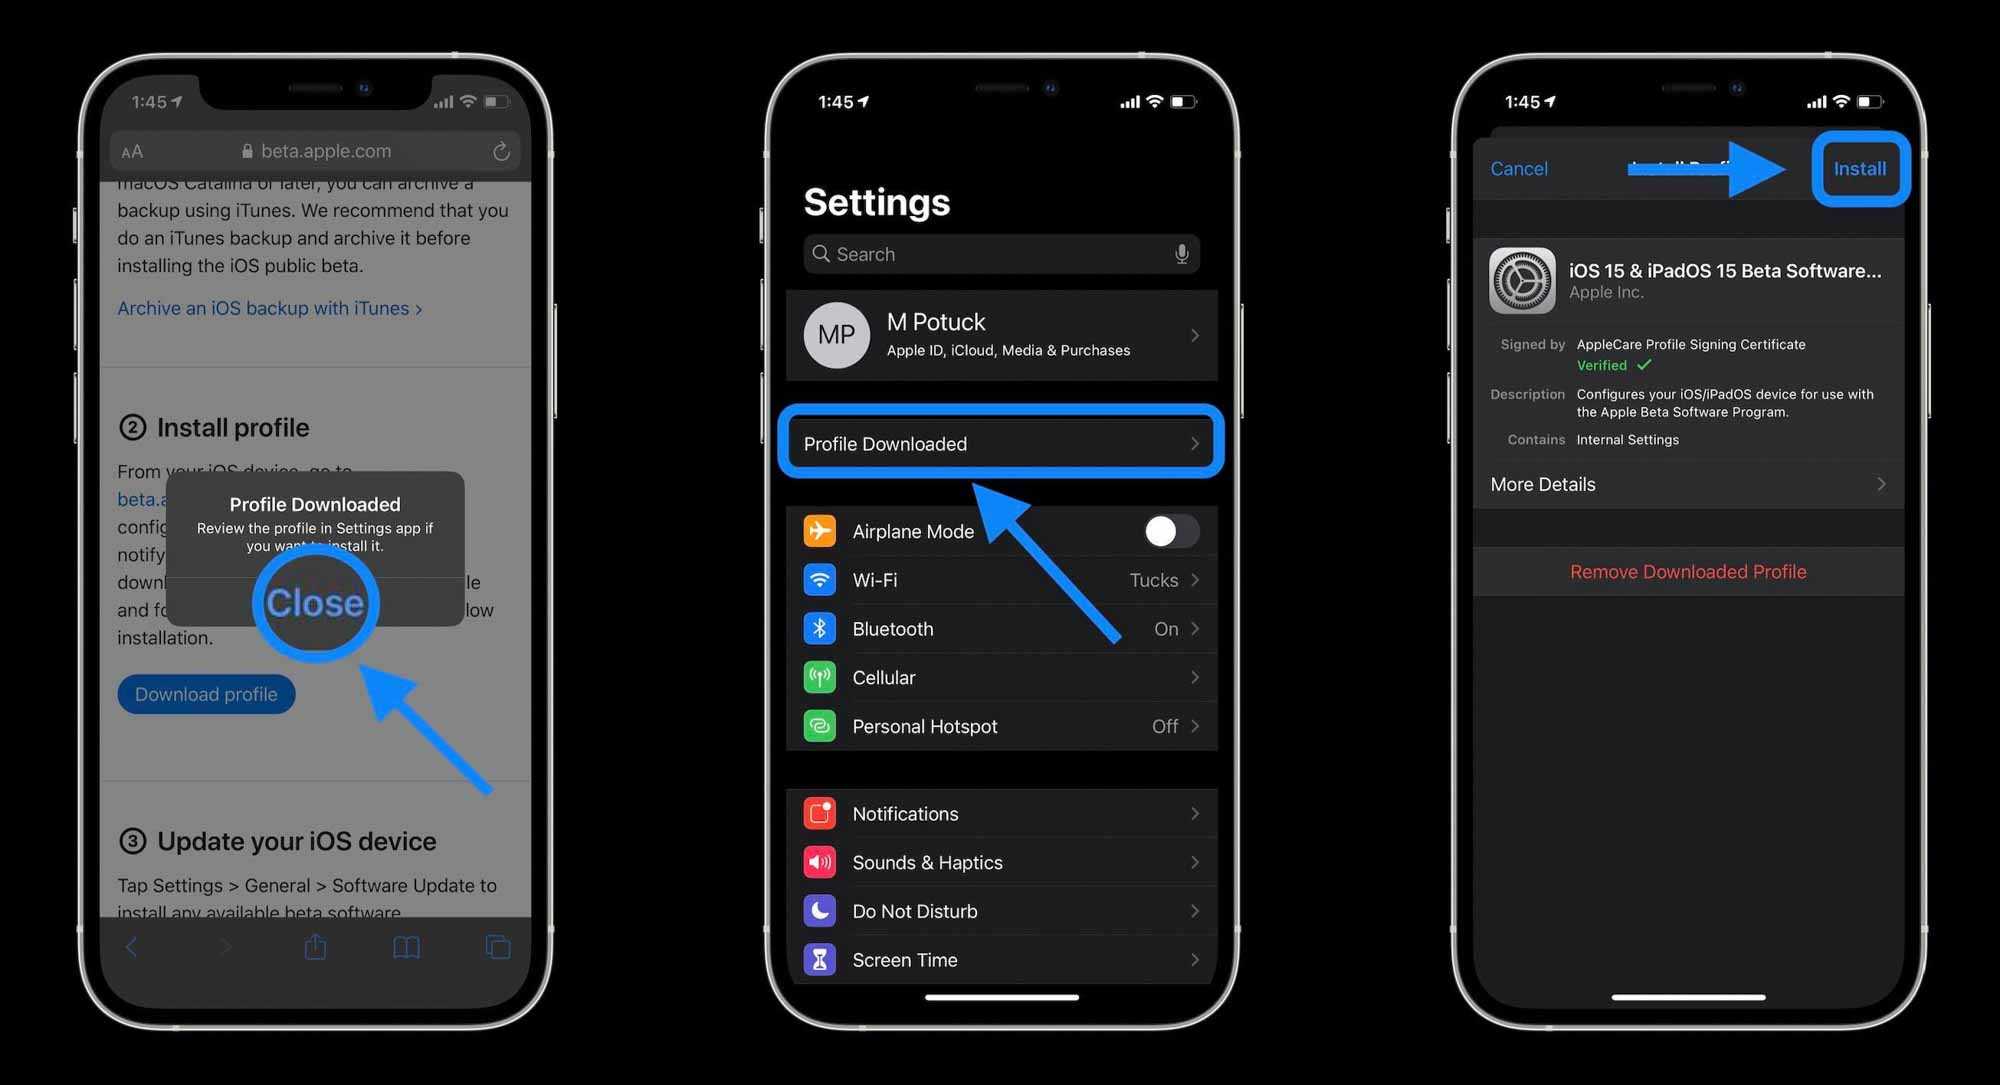
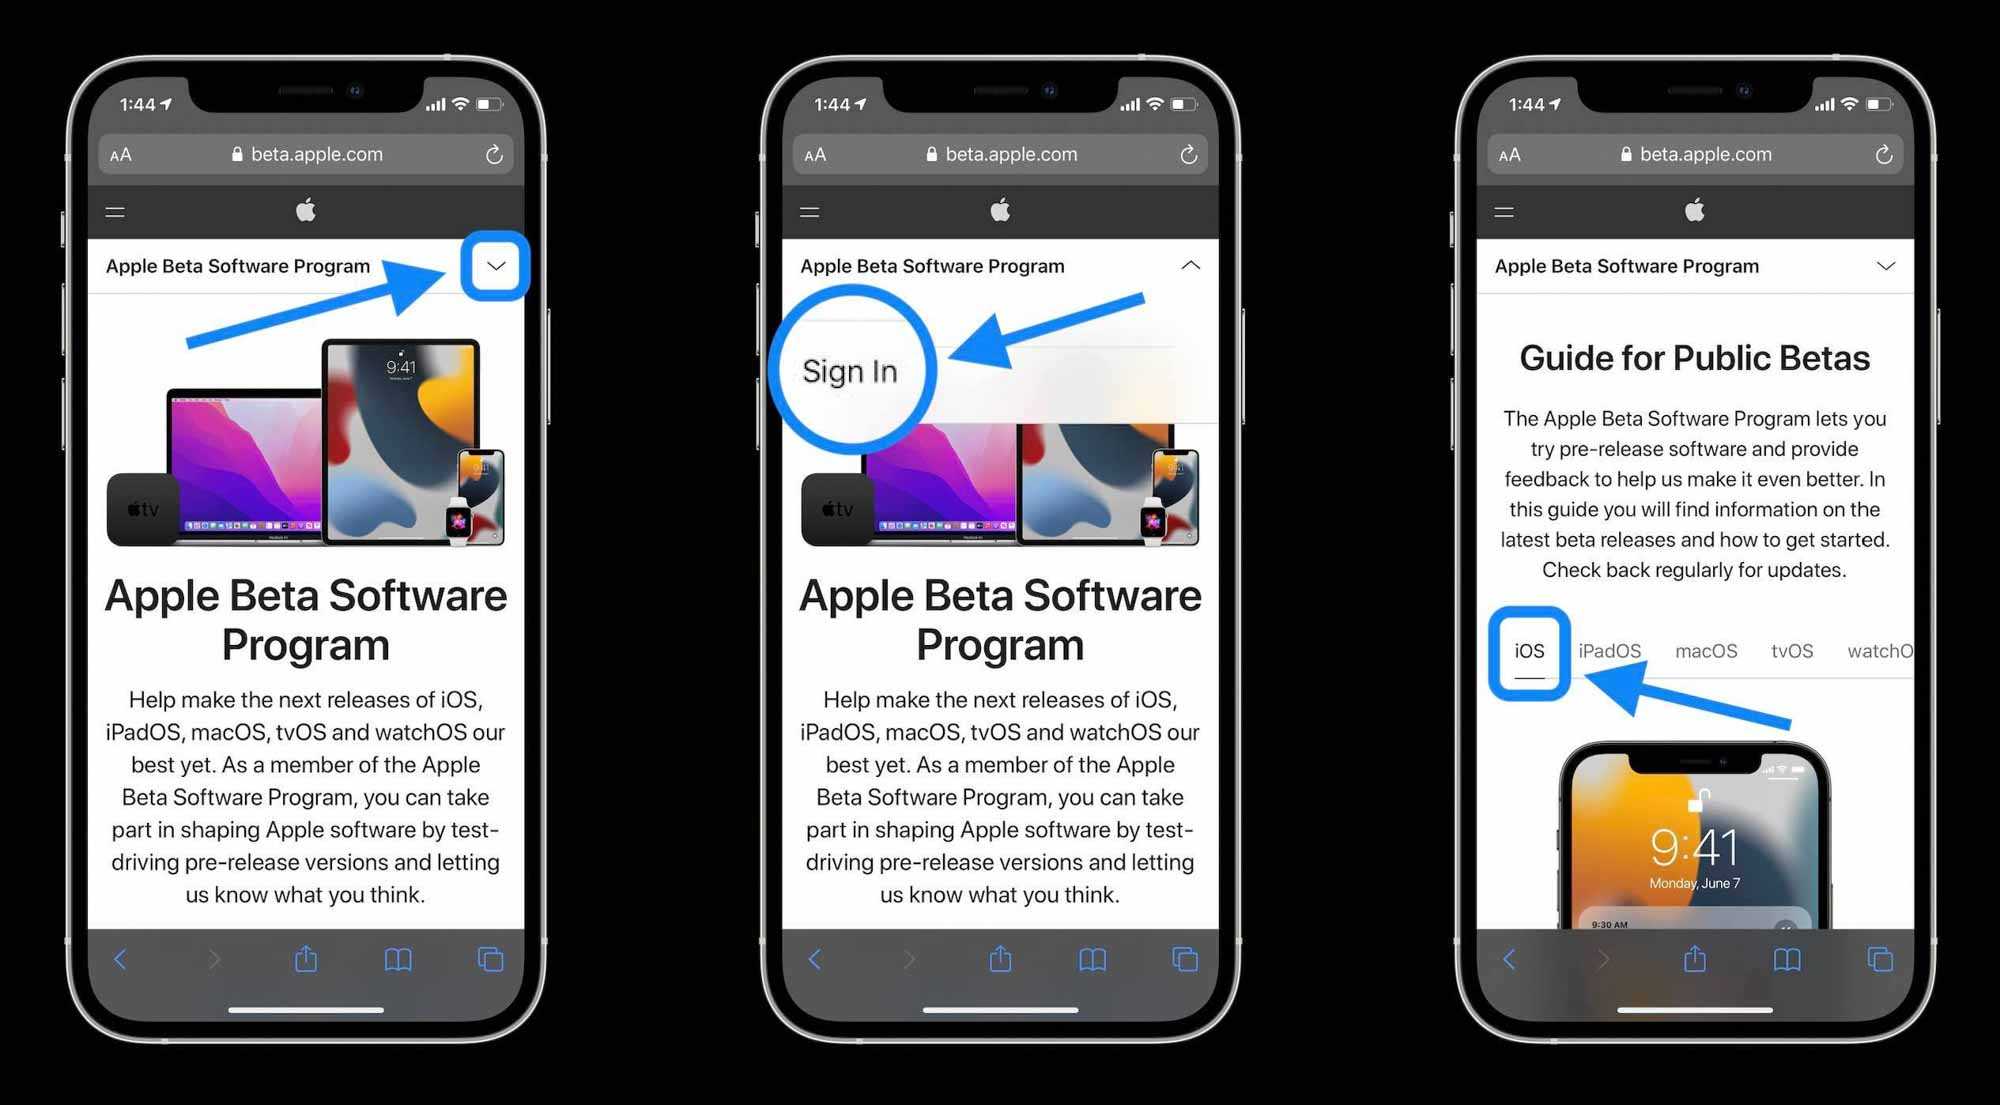
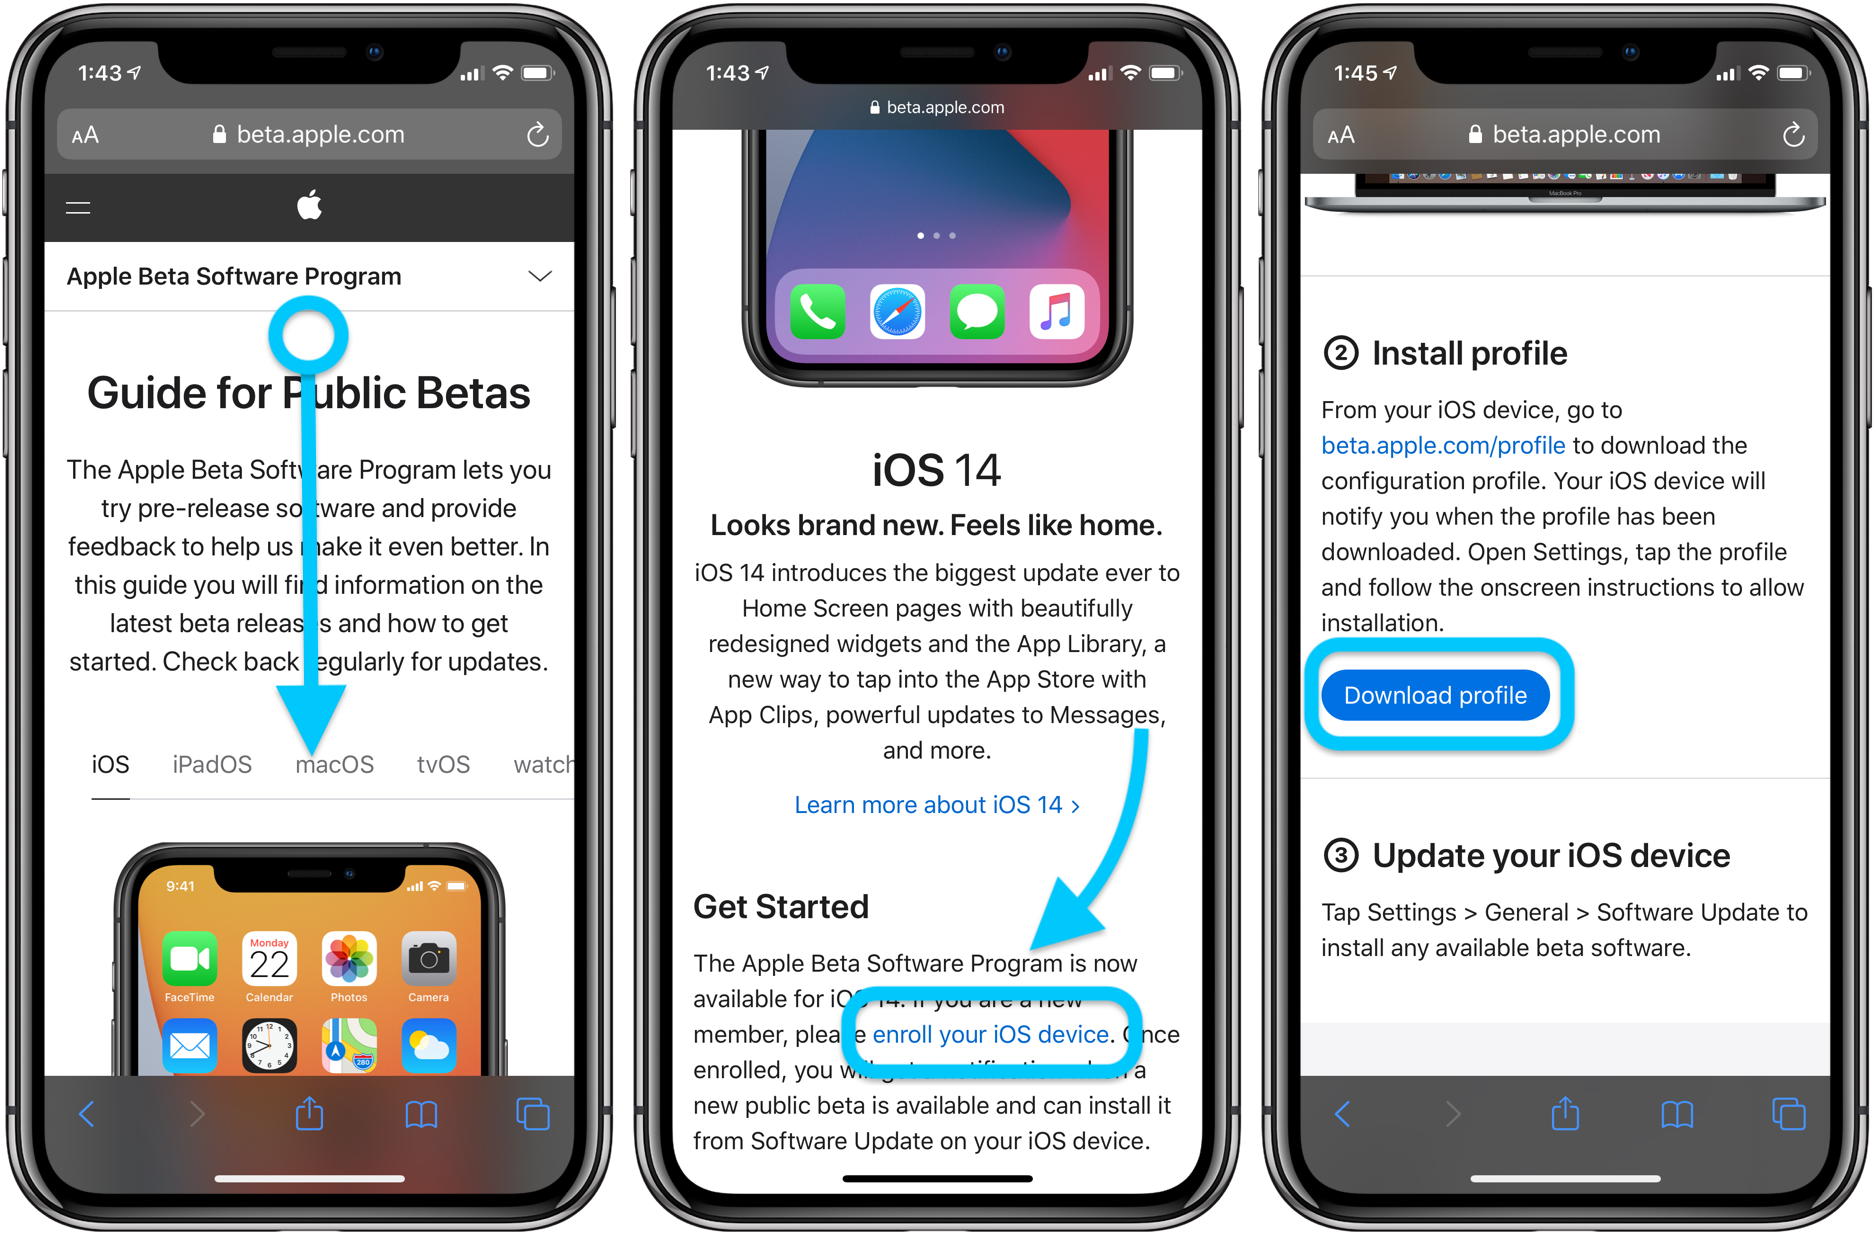
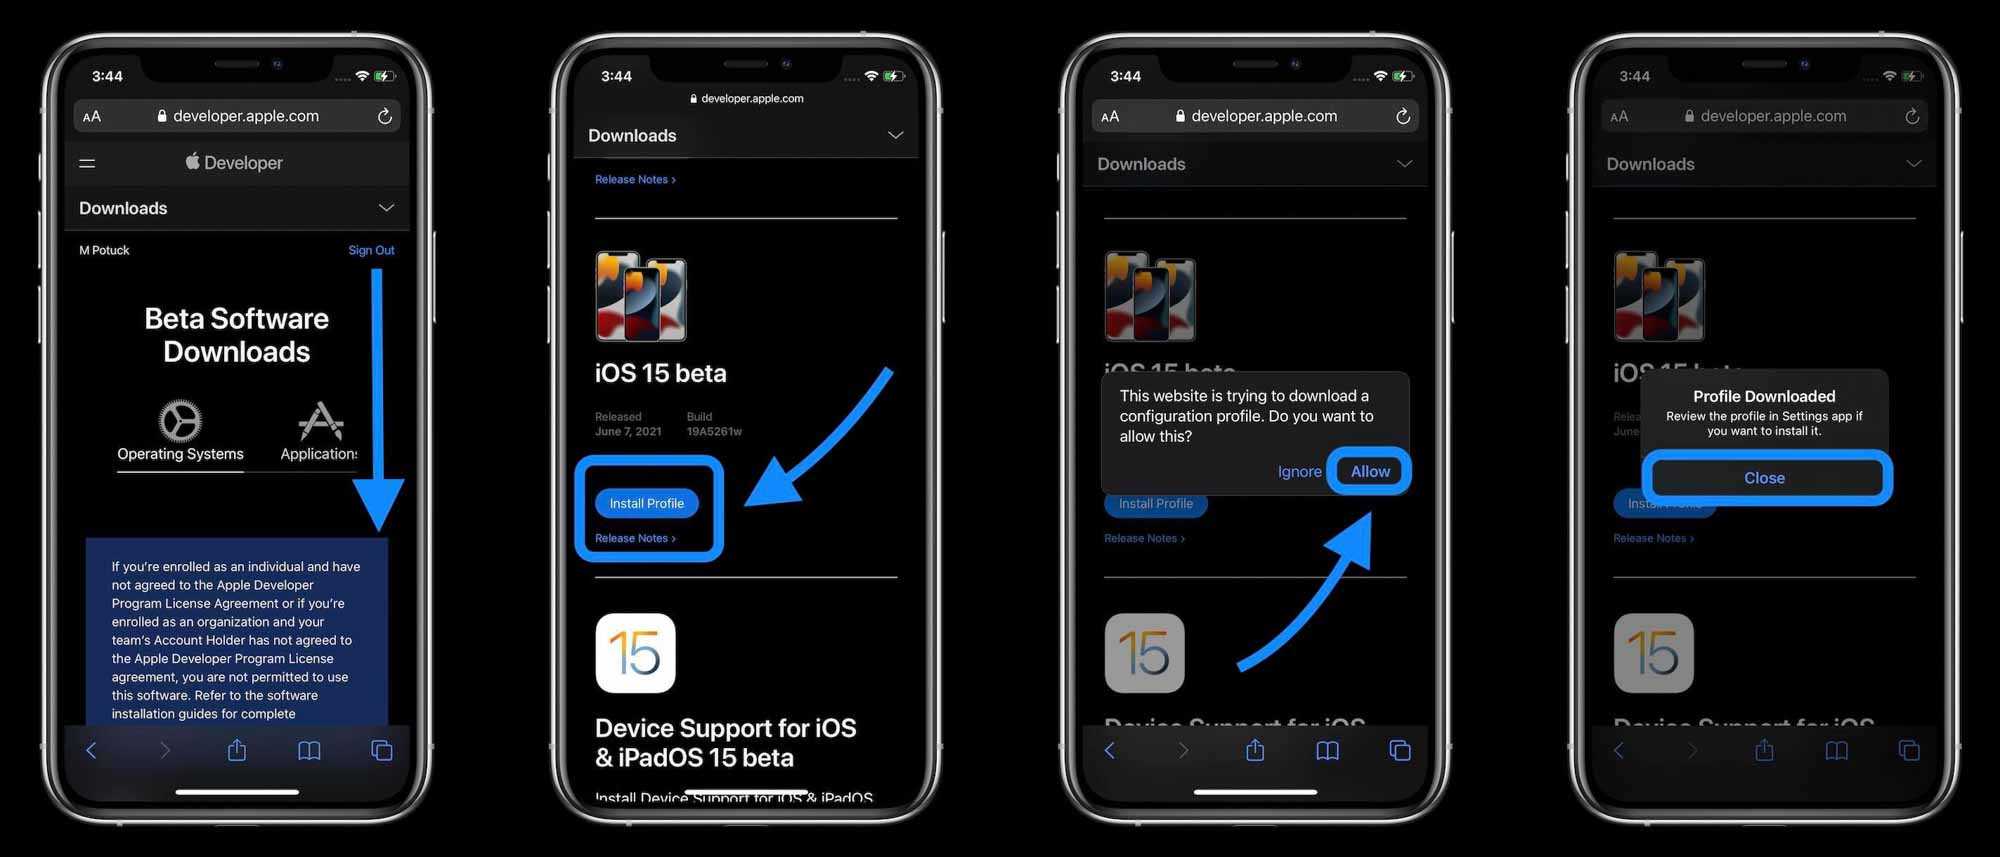
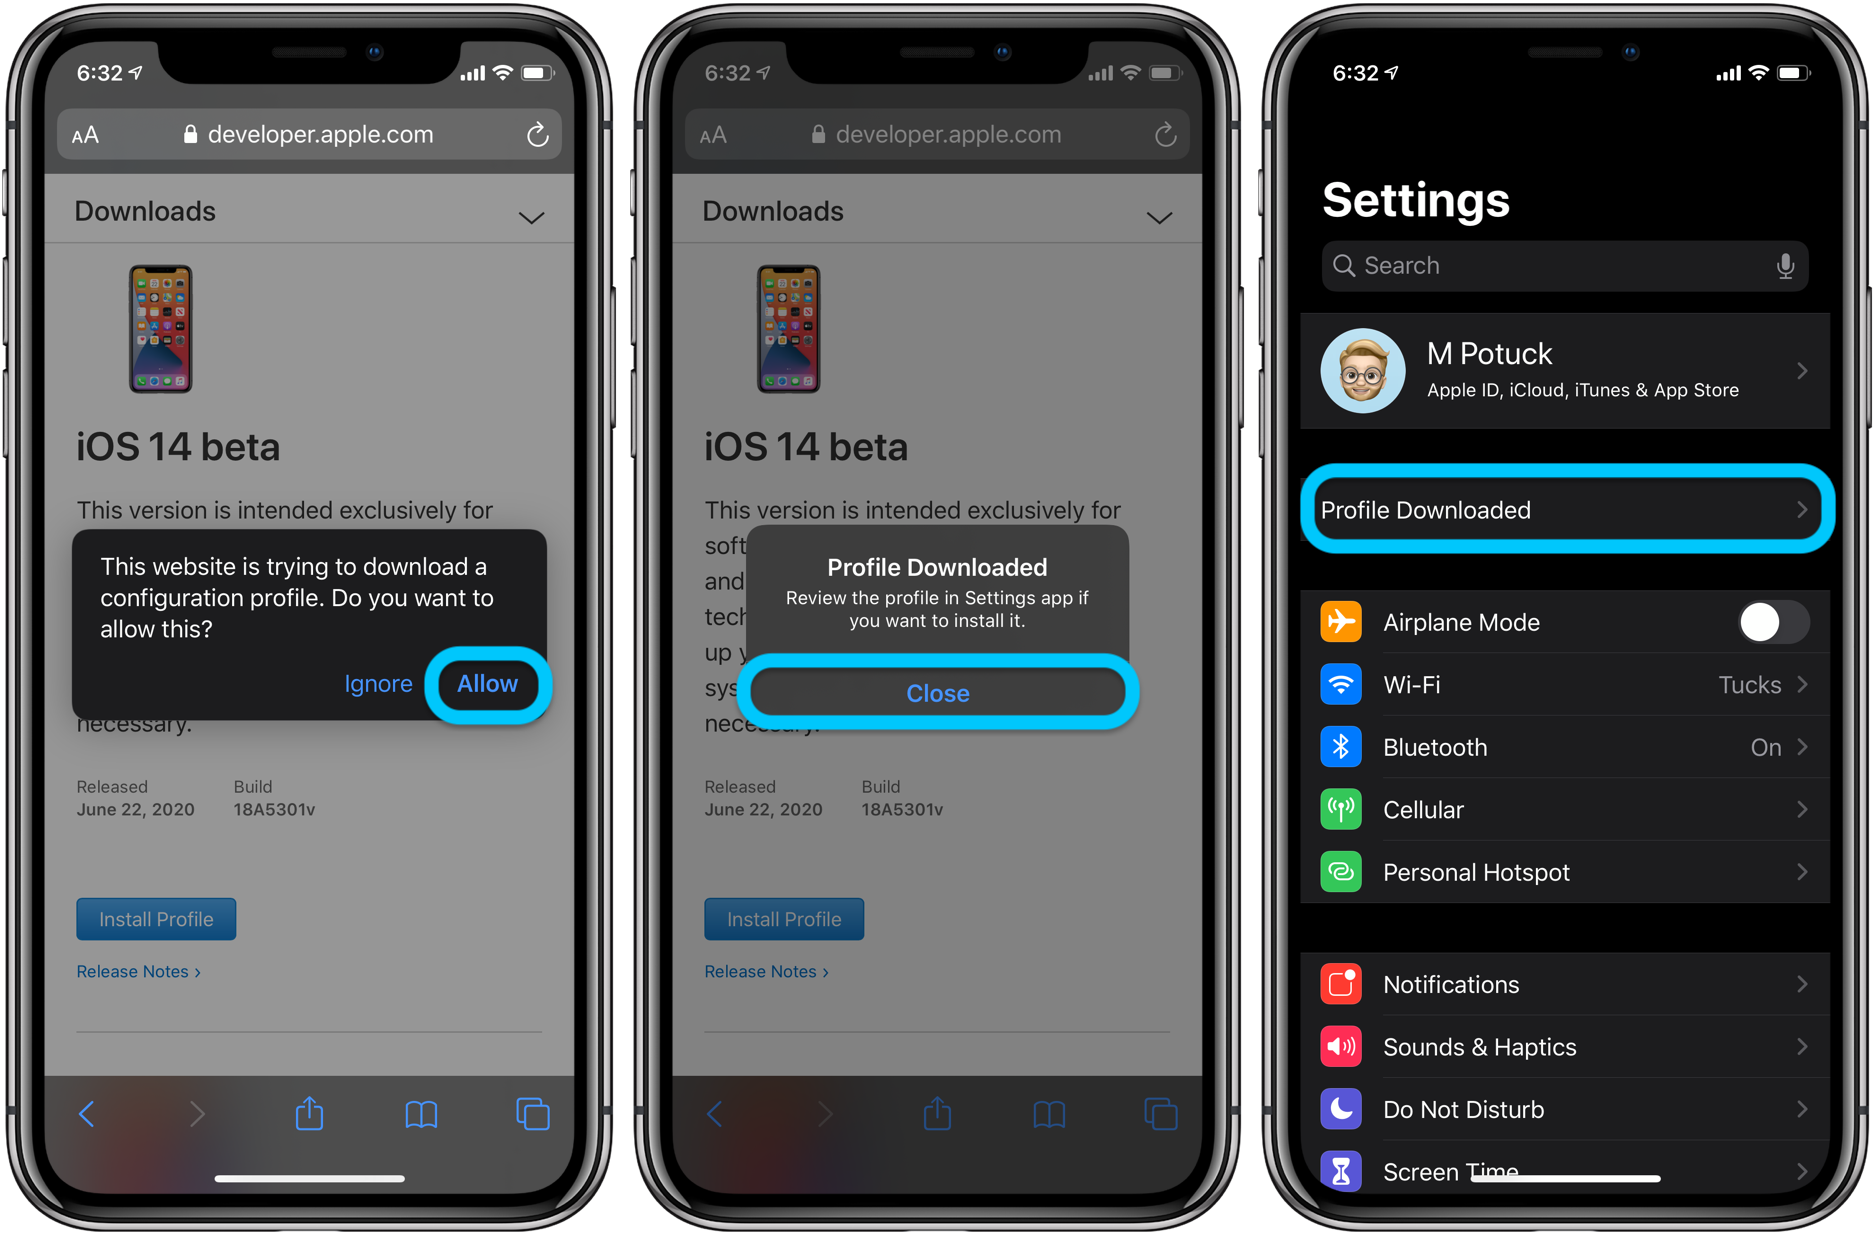
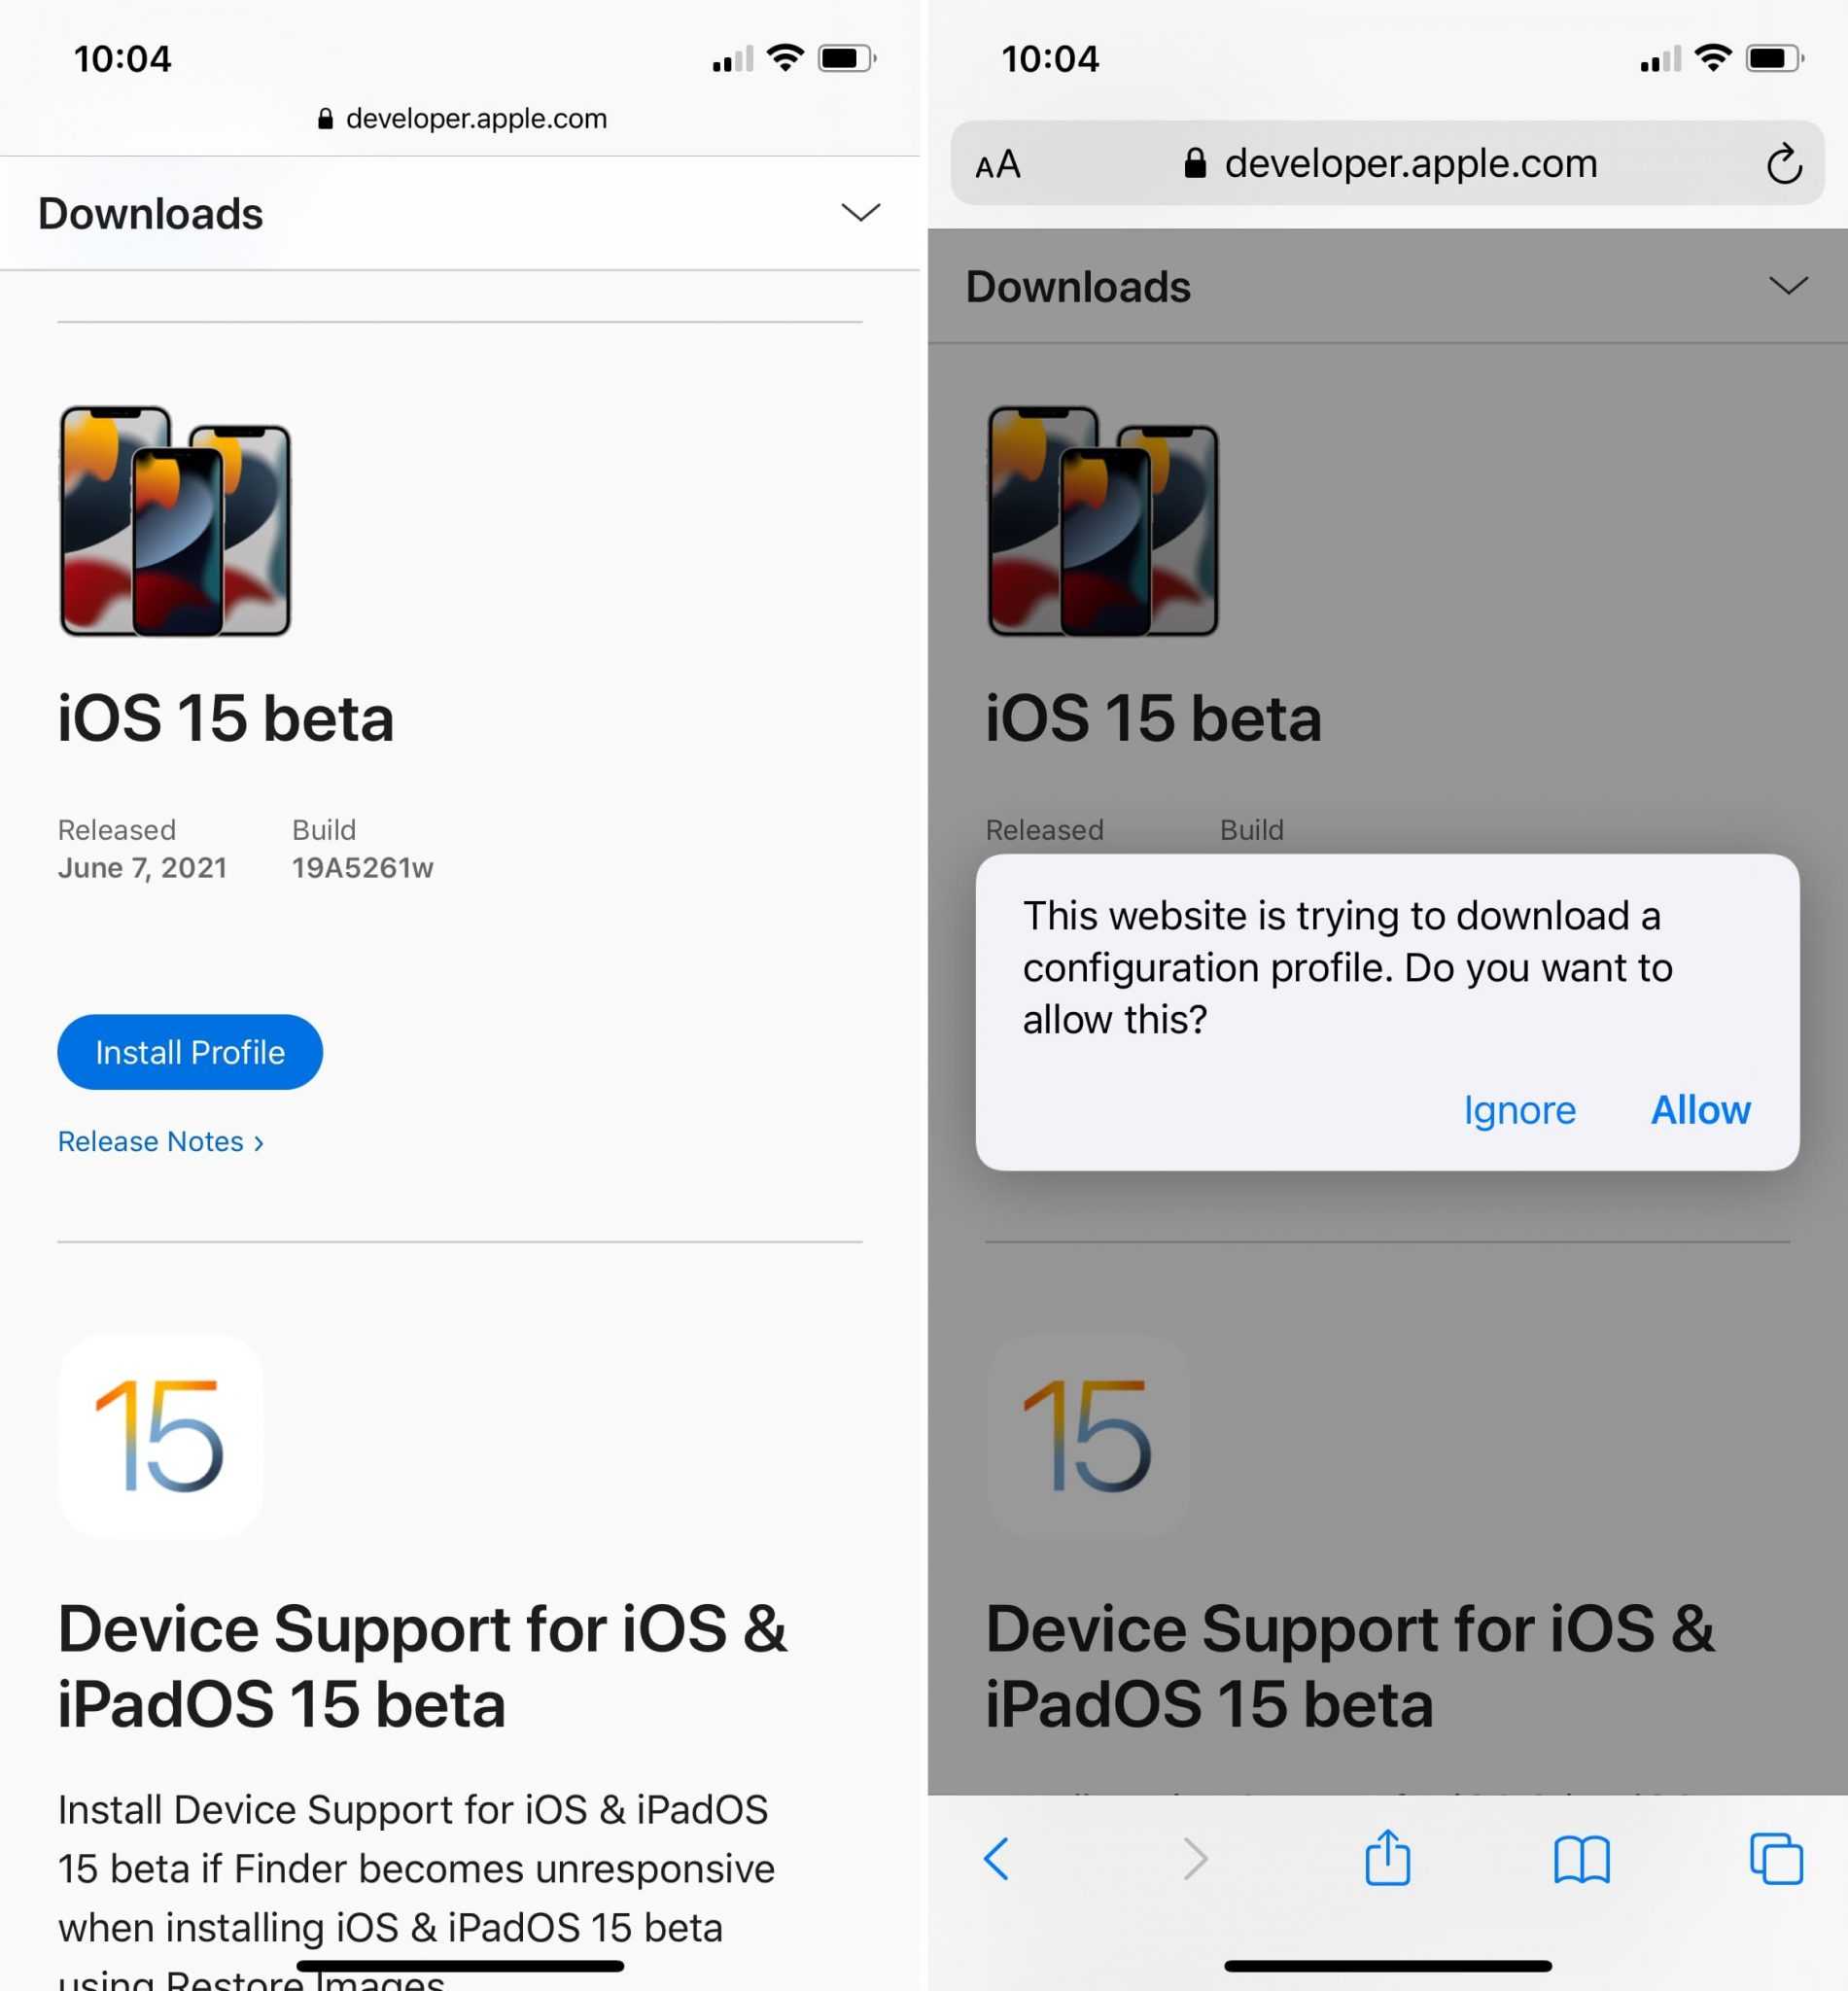
Для тех же, кто ранее с бета-версиями iPadOS 13 для разработчиков дела не имел, нужно сначала зарегистрировать соответствующий профиль на сайте Apple. От вас потребуется зайти на сайт developer.apple.com с iPad, зарегистрировать свой гаджет там, а после пройти в раздел Downloads → Install Profile, согласиться. После бета-версия будет доступна по пути «Настройки» → «Основные» → «Обновление ПО».
Кроме того, имеется возможность установить новую ОС через iTunes. Предварительно прошивку необходимо скачать на сайте Apple.
Новый двойной сетевой адаптер Apple USB-C 35W разобрали – есть интересные подробности
Разбор компактного двойного адаптера Apple USB-C 35W показал симметричные компоненты на плате, а сама конструкция вышла очень компактной и судя по техническим параметрам – действительно не самой слабой по мощности. Также судя по всему, компактный адаптер USB-C 35W будет доступен только для рынков США и Китая. Странно, что нет версии для Великобритании и Гонконга, ведь Джони Айв в своё время придумал для адаптеров этих стран крутую складную систему. Изучить разбор адаптера можно на видео:
Для всех остальных стран доступна обычная версия со съемной «вилкой». Имейте в виду при покупке из Европы, да и в принципе у этой версии адаптера вилка сменная.
Стоимость адаптера аналогична – $59
Слухи: подробности о начинке iPhone 14, новых Mac, AirPods Pro нового поколения, а также свежих tv и HomePod
По слухам, линейка iPhone 14 получит такие аккумуляторы:
-
iPhone 14: 3279 mAh
-
iPhone 14 Max: 4325 mAh
-
iPhone 14 Pro: 3200 mAh
-
iPhone 14 Pro Max: 4323 mAh
Небольшой прирост относительно предшественников наблюдается только у 14 и 14 Pro – в 13 серии эти показатели были 3227 mAh и 3095 mAh.
Объём батареи iPhone 14 против iPhone 14 Pro будет традиционно немного больше
Слухи о семействе процессоров Apple Silicon для новых компьютеров Mac, согласно которым:
-
Mac mini будет на M2 и M2 Pro
-
MacBook Pro 14/16 – на M2 Pro и M2 Max
-
Mac Pro в совершенно новом дизайне – на M2 Ultra и M2 Extreme
А годом позже, чип M3 получат модели Mac:
-
MacBook Air 13”
-
MacBook Air 15”
-
iMac
-
MacBook 12”
Вероятно, не все продукты линейки Mac будут обновляться регулярно
Последние данные про AirPods Pro 2-го поколения: SiP с чипом серии H нового поколения, датчик сердцебиения, порт USB-C с более быстрой зарядкой. На самом кейсе будет микрофон для работы функции Live-прослушивания в помощь слабослышащим, а динамик поможет найти кейс по звуку с помощью «Локатора». Дизайн самих наушников, скорее всего, останется прежним.
Предположительно кейс AirPods Pro 2
В то же время бета-версия для AirPods свидетельствует о поддержке кодека LC3 (Low Complexity Communication Codec) с более низким битрейтом, но тем же качеством звука, а также Bluetooth 5.2, что улучшит качество аудиозвонков, уменьшит рассинхрон и позволит увеличить время работы наушников.
Apple работает над новой версией tv (J255) на чипе A14 с 4GB RAM. А новый HomePod (B620) получит чип S8, как у следующего поколения WATCH. Размер и качество звука будут на уровне оригинальной колонки, экран на верхней части получит поддержку мультитач.
Релиз новых телеприставок и колонок может быть уже этой осенью
Чип S8 будет не особо отличаться по производительности от предшественников S7 и S6. Также S8 будет установлен в обновленной версии WATCH SE.
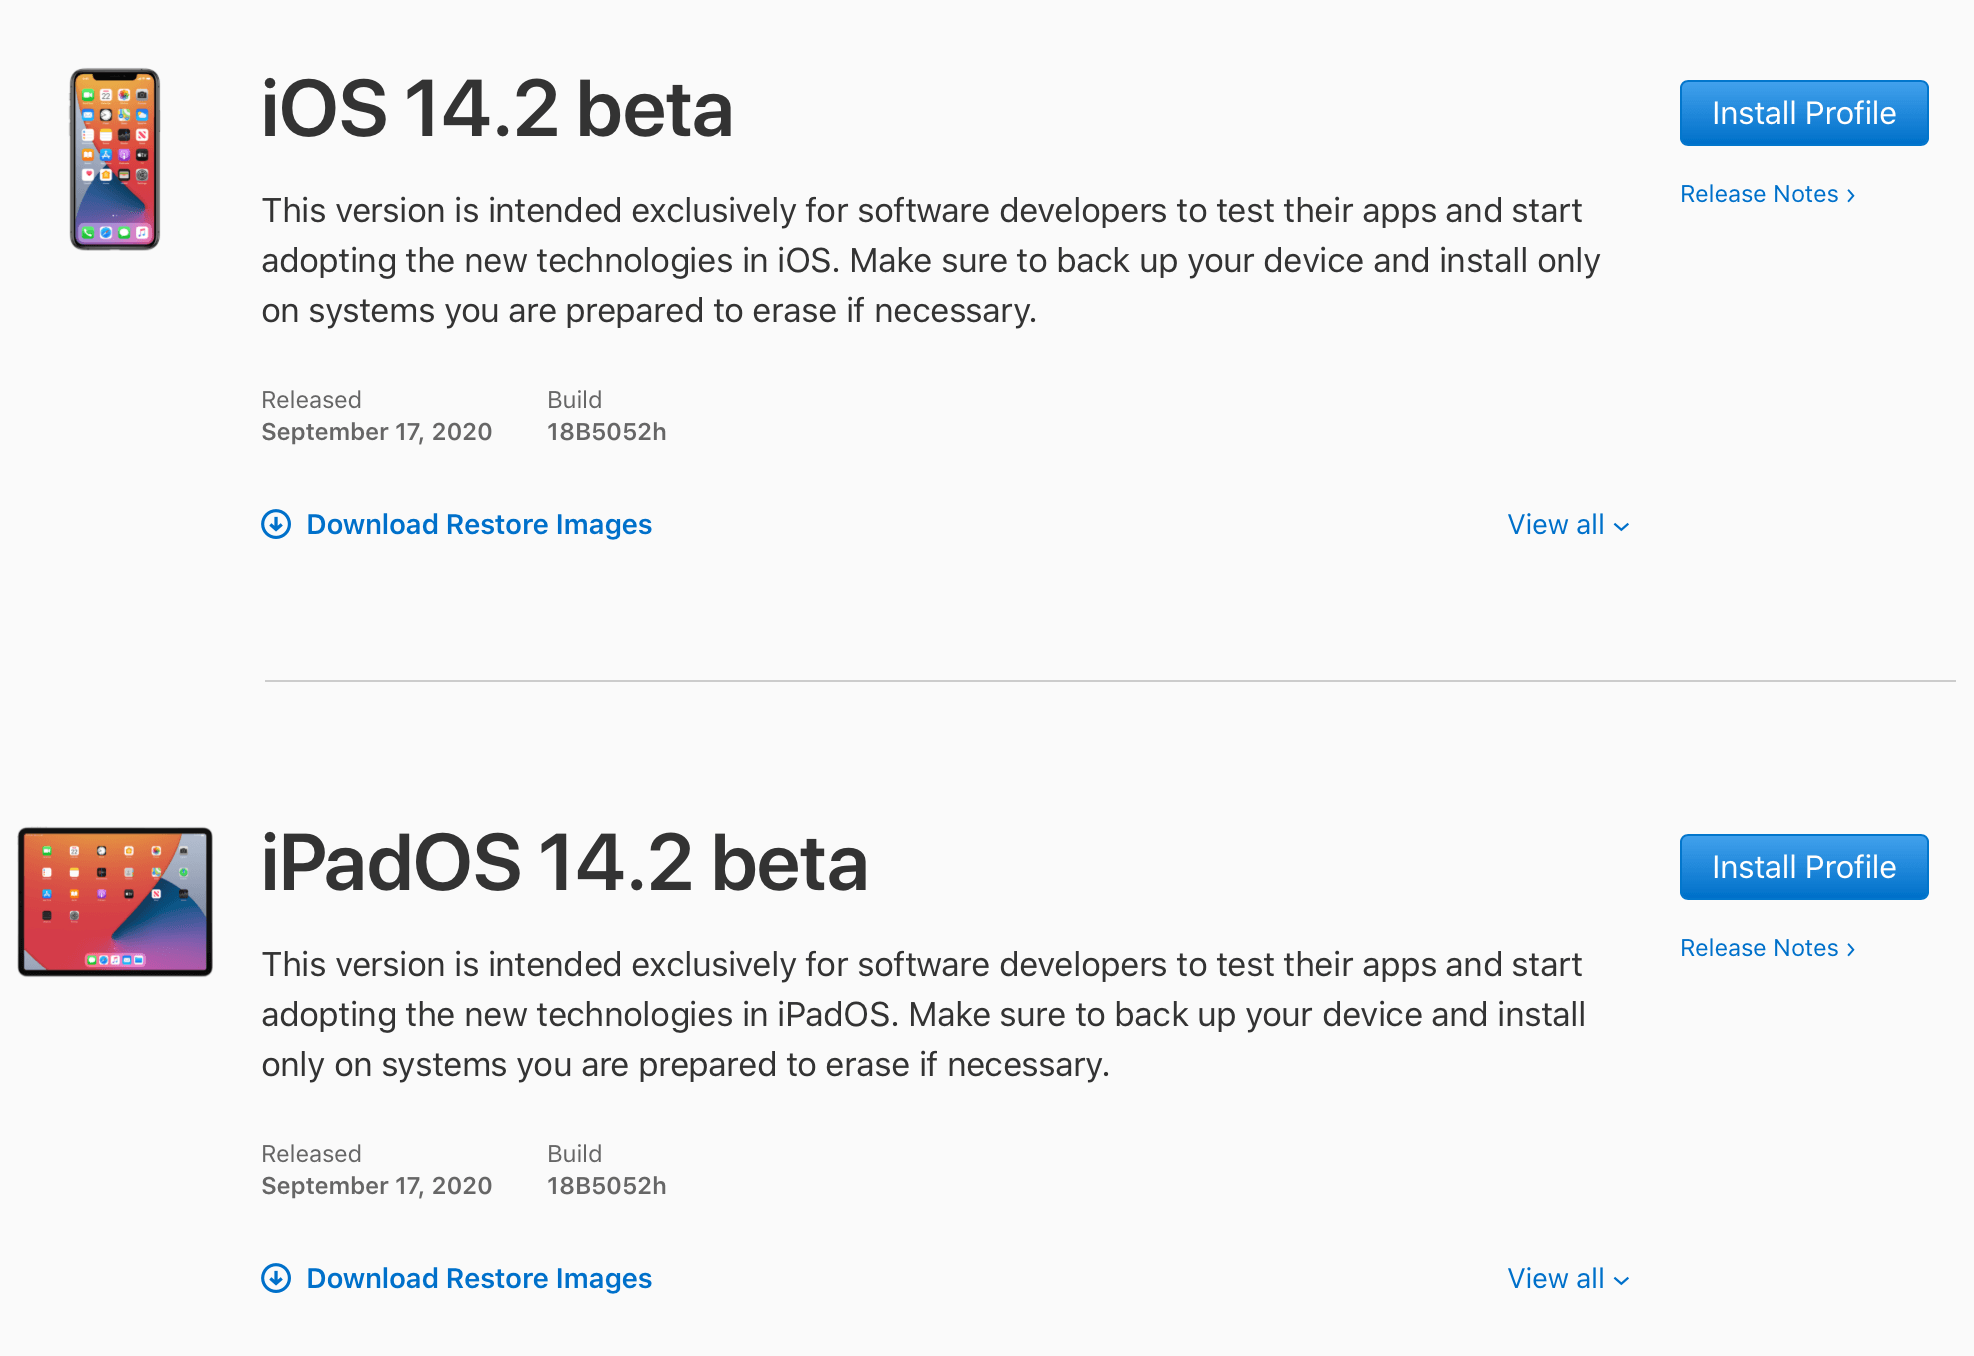
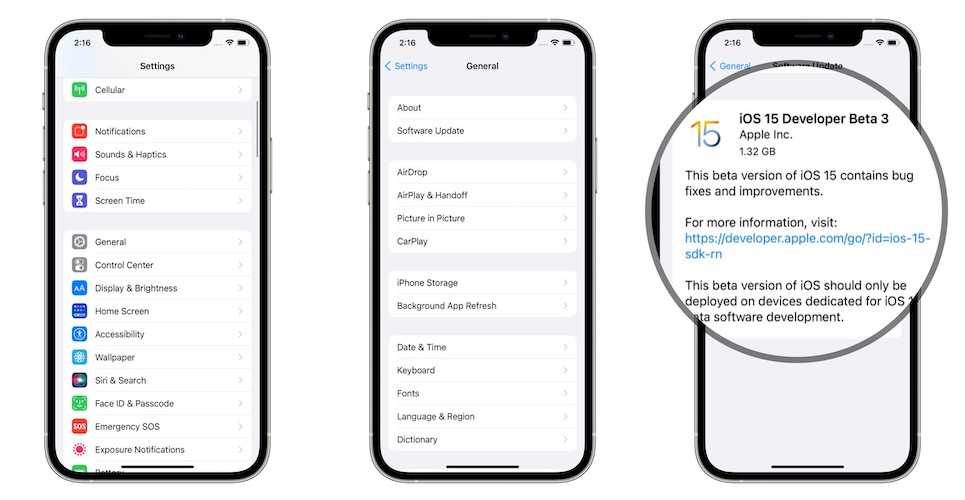
Apple выпустила iOS 13.2 beta 3 для всех. Как установить
Только слепой мог не заметить, что этой осенью Apple сильно пересмотрела свои принципы относительно выпуска свежих обновлений для iOS. Если раньше компания предпочитала разносить запуск тестовых сборок для разработчиков и для участников программы раннего доступа как минимум одной неделей, то теперь ограничивается всего лишь несколькими часами, да и сами они выходят не в пример чаще. Это серьёзно ускоряет весь процесс, суля более ранний релиз. Но, видимо, в Купертино только того и ждут.
![]()
К настоящему времени Apple выпустила iOS 13.1 для разработчиков и публичную бету iOS 13 public beta 7. О том, как установить iOS 13 по Wi-Fi рассказали в этой инструкции.
![]()