Step 2: Choose who to share with & how they can use your file
Share with specific people
Important: If you use a Google Account through work or school, you might not be able to share files outside of your organization.
- On your computer, go to Google Drive.
- Select the file you want to share Share .
- Enter the email address you want to share with. If you use a work or school account
Tip: To turn off suggested recipients, go to your Drive Settings . Uncheck «Show suggested recipients in the sharing dialog.»
, you can share with suggested recipients.
- Decide how people can use your file. Select one:
- Viewer
- Commenter
- Editor
- If you use an eligible work or school account, click Add expiration to .
- When you share your file, each email address gets an email:
- Optional: Add a message to your notification email.
- If you don’t want to notify people, uncheck the box.
- Click Send or Share.
Share with a group of specific people
Share with a Google Group
You can share files with Google Groups instead of specific people. When you:
- Add a member to a group: That person gains permission to access the files and folders the group has.
- Remove a member from a group: That person loses permission to access the files and folders that the group has.
To share a file with your Google Group:
- Create a Google Group.
- Add members to your group.
- Share the file with your group.
Tip: Before a file appears in the “Shared with me” folder, you must open that file from an invitation or a link.
Share with a Chat space
To share files with a Chat space, you can add the file you want to share to that Chat space.
To add a Drive file to a Chat space:
Option 1:
- On your computer, .
- Select the Chat space you want to share the file with.
- At the bottom left, click Integration menu Drive .
- Select the file you want to share with a Chat space.
- Click Insert.
Option 2:
- On your computer, go to Google Drive.
- Right-click on the file you want to share with a Chat space.
- Click Get link Copy link Done.
- Go to Google Chat.
- Select the Chat space you want to share the file with.
- In the message field, paste the link you copied.
Tips:
- When you send a file to a Chat space, a prompt to grant access appears.
- When people leave a Chat space, they lose access to the files in that Chat space if they don’t have sharing access:
- As an individual
- As a member of another group
- To grant file access, you must have edit access on the file you want to share.
Add an expiration date
The expiration date feature is only available for eligible work or school accounts.
You’re currently not signed in.
Allow general access to the file
You can choose if your file should be available to anyone or restricted to only the people with access. If you allow access to anyone with the link, your folder won’t restrict who can access it.
- Select the file you want to share.
- Click Share or Share .
- Under “General access”, click the Down arrow .
- Choose who can access the file.
- To decide what role people will have with your file, select Viewer, Commenter, or Editor
Learn more about how others view, comment, or edit files.
.
- Click Done.
Share a file publicly
- Select the file you want to share.
- Click Share or Share .
- Under “General access” click the Down arrow .
- Choose Anyone with the link.
- To decide what role people will have, select Viewer, Commenter, or Editor.
- Click Copy link.
- Click Done.
- Paste the link in an email or any place you want to share it.
People who aren’t signed in to a Google Account show up as anonymous animals in your file. Learn more about anonymous animals.
Как управлять доступом к файлам
Как запретить скачивание, печать или копирование файлов
Пользователи, которым разрешено редактировать документ, могут:
- предоставлять доступ другим пользователям;
- добавлять и удалять пользователей;
- изменять разрешения на доступ к файлу;
- копировать, распечатывать и скачивать файлы.
Примечание. Этот параметр нельзя применить ко всей папке, но вы можете настроить его для отдельных файлов в ней.
Чтобы запретить читателям и комментаторам печатать, копировать и скачивать файлы, выполните следующие действия:
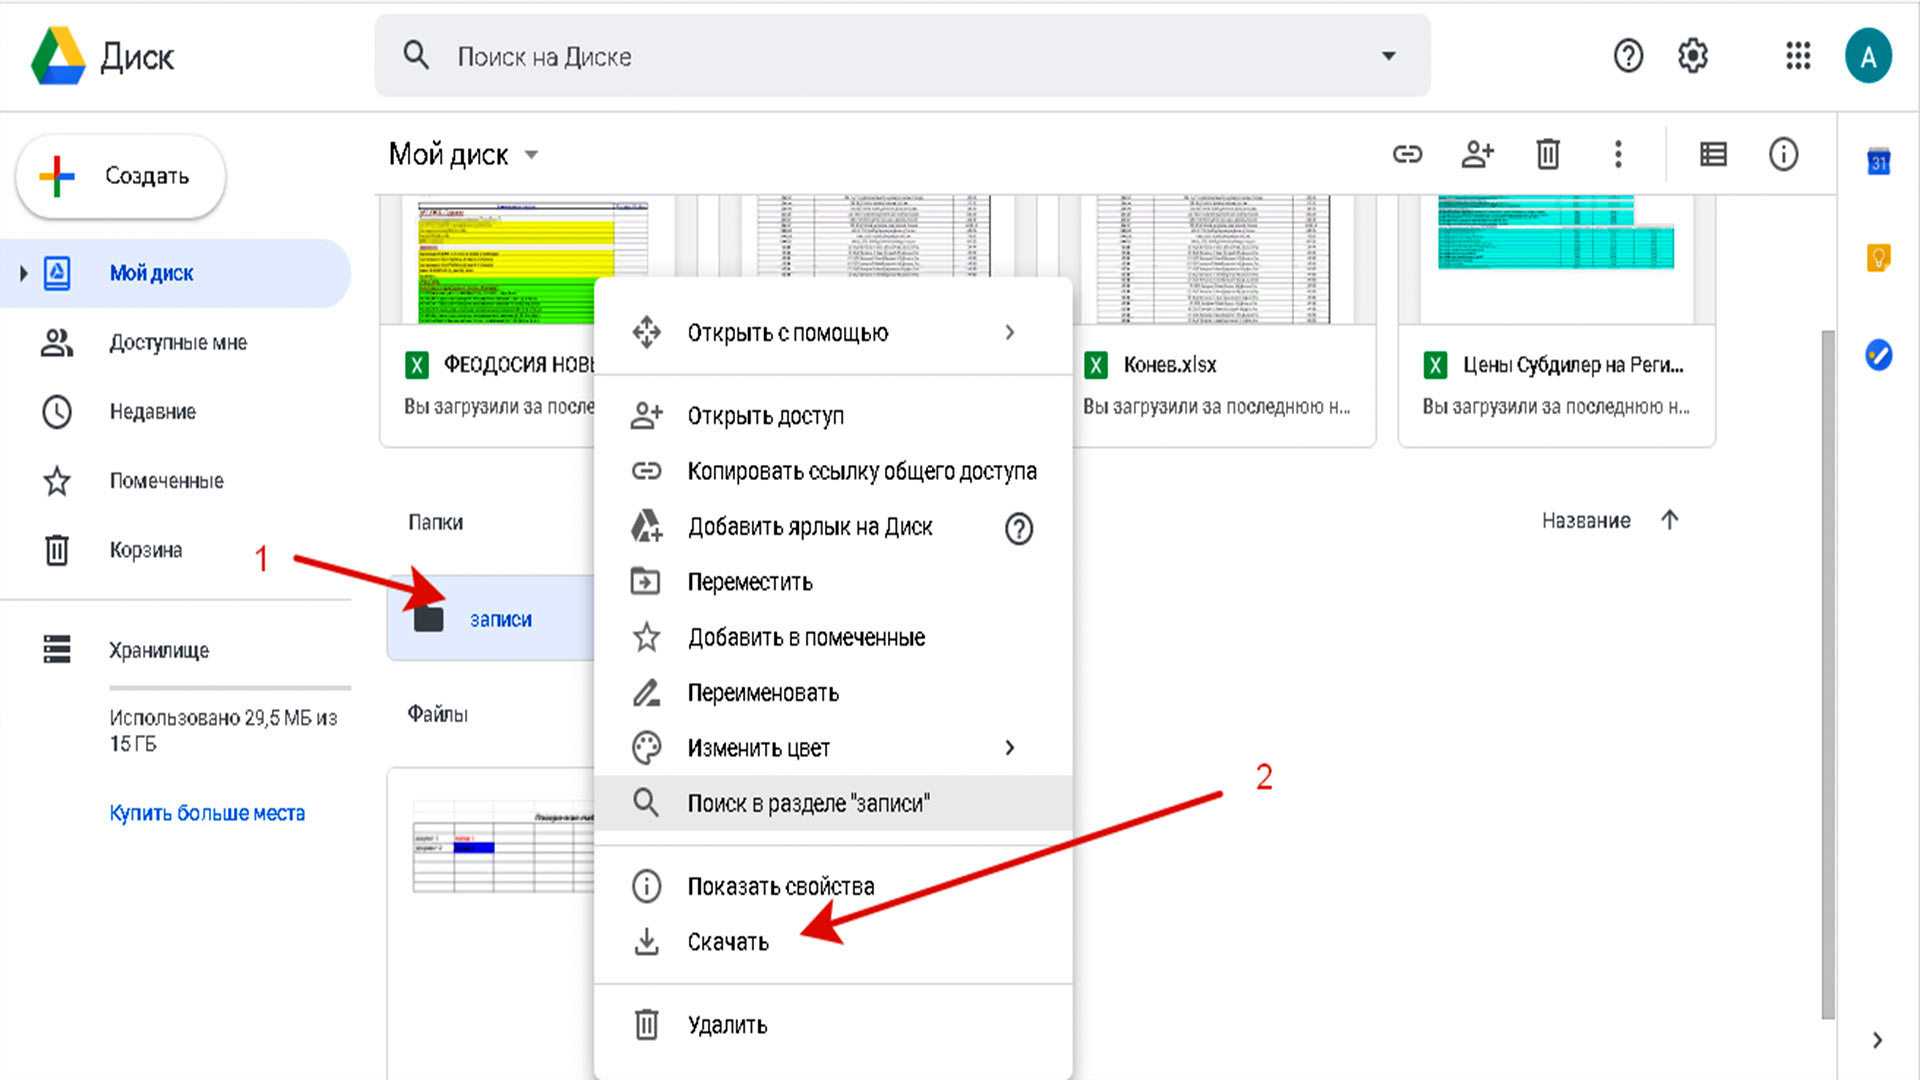
- Найдите нужный файл или папку на Google Диске, в Документах, Таблицах или Презентациях.
- Выберите файлы.
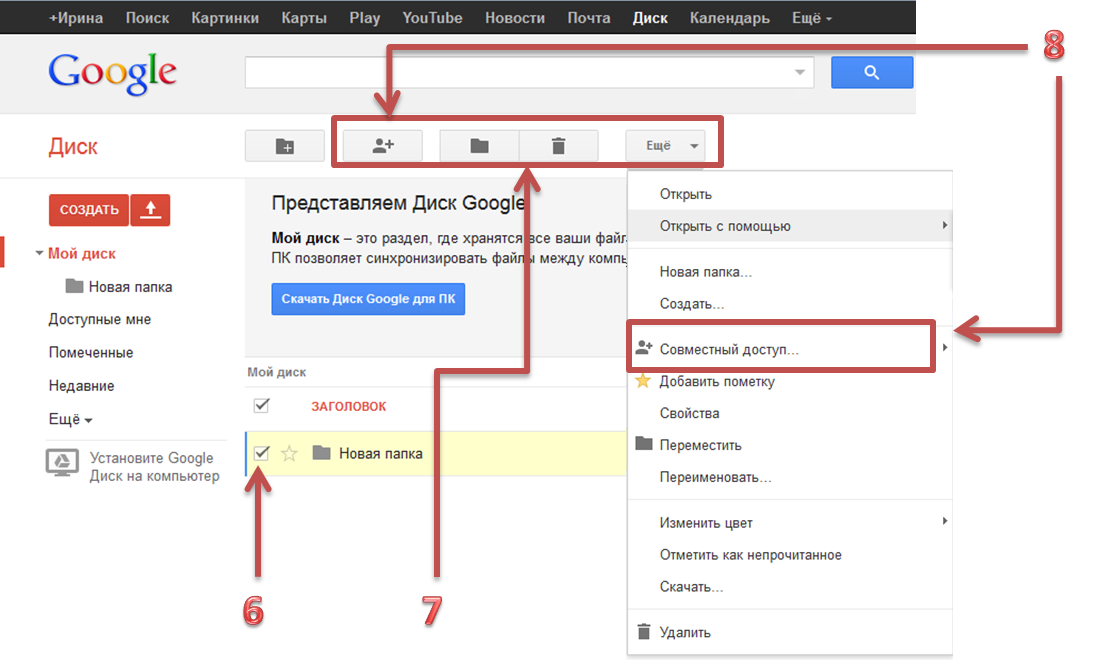
- Выберите Настроить доступ или нажмите на значок «Открыть доступ» .
- Нажмите на значок настроек в верхней части страницы.
- Снимите флажок Разрешить читателям и комментаторам документа скачивать, распечатывать и копировать его.
Примечание. Вы можете запрещать пользователям копировать, скачивать и распечатывать файлы, а также делиться ими на Google Диске, в Документах, Таблицах и Презентациях, но у вас нет возможности контролировать другие способы предоставления доступа к контенту.
Как запретить другим пользователям изменять настройки доступа к файлам
Изменять настройки доступа к файлу могут его владелец и пользователи с правом на редактирование. Чтобы запретить другим пользователям изменять настройки доступа к файлу, выполните следующие действия:
- Откройте файл на Google Диске, в Документах, Таблицах или Презентациях.
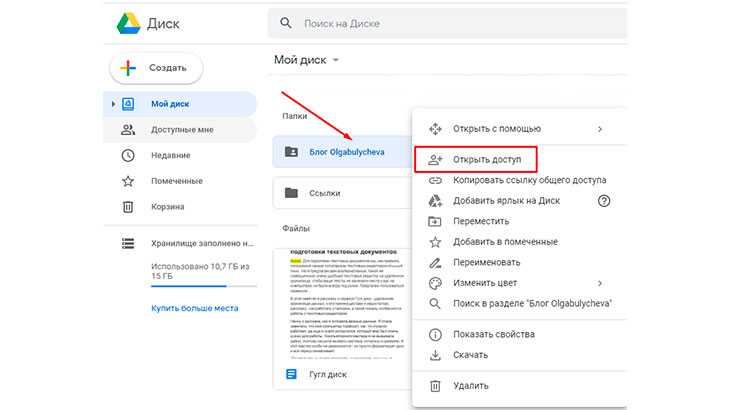
- Выберите Настроить доступ или нажмите на значок «Открыть доступ» .
- Нажмите на значок настроек в верхней части страницы.
- Снимите флажок Пользователи с правом на редактирование смогут изменять разрешения и параметры доступа.
Примечание. Запрет на предоставление доступа к папке не распространяется на хранящиеся в ней файлы. Чтобы пользователи не могли управлять доступом к таким файлам, измените настройки для каждого из них.
Как предоставить временный доступ
Откройте файл на Google Диске, в Документах, Таблицах или Презентациях.
Нажмите Настройки доступа Если доступ к файлу этому пользователю ещё не предоставлялся, добавьте адрес электронной почты пользователя и нажмите Отправить или Открыть доступ. В правом верхнем углу документа снова нажмите Настройки доступа. выберите пользователя, которому хотите предоставить временный доступ.
Рядом с именем пользователя нажмите на стрелку вниз Предоставить временный доступ.
В поле «Доступ будет закрыт» выберите дату
Обратите внимание, что от начальной до конечной даты действия доступа должно пройти не более года.
Нажмите Сохранить.
Share & collaborate on a file with many people
At any time, a Google Docs, Sheets, or Slides file can only be edited on up to 100 open tabs or devices. If there are more than 100 instances of the file open, only the owner and some users with editing permissions can edit the file.
To share and collaborate on a file with a very wide audience:
Publish the file
- If you need many people to view a file at once, publish it and create a link to share to viewers. You can give edit access to people who need to edit or comment on the file. Learn how to publish a file.
- Depending on your account’s settings, publishing a file makes it visible to everyone on the web, everyone in your organization, or a group of people in your organization. Be careful when publishing private or sensitive info.
- To remove a file from the web, you must stop publishing it. .
- To stop sharing a file with collaborators, learn how to change sharing permissions.
Create a Google Site
- Create a Google Site to share information with many people. You can embed documents, spreadsheets, and presentations on the site, which can be viewed by a large amount of users. Learn how to embed documents on a site.
- If you anticipate high traffic to your site, first publish your document in Google Docs, Sheets or Slides, then embed the published URL into Google Sites. Learn how to publish a file.
Collect feedback with Google Forms
If you need to gather a lot of information, create a Google Form. Responses will be recorded in a Google Sheet. Give edit access only to people who need to work with the responses. To let more than 100 people view the responses, publish the spreadsheet to the web and create a link to share with viewers. Learn how to publish a file.
Fix problems with documents shared with many people
If your document is shared with many people and it’s crashing or not updating quickly, try these troubleshooting tips:
- Instead of allowing people to comment on a document or spreadsheet, create a Google Form to collect feedback. Learn how to create a Google Form.
- If you’re making a copy of a document, don’t include resolved comments and suggestions. .
- Delete older information or move data into a new document.
- Ask viewers to close the document when they aren’t using it.
- Include only the most important information in a published document. Shorter documents load faster.
- Reduce the amount of people with edit access to a document.
- If collecting information from multiple documents, create a new, view-only document to share with a large number of people.
Limit how a file is shared
When you share a file with someone, you can choose their access level:
- Viewer: People can view, but can’t change or share the file with others.
- Commenter: People can make comments and suggestions, but can’t change or share the file with others.
- Editor: People can make changes, accept or reject suggestions, and share the file with others.
Change the general access for your file
You can allow broad access to your file. These options depend on if your Google Account is through work, school, or Gmail.


- Public: Anyone can search on Google and get access to your file, without signing in to their Google Account.
- Anyone with the link: Anyone who has the link can use your file, without signing in to their Google Account.
Restricted: Only people with access can open the file.
Related articles
- Make Google Docs, Sheets, Slides & Forms public
- Stop or change how a file is shared
- Transfer file ownership
- Share folders in Google Drive
- Find files shared with you
Шаг 2. Выберите, кому и какой доступ предоставить
Как предоставить доступ отдельным пользователям
Важно! В рабочих и учебных аккаунтах Google возможность предоставлять доступ к файлам за пределами домена может быть отключена
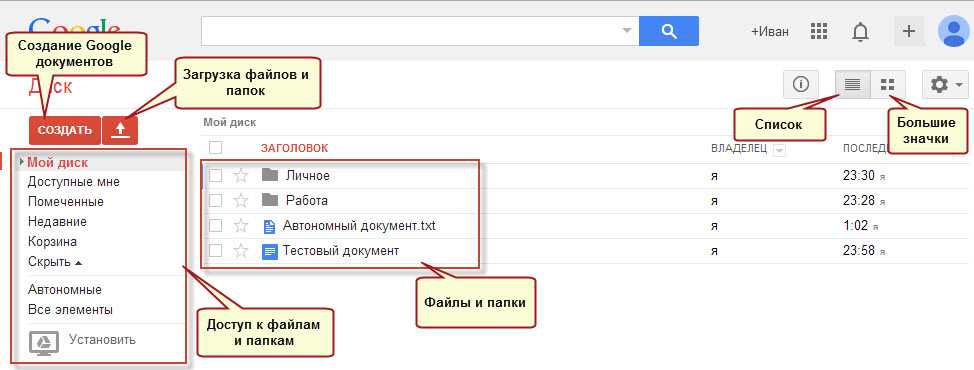
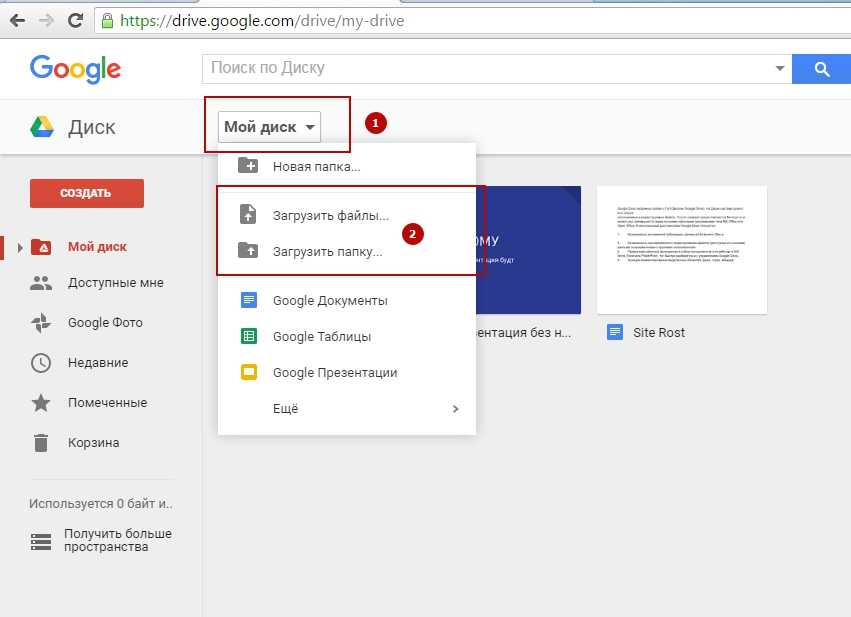
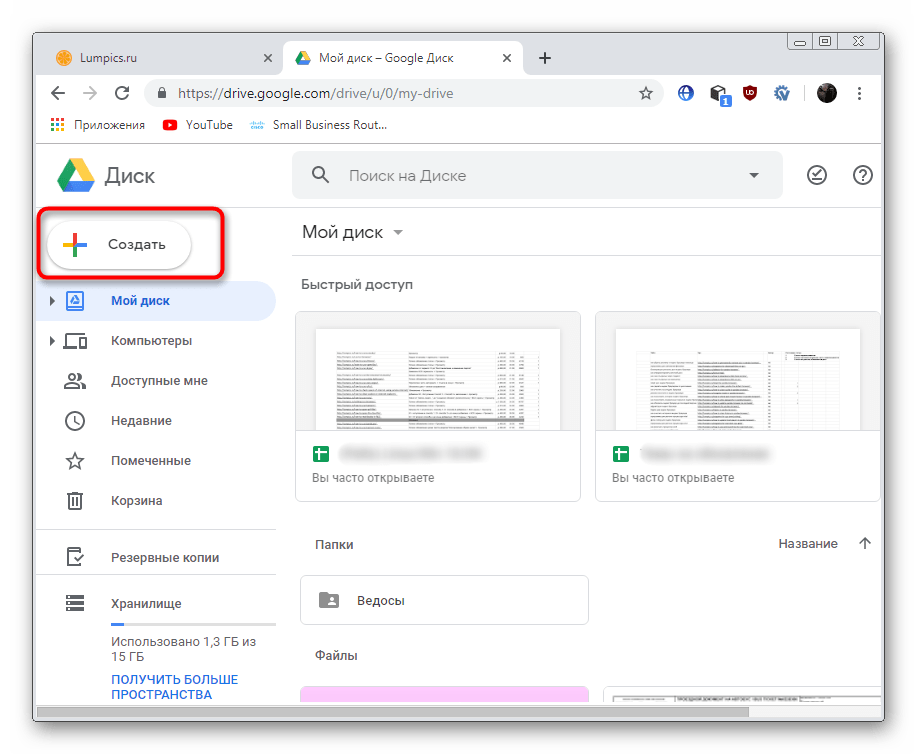
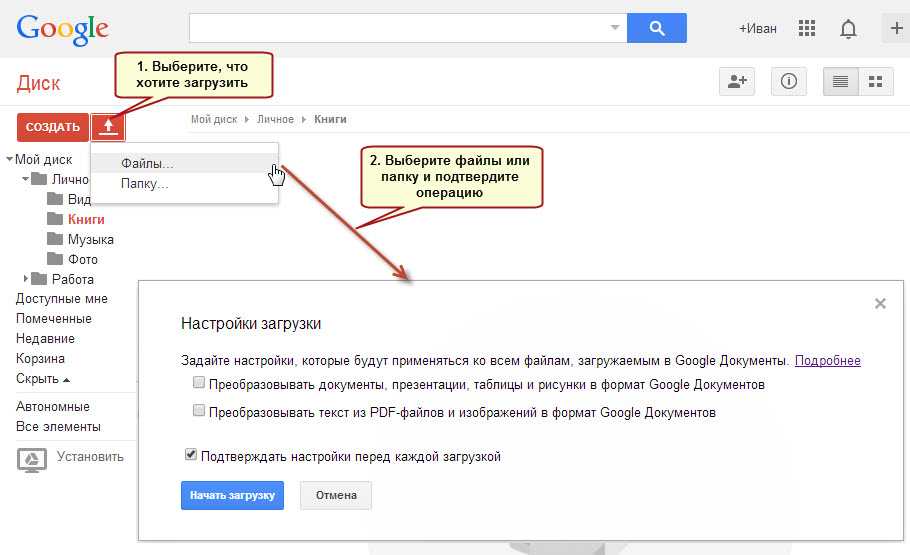
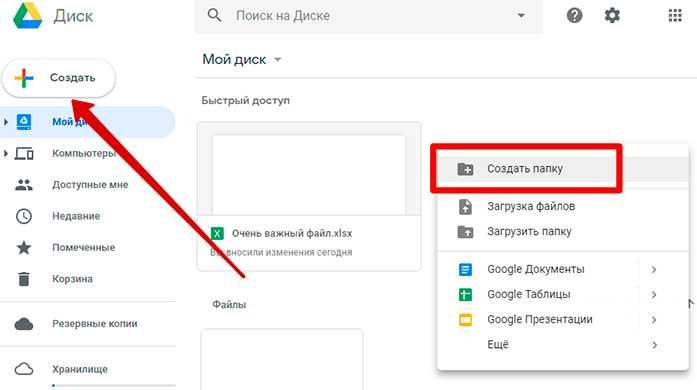
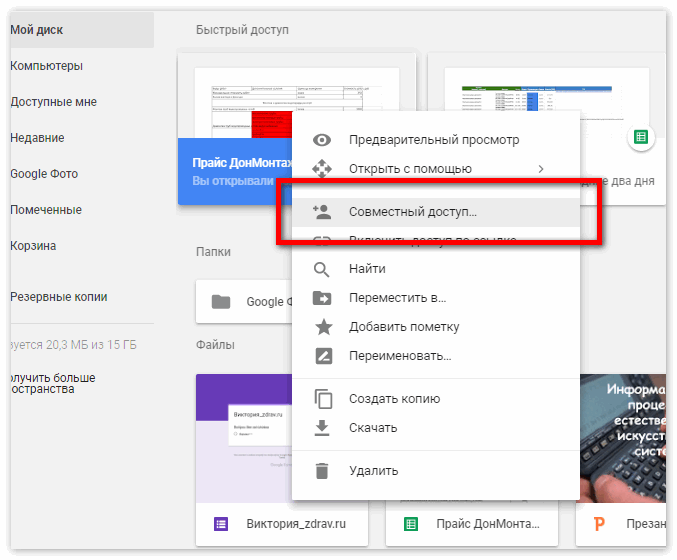
- Откройте Google Диск на компьютере.
- Выберите нужный файл «Открыть доступ» .
- Введите адрес электронной почты нужного пользователя или название группы Google. Если у вас рабочий или учебный аккаунт
Совет. Чтобы отключить эти подсказки, перейдите в настройки Диска и снимите флажок «Показывать предлагаемых получателей в диалоговом окне предоставления доступа».
, система предложит адреса, которые можно подставить в это поле.
- Задайте уровень доступа к файлу, выбрав один из следующих вариантов:
- Читатель;
- Комментатор;
- Редактор.
- Вы можете указать доступа, нажав Добавить срок действия, если используете рабочий или учебный аккаунт, у которого есть разрешение на это.
- На адрес электронной почты пользователя, которому вы предоставили доступ к файлу, будет отправлено уведомление.
- Вы можете добавить к этому уведомлению собственное сообщение.
- Если вы не хотите никого оповещать, снимите этот флажок.
- Выберите Отправить или Открыть доступ.
Подробнее …
Как добавить срок действия доступа
Функция управления сроком действия доступна только совместимым рабочим и учебным аккаунтам.
Вы не вошли в аккаунт.
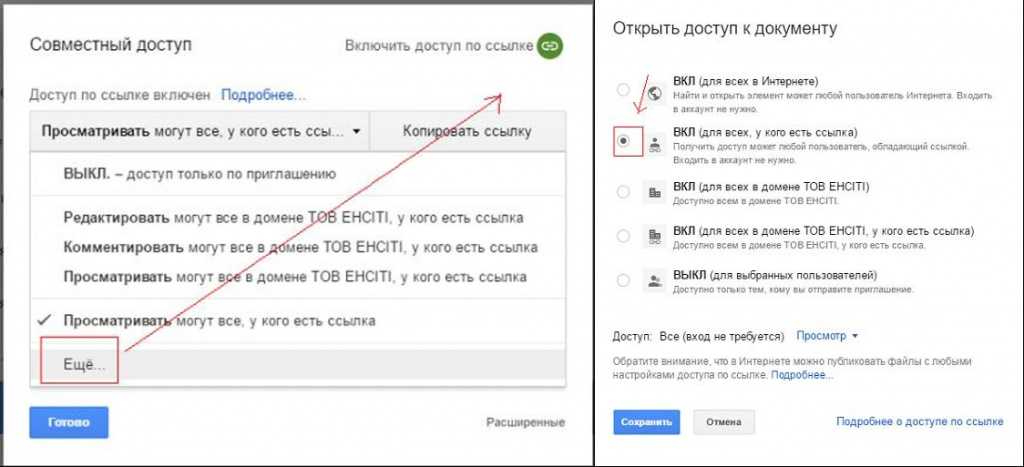
Как открыть общий доступ к файлу
Вы можете открыть общий доступ к файлу или предоставить его только выбранным вами пользователям. Если установить доступ для всех, у кого есть ссылка, то ограничения, заданные для папки, не будут распространяться на файл.
- Выберите нужный файл.
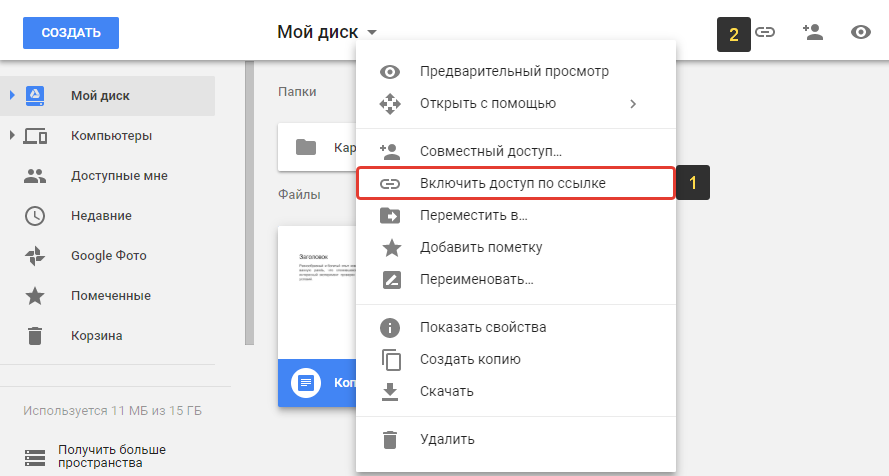
- Выберите Настройки доступа или нажмите на значок «Открыть доступ к объекту» .
- В разделе «Общий доступ» нажмите на стрелку вниз .
- Укажите, кому разрешен доступ к файлу.
- Задайте уровень доступа, выбрав вариант Читатель, Комментатор или Редактор
Подробнее о правах доступа…
.
- Нажмите Готово.
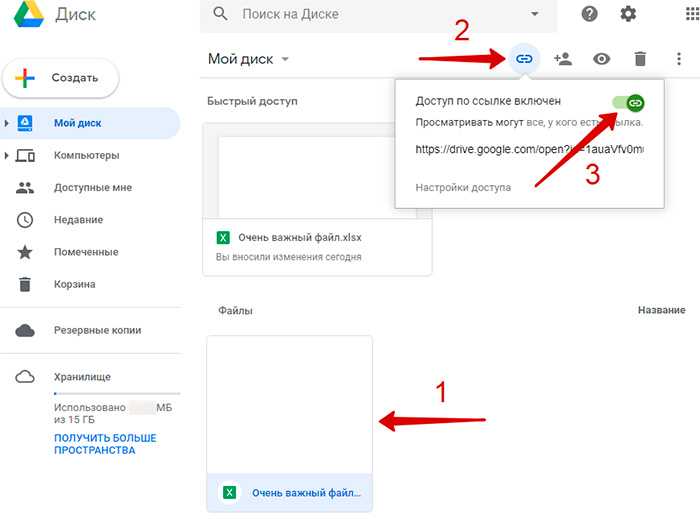
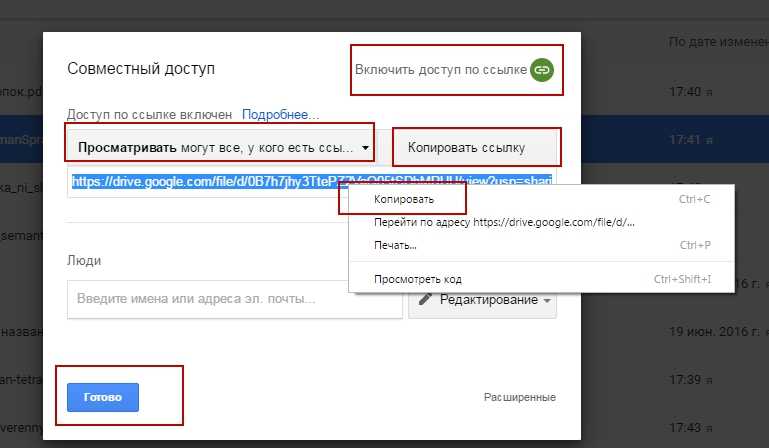
Как сделать файл общедоступным
- Выберите нужный файл.
- Выберите Настройки доступа или нажмите на значок «Открыть доступ к объекту» .
- В разделе «Общий доступ» нажмите на стрелку вниз .
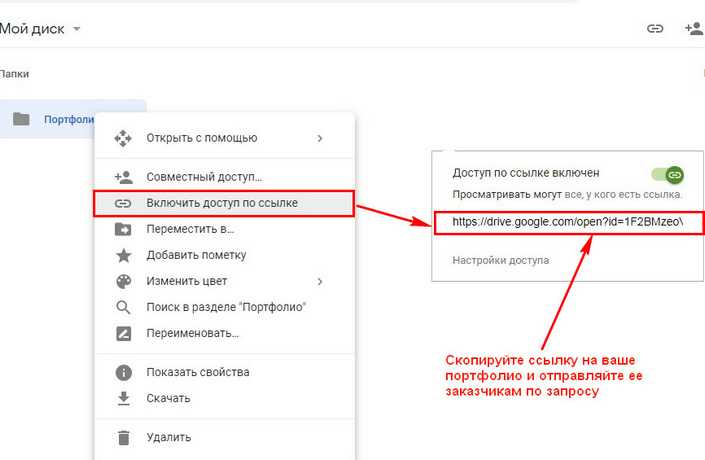
- Выберите Все, у кого есть ссылка.
- Задайте уровень доступа, выбрав вариант Читатель, Комментатор или Редактор.
- Нажмите Копировать ссылку.
- Нажмите Готово.
- Вставьте ссылку в письмо или передайте ее нужным пользователям другим способом.
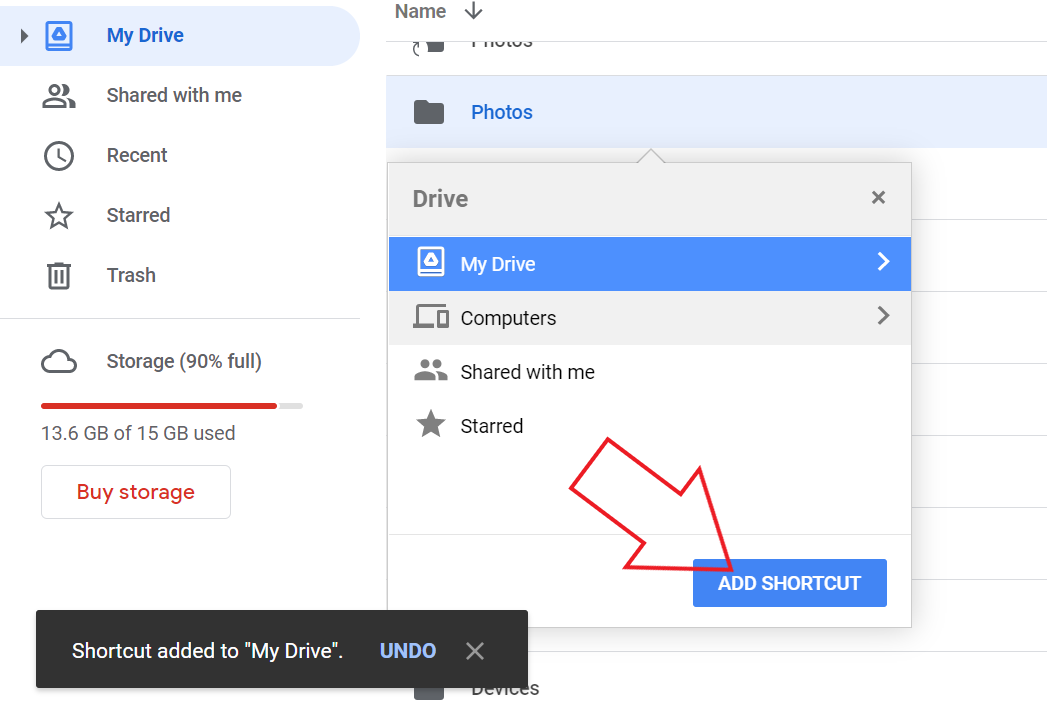
Когда люди, не вошедшие в аккаунт Google, просматривают файл одновременно с вами, вместо их фото профиля отображаются значки с изображением различных животных. Подробнее о значках для анонимных пользователей…
Как изменить настройки доступа к папке
Настройки доступа к папке применяются ко всем хранящимся в ней объектам. В зависимости от выбранного уровня доступа пользователи могут выполнять различные действия с файлами в папке.
- Редактор может открывать и изменять объекты, находящиеся в папке, перемещать и удалять их из нее, а также добавлять новые.
- Комментатор имеет право оставлять комментарии и предлагать изменения, но не может редактировать файлы в папке или делиться ими с кем-либо ещё.
- Читатель может открывать папку и все хранящиеся в ней файлы.
Открыв доступ к папке, вы можете изменить настройки доступа для отдельных файлов из нее.
Добавьте срок действия
Смена владельца папки
Передача права собственности на папку не отражается на хранящихся в ней файлах – их владельцы остаются прежними. Чтобы сменить владельцев нескольких папок, выполните следующие действия:
- Откройте сайт drive.google.com на компьютере.
- Выберите нужную папку.
- В правом верхнем углу экрана нажмите на значок «Открыть доступ» .
- Справа от имени будущего владельца нажмите на стрелку вниз .
- Выберите Передача права собственности.
- Нажмите Да.
После этого вы сможете работать с папкой, пока новый владелец не изменит ваши права доступа.
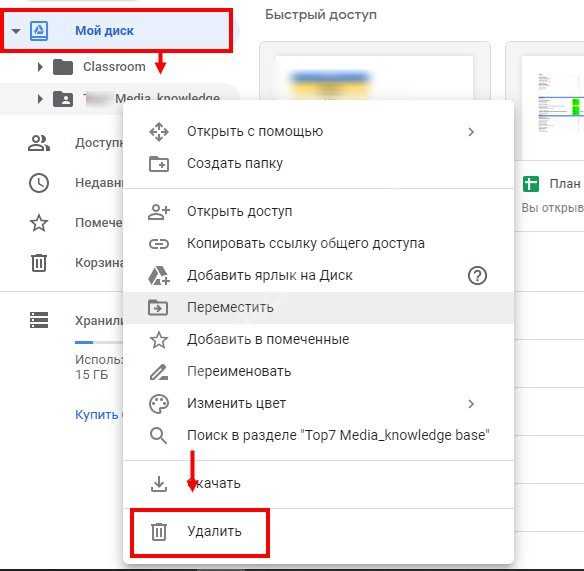
Файлы, удаленные из общих папок
При удалении файла из общей папки все, кроме владельца, теряют к нему доступ.
Чтобы восстановить удаленный файл из такой папки, выполните следующие действия:
- Откройте сайт drive.google.com на компьютере.
- Вверху нажмите Поиск на Диске.
- Введите название файла.
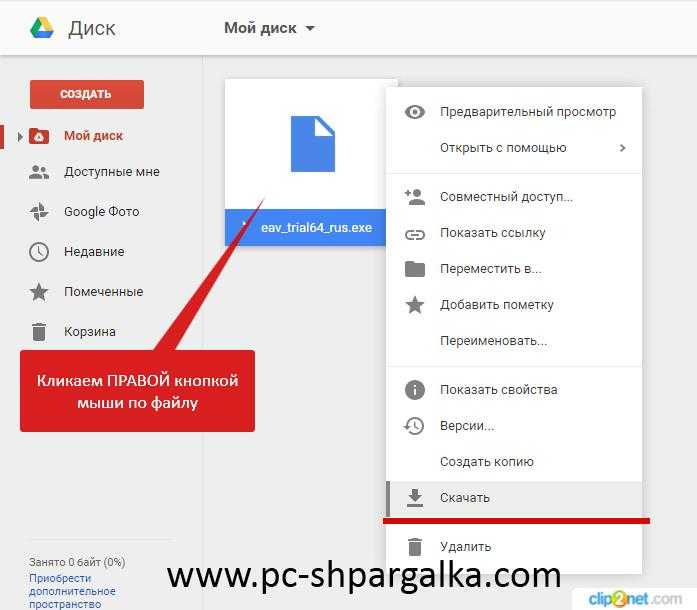
- Нажмите на нужный файл правой кнопкой мыши.
- Выберите «Добавить на Мой диск» .
Limit how a file is shared
When you share a file with someone, you can choose their access level:
- Viewer: People can view, but can’t change or share the file with others.
- Commenter: People can make comments and suggestions, but can’t change or share the file with others.
- Editor: People can make changes, accept or reject suggestions, and share the file with others.
Change the general access for your file
You can allow broad access to your file. These options depend on if your Google Account is through work, school, or Gmail.
- Public: Anyone can search on Google and get access to your file, without signing in to their Google Account.
- Anyone with the link: Anyone who has the link can use your file, without signing in to their Google Account.
Restricted: Only people with access can open the file.
Related articles
- Make Google Docs, Sheets, Slides & Forms public
- Stop or change how a file is shared
- Transfer file ownership
- Share folders in Google Drive
- Find files shared with you
Share & collaborate on a file with many people
At any time, a Google Docs, Sheets, or Slides file can only be edited on up to 100 open tabs or devices. If there are more than 100 instances of the file open, only the owner and some users with editing permissions can edit the file.
To share and collaborate on a file with a very wide audience:
Publish the file
- If you need many people to view a file at once, publish it and create a link to share to viewers. You can give edit access to people who need to edit or comment on the file. Learn how to publish a file.
- Depending on your account’s settings, publishing a file makes it visible to everyone on the web, everyone in your organization, or a group of people in your organization. Be careful when publishing private or sensitive info.
- To remove a file from the web, you must stop publishing it. .
- To stop sharing a file with collaborators, learn how to change sharing permissions.
Create a Google Site
- Create a Google Site to share information with many people. You can embed documents, spreadsheets, and presentations on the site, which can be viewed by a large amount of users. Learn how to embed documents on a site.
- If you anticipate high traffic to your site, first publish your document in Google Docs, Sheets or Slides, then embed the published URL into Google Sites. Learn how to publish a file.
Collect feedback with Google Forms
If you need to gather a lot of information, create a Google Form. Responses will be recorded in a Google Sheet. Give edit access only to people who need to work with the responses. To let more than 100 people view the responses, publish the spreadsheet to the web and create a link to share with viewers. Learn how to publish a file.
Fix problems with documents shared with many people
If your document is shared with many people and it’s crashing or not updating quickly, try these troubleshooting tips:
- Instead of allowing people to comment on a document or spreadsheet, create a Google Form to collect feedback. Learn how to create a Google Form.
- If you’re making a copy of a document, don’t include resolved comments and suggestions. .
- Delete older information or move data into a new document.
- Ask viewers to close the document when they aren’t using it.
- Include only the most important information in a published document. Shorter documents load faster.
- Reduce the amount of people with edit access to a document.
- If collecting information from multiple documents, create a new, view-only document to share with a large number of people.
Limit how a file is shared
When you share a file with someone, you can choose their access level:
- Viewer: People can view, but can’t change or share the file with others.
- Commenter: People can make comments and suggestions, but can’t change or share the file with others.
- Editor: People can make changes, accept or reject suggestions, and share the file with others.
Change the general access for your file
You can allow broad access to your file. These options depend on if your Google Account is through work, school, or Gmail.


- Public: Anyone can search on Google and get access to your file, without signing in to their Google Account.
- Anyone with the link: Anyone who has the link can use your file, without signing in to their Google Account.
Restricted: Only people with access can open the file.
Related articles
- Make Google Docs, Sheets, Slides & Forms public
- Stop or change how a file is shared
- Transfer file ownership
- Share folders in Google Drive
- Find files shared with you
Step 2: Choose who to share with & how they can use your file
Share with specific people
Important: If you use a Google Account through work or school, you might not be able to share files outside of your organization.
- On your computer, go to Google Drive.
- Select the file you want to share Share .
- Enter the email address you want to share with. If you use a work or school account
Tip: To turn off suggested recipients, go to your Drive Settings . Uncheck «Show suggested recipients in the sharing dialog.»
, you can share with suggested recipients.
- Decide how people can use your file. Select one:
- Viewer
- Commenter
- Editor
- If you use an eligible work or school account, click Add expiration to .
- When you share your file, each email address gets an email:
- Optional: Add a message to your notification email.
- If you don’t want to notify people, uncheck the box.
- Click Send or Share.
Share with a group of specific people
Share with a Google Group
You can share files with Google Groups instead of specific people. When you:
- Add a member to a group: That person gains permission to access the files and folders the group has.
- Remove a member from a group: That person loses permission to access the files and folders that the group has.
To share a file with your Google Group:
- Create a Google Group.
- Add members to your group.
- Share the file with your group.
Tip: Before a file appears in the “Shared with me” folder, you must open that file from an invitation or a link.
Share with a Chat space
To share files with a Chat space, you can add the file you want to share to that Chat space.
To add a Drive file to a Chat space:
Option 1:
- On your computer, .
- Select the Chat space you want to share the file with.
- At the bottom left, click Integration menu Drive .
- Select the file you want to share with a Chat space.
- Click Insert.
Option 2:
- On your computer, go to Google Drive.
- Right-click on the file you want to share with a Chat space.
- Click Get link Copy link Done.
- Go to Google Chat.
- Select the Chat space you want to share the file with.
- In the message field, paste the link you copied.
Tips:
- When you send a file to a Chat space, a prompt to grant access appears.
- When people leave a Chat space, they lose access to the files in that Chat space if they don’t have sharing access:
- As an individual
- As a member of another group
- To grant file access, you must have edit access on the file you want to share.
Add an expiration date
The expiration date feature is only available for eligible work or school accounts.
You’re currently not signed in.
Allow general access to the file
You can choose if your file should be available to anyone or restricted to only the people with access. If you allow access to anyone with the link, your folder won’t restrict who can access it.
- Select the file you want to share.
- Click Share or Share .
- Under “General access”, click the Down arrow .
- Choose who can access the file.
- To decide what role people will have with your file, select Viewer, Commenter, or Editor
Learn more about how others view, comment, or edit files.
.
- Click Done.
Share a file publicly
- Select the file you want to share.
- Click Share or Share .
- Under “General access” click the Down arrow .
- Choose Anyone with the link.
- To decide what role people will have, select Viewer, Commenter, or Editor.
- Click Copy link.
- Click Done.
- Paste the link in an email or any place you want to share it.
People who aren’t signed in to a Google Account show up as anonymous animals in your file. Learn more about anonymous animals.
Limit how a file is shared
When you share a file with someone, you can choose their access level:
- Viewer: People can view, but can’t change or share the file with others.
- Commenter: People can make comments and suggestions, but can’t change or share the file with others.
- Editor: People can make changes, accept or reject suggestions, and share the file with others.
Change the general access for your file
You can allow broad access to your file. These options depend on if your Google Account is through work, school, or Gmail.
- Public: Anyone can search on Google and get access to your file, without signing in to their Google Account.
- Anyone with the link: Anyone who has the link can use your file, without signing in to their Google Account.
Restricted: Only people with access can open the file.
Related articles
- Make Google Docs, Sheets, Slides & Forms public
- Stop or change how a file is shared
- Transfer file ownership
- Share folders in Google Drive
- Find files shared with you
Share & collaborate on a file with many people
At any time, a Google Docs, Sheets, or Slides file can only be edited on up to 100 open tabs or devices. If there are more than 100 instances of the file open, only the owner and some users with editing permissions can edit the file.
To share and collaborate on a file with a very wide audience:
Publish the file
- If you need many people to view a file at once, publish it and create a link to share to viewers. You can give edit access to people who need to edit or comment on the file. Learn how to publish a file.
- Depending on your account’s settings, publishing a file makes it visible to everyone on the web, everyone in your organization, or a group of people in your organization. Be careful when publishing private or sensitive info.
- To remove a file from the web, you must stop publishing it. .
- To stop sharing a file with collaborators, learn how to change sharing permissions.
Create a Google Site
- Create a Google Site to share information with many people. You can embed documents, spreadsheets, and presentations on the site, which can be viewed by a large amount of users. Learn how to embed documents on a site.
- If you anticipate high traffic to your site, first publish your document in Google Docs, Sheets or Slides, then embed the published URL into Google Sites. Learn how to publish a file.
Collect feedback with Google Forms
If you need to gather a lot of information, create a Google Form. Responses will be recorded in a Google Sheet. Give edit access only to people who need to work with the responses. To let more than 100 people view the responses, publish the spreadsheet to the web and create a link to share with viewers. Learn how to publish a file.
Fix problems with documents shared with many people
If your document is shared with many people and it’s crashing or not updating quickly, try these troubleshooting tips:
- Instead of allowing people to comment on a document or spreadsheet, create a Google Form to collect feedback. Learn how to create a Google Form.
- If you’re making a copy of a document, don’t include resolved comments and suggestions. .
- Delete older information or move data into a new document.
- Ask viewers to close the document when they aren’t using it.
- Include only the most important information in a published document. Shorter documents load faster.
- Reduce the amount of people with edit access to a document.
- If collecting information from multiple documents, create a new, view-only document to share with a large number of people.
Step 2: Choose who to share with & how they can use your file
Share with specific people
Important: If you use a Google Account through work or school, you might not be able to share files outside of your organization.
- On your computer, go to Google Drive.
- Select the file you want to share Share .
- Enter the email address you want to share with. If you use a work or school account
Tip: To turn off suggested recipients, go to your Drive Settings . Uncheck «Show suggested recipients in the sharing dialog.»
, you can share with suggested recipients.
- Decide how people can use your file. Select one:
- Viewer
- Commenter
- Editor
- If you use an eligible work or school account, click Add expiration to .
- When you share your file, each email address gets an email:
- Optional: Add a message to your notification email.
- If you don’t want to notify people, uncheck the box.
- Click Send or Share.
Share with a group of specific people
Share with a Google Group
You can share files with Google Groups instead of specific people. When you:
- Add a member to a group: That person gains permission to access the files and folders the group has.
- Remove a member from a group: That person loses permission to access the files and folders that the group has.
To share a file with your Google Group:
- Create a Google Group.
- Add members to your group.
- Share the file with your group.
Tip: Before a file appears in the “Shared with me” folder, you must open that file from an invitation or a link.
Share with a Chat space
To share files with a Chat space, you can add the file you want to share to that Chat space.
To add a Drive file to a Chat space:
Option 1:
- On your computer, .
- Select the Chat space you want to share the file with.
- At the bottom left, click Integration menu Drive .
- Select the file you want to share with a Chat space.
- Click Insert.
Option 2:
- On your computer, go to Google Drive.
- Right-click on the file you want to share with a Chat space.
- Click Get link Copy link Done.
- Go to Google Chat.
- Select the Chat space you want to share the file with.
- In the message field, paste the link you copied.
Tips:
- When you send a file to a Chat space, a prompt to grant access appears.
- When people leave a Chat space, they lose access to the files in that Chat space if they don’t have sharing access:
- As an individual
- As a member of another group
- To grant file access, you must have edit access on the file you want to share.
Add an expiration date
The expiration date feature is only available for eligible work or school accounts.
You’re currently not signed in.
Allow general access to the file
You can choose if your file should be available to anyone or restricted to only the people with access. If you allow access to anyone with the link, your folder won’t restrict who can access it.


- Select the file you want to share.
- Click Share or Share .
- Under “General access”, click the Down arrow .
- Choose who can access the file.
- To decide what role people will have with your file, select Viewer, Commenter, or Editor
Learn more about how others view, comment, or edit files.
.
- Click Done.
Share a file publicly
- Select the file you want to share.
- Click Share or Share .
- Under “General access” click the Down arrow .
- Choose Anyone with the link.
- To decide what role people will have, select Viewer, Commenter, or Editor.
- Click Copy link.
- Click Done.
- Paste the link in an email or any place you want to share it.
People who aren’t signed in to a Google Account show up as anonymous animals in your file. Learn more about anonymous animals.
Share & collaborate on a file with many people
At any time, a Google Docs, Sheets, or Slides file can only be edited on up to 100 open tabs or devices. If there are more than 100 instances of the file open, only the owner and some users with editing permissions can edit the file.
To share and collaborate on a file with a very wide audience:
Publish the file
- If you need many people to view a file at once, publish it and create a link to share to viewers. You can give edit access to people who need to edit or comment on the file. Learn how to publish a file.
- Depending on your account’s settings, publishing a file makes it visible to everyone on the web, everyone in your organization, or a group of people in your organization. Be careful when publishing private or sensitive info.
- To remove a file from the web, you must stop publishing it. .
- To stop sharing a file with collaborators, learn how to change sharing permissions.
Create a Google Site
- Create a Google Site to share information with many people. You can embed documents, spreadsheets, and presentations on the site, which can be viewed by a large amount of users. Learn how to embed documents on a site.
- If you anticipate high traffic to your site, first publish your document in Google Docs, Sheets or Slides, then embed the published URL into Google Sites. Learn how to publish a file.
Collect feedback with Google Forms
If you need to gather a lot of information, create a Google Form. Responses will be recorded in a Google Sheet. Give edit access only to people who need to work with the responses. To let more than 100 people view the responses, publish the spreadsheet to the web and create a link to share with viewers. Learn how to publish a file.
Fix problems with documents shared with many people
If your document is shared with many people and it’s crashing or not updating quickly, try these troubleshooting tips:
- Instead of allowing people to comment on a document or spreadsheet, create a Google Form to collect feedback. Learn how to create a Google Form.
- If you’re making a copy of a document, don’t include resolved comments and suggestions. .
- Delete older information or move data into a new document.
- Ask viewers to close the document when they aren’t using it.
- Include only the most important information in a published document. Shorter documents load faster.
- Reduce the amount of people with edit access to a document.
- If collecting information from multiple documents, create a new, view-only document to share with a large number of people.