Добавление браузера Google в Linux требует ручной установки пакета
Хотя Chromium – браузер с открытым исходным кодом, на котором основан Google Chrome – свободно доступен в большинстве репозиториев дистрибутивов Linux, Chrome – нет. Усовершенствования Google в Chromium обычно делают его более предпочтительным по сравнению с родительским ПО с открытым исходным кодом, но для его установки требуется несколько дополнительных шагов.
Информация в этой статье относится ко всем современным поддерживаемым версиям Ubuntu Linux и связанным дистрибутивам, основанным на Ubuntu 12.04 и выше.
Системные Требования
Чтобы запустить браузер Google Chrome, ваша система должна соответствовать следующим минимальным требованиям:
- Ubuntu 12.04 или выше на 64-битной архитектуре (32-битный Chrome больше не поддерживается)
- Процессор Intel Pentium 4 или выше
- 350 мегабайт свободного дискового пространства
- 500 мегабайт оперативной памяти
Перед установкой Chrome ознакомьтесь с нашим списком лучших и худших браузеров для Linux.
Скачать Google Chrome
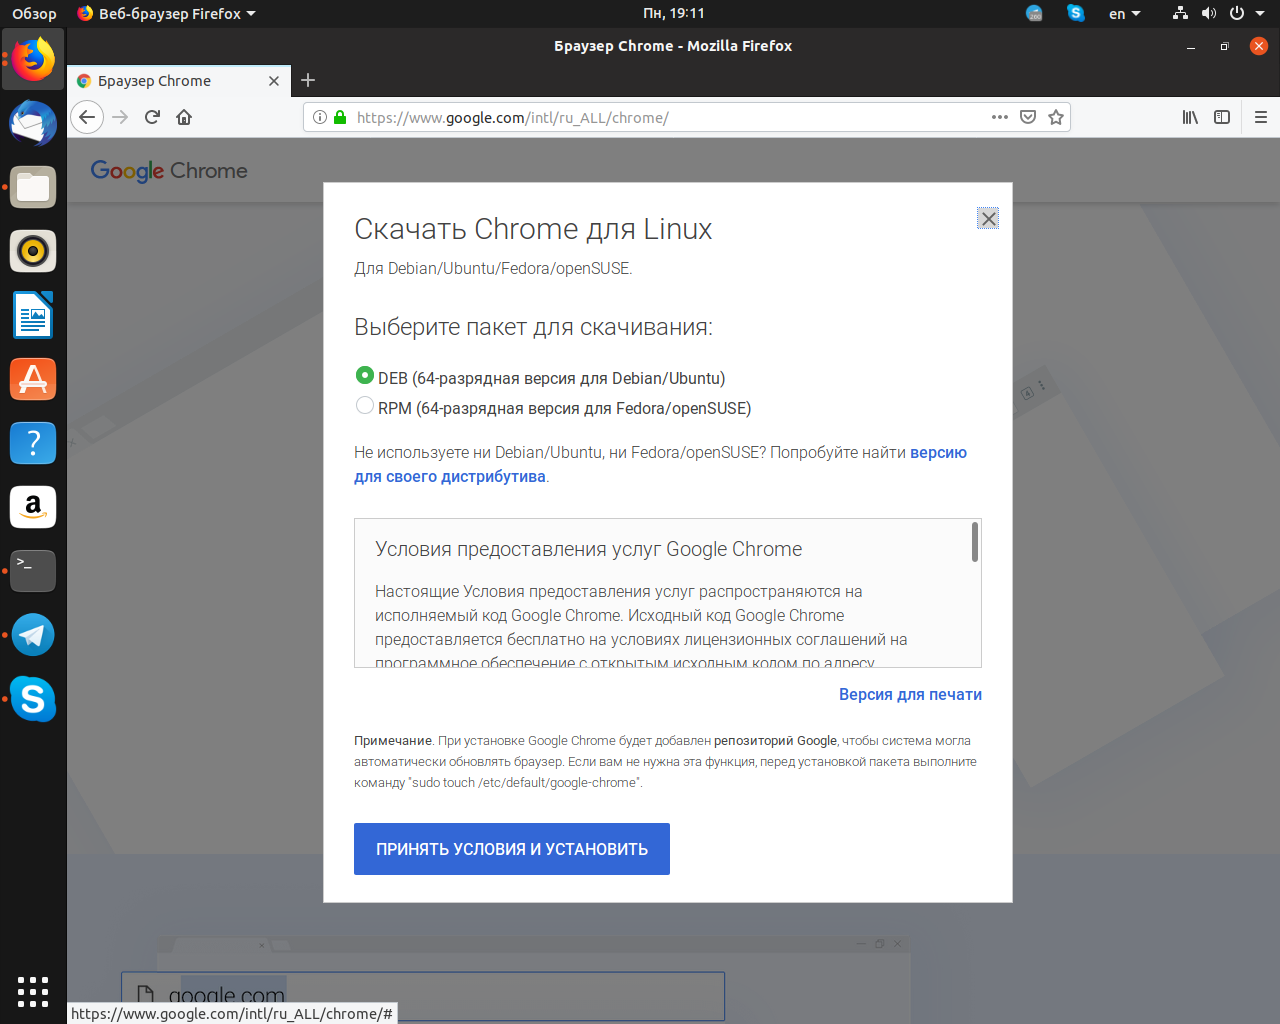
Когда вы загружаете Google Chrome непосредственно из Google, сайт определяет вашу операционную систему на основе строки User-Agent, которую отправляет ваш браузер.
Эта статья посвящена Linux Mint 19.1 Cinnamon, но процесс установки идентичен в Ubuntu и его вариантах.
![]()
Если обнаружен неправильный браузер, прокрутите страницу вниз и выберите ссылку Другие платформы в меню в левом нижнем колонтитуле.
Выбрав 64-разрядный вариант .DEB, нажмите или нажмите Принять и установить , чтобы продолжить.
Скачать Chrome
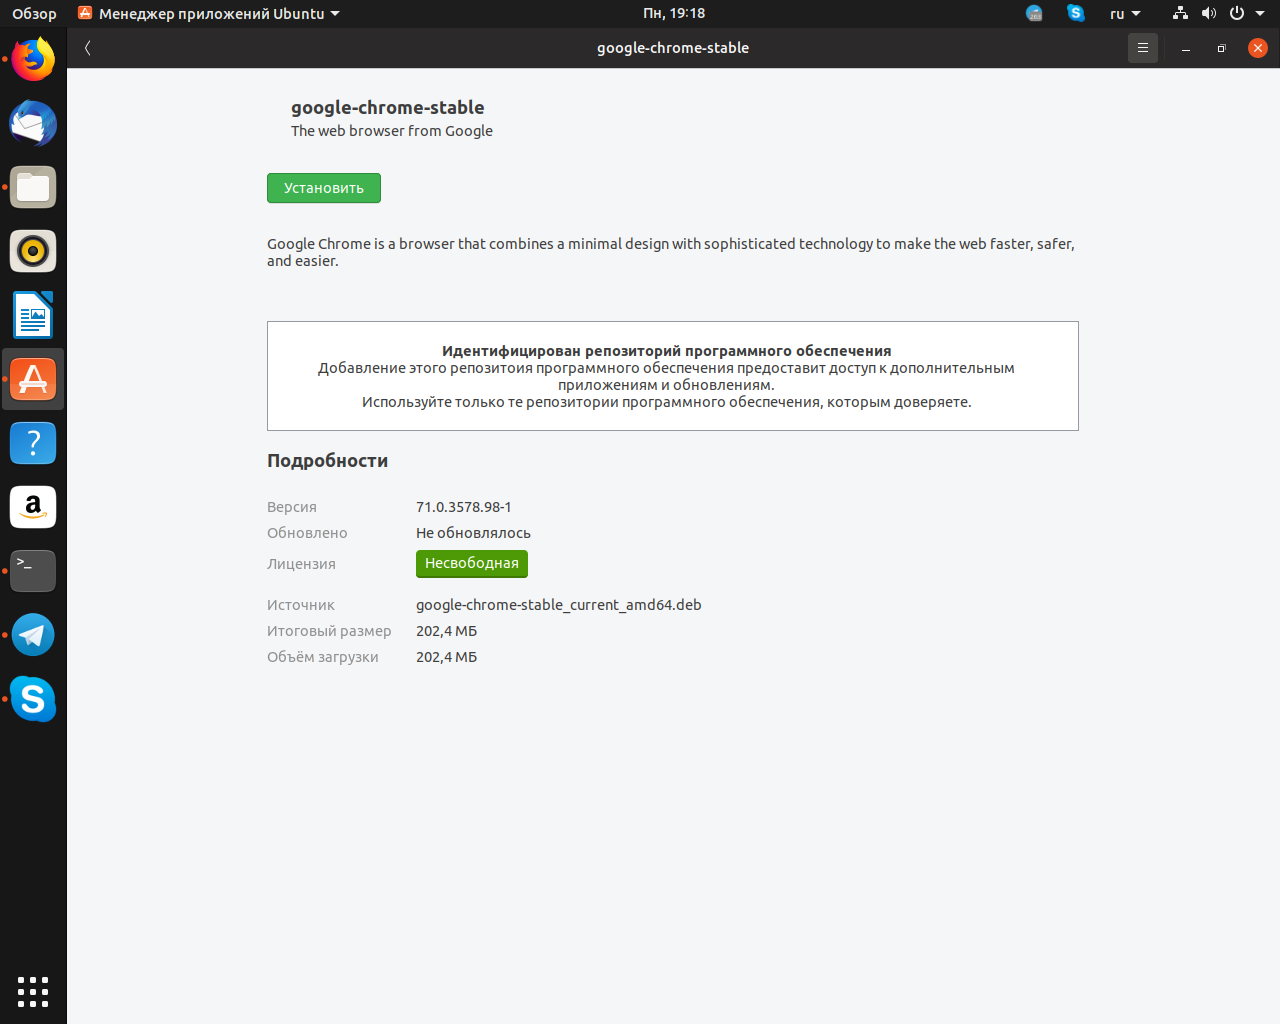
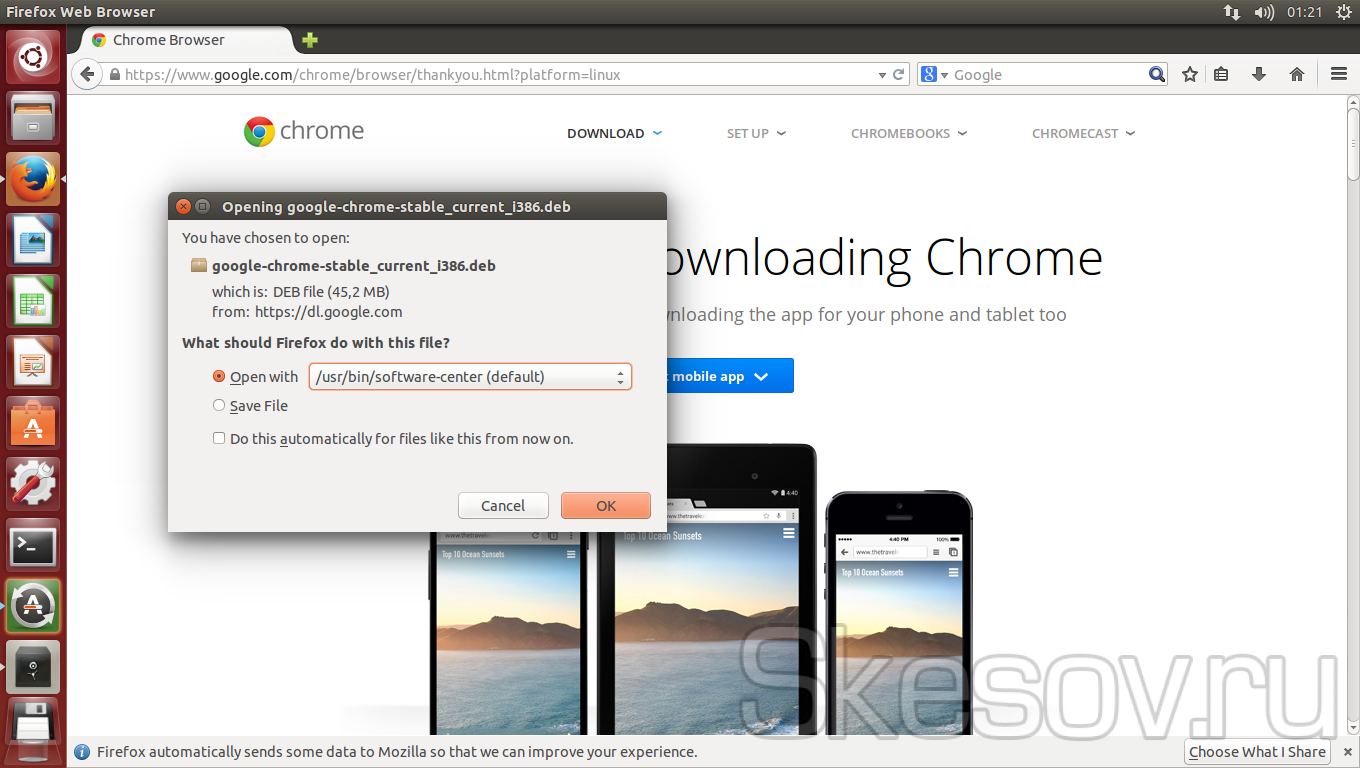
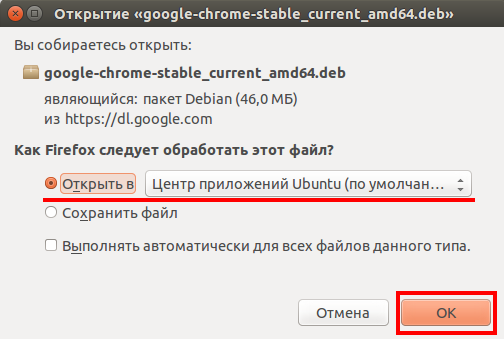
Откройте пакет с помощью графического установщика
Ubuntu (или ваш дистрибутив, управляемый Ubuntu) может предложить вам после выбора пакета загрузки сохранить файл или открыть его с помощью диспетчера пакетов по умолчанию. Использование подхода с графическим интерфейсом представляет собой самое простое решение, но в зависимости от того, как вы настроили Ubuntu, может использоваться один из нескольких различных менеджеров пакетов, включая Ubuntu Software Center и Synaptic Package Manager.
![]()
Если вы решите использовать менеджер пакетов по умолчанию для установки Chrome, вы увидите окно установщика, чтобы проверить зависимости программного обеспечения. Просто следуйте инструкциям. Например, в GDebi все, что вам нужно сделать, это нажать Установить пакет.
Установить через оболочку
Хотя графические менеджеры пакетов отличаются, один подход, который универсален для всех дистрибутивов Ubuntu, – это утилита dpkg .
Чтобы продолжить, сохраните файл Chrome, затем откройте окно терминала, нажав горячую клавишу Ctrl + Alt + T . Установите Chrome, используя dpkg , выполнив следующую команду:
sudo dpkg -i google-chrome-stable_current_amd64.deb
Как и при любом изменении программного пакета, вам потребуются повышенные привилегии. Используйте sudo для добавления префикса к команде, чтобы временно предоставить учетной записи пользователя необходимые права для установки нового программного обеспечения.
Убедитесь, что имя файла DEB точно совпадает с тем, что вы скачали.
![]()
После завершения установки Google Chrome добавляется в список приложений – по умолчанию в папке «Интернет». При первом запуске Chrome будет предложено сделать Chrome браузером по умолчанию и отправлять статистику использования и отчеты о сбоях в Google.
Используйте Chrome
После того, как вы его установили, Chrome обновляется через вашу систему управления пакетами. Запустите его, как любую другую программу, следуя соглашениям предпочитаемого вами оконного менеджера.
How to Install Google Chrome Web Browser on Ubuntu 18.04
17 Сентября 2020
|
Ubuntu
![]()
Google Chrome — самый широко используемый веб-браузер в мире. Это быстрый, простой в использовании и безопасный браузер, созданный для современной сети.
Chrome не является браузером с открытым исходным кодом, и он не включен в репозитории Ubuntu. Google Chrome основан на Chromium , браузере с открытым исходным кодом, который доступен в репозиториях Ubuntu по умолчанию.
Установка Google Chrome в Ubuntu
Чтобы установить Google Chrome в вашей системе Ubuntu, выполните следующие действия:
1. Загрузите Google Chrome.
Откройте свой терминал с помощью сочетания клавиш или щелкнув значок терминала.
Загрузите последний пакет Google Chrome с помощью wget :
2. Установите Google Chrome.
Для установки пакетов в Ubuntu требуются права sudo. Убедитесь, что вы выполняете следующую команду как пользователь с привилегиями sudo.
Установите пакет Google Chrome , набрав:
Вам будет предложено ввести пароль пользователя. Результат должен выглядеть примерно так:
![]()
Запуск Google Chrome
Теперь, когда Google Chrome установлен в вашей системе Ubuntu, вы можете запустить его из командной строки, набрав или щелкнув значок Google Chrome ( ):
![]()
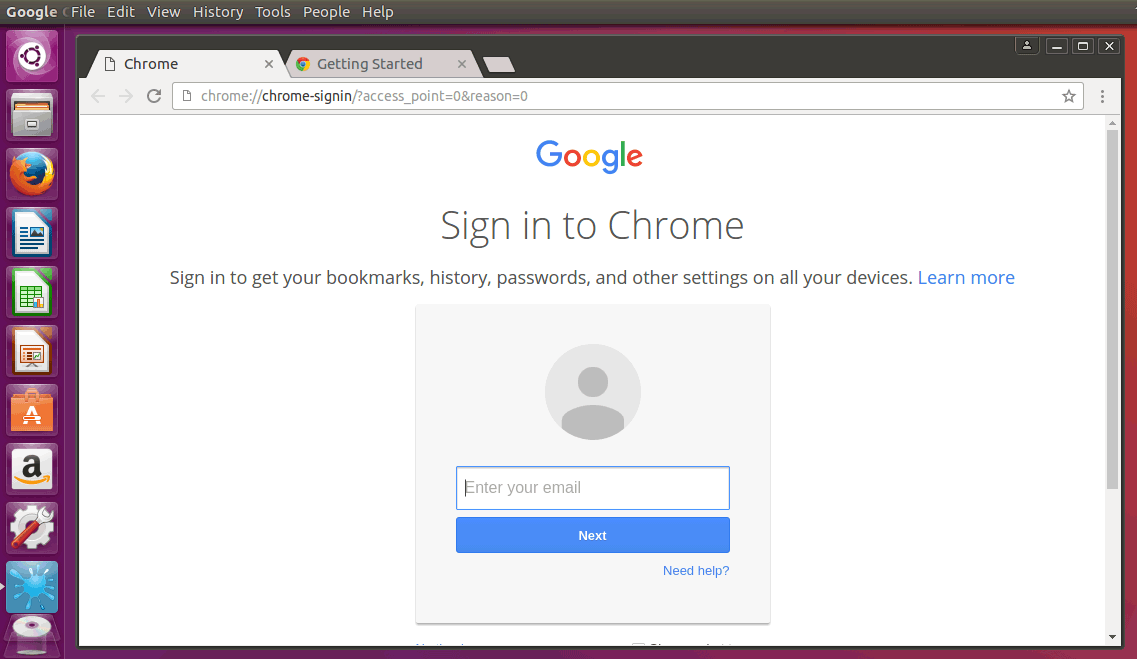
Когда вы запускаете Google Chrome в первый раз, появляется следующее окно с вопросом, хотите ли вы сделать Google Chrome браузером по умолчанию и отправлять статистику использования и отчеты о сбоях в Google:
![]()
Выберите в соответствии с вашими предпочтениями и нажмите, чтобы продолжить.
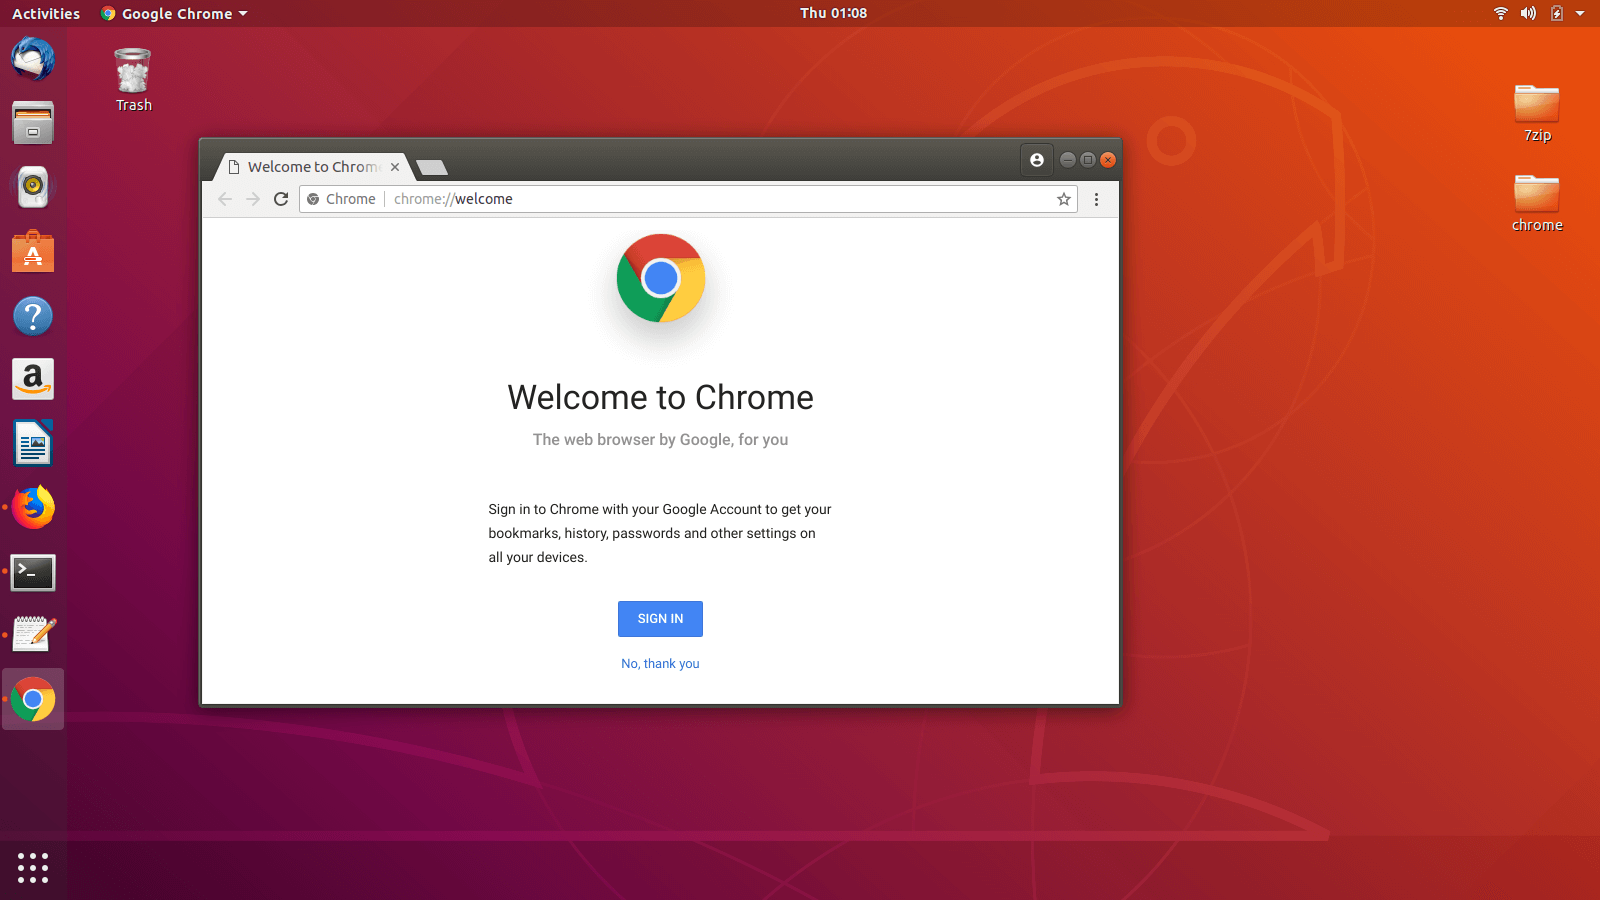
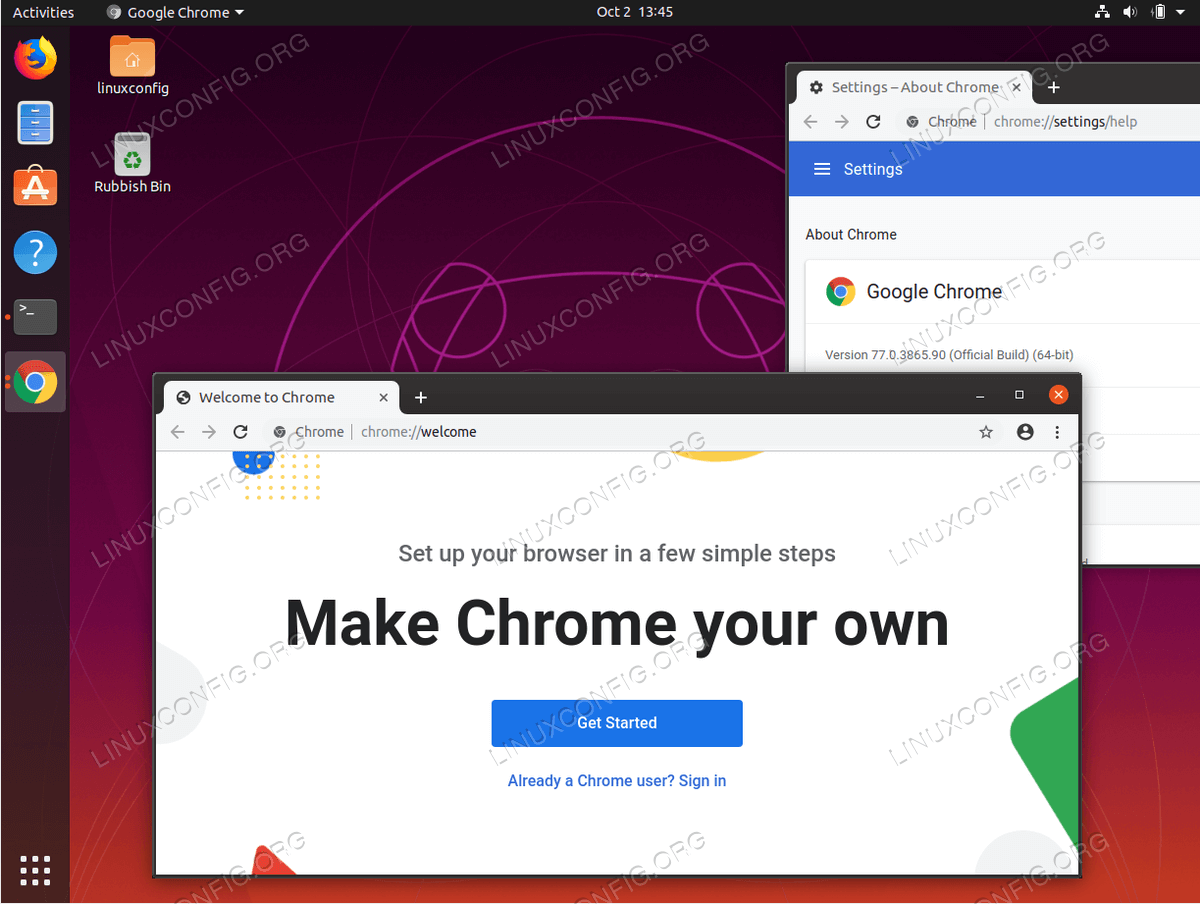
Откроется Google Chrome, и вы увидите страницу приветствия Chrome по умолчанию.
![]()
Отсюда вы можете войти в Chrome со своей учетной записью Google, чтобы синхронизировать свои закладки, историю, пароли и другие настройки на всех ваших устройствах.
Обновление Google Chrome
В процессе установки в вашу систему будет добавлен официальный репозиторий Google. Вы можете использовать команду cat для проверки содержимого файла:
Это гарантирует, что ваша установка Google Chrome будет обновляться автоматически при выпуске новой версии с помощью стандартного инструмента обновления программного обеспечения для настольного компьютера.
Если вы ранее использовали другой браузер, например Firefox, Chromium или Opera , вы можете импортировать свои закладки и настройки в Chrome.
Method 1: Command Line Interface
Follow the below steps to download Chrome through the command-line interface (CLI).
Step 1: Opening a Terminal
Firstly open a terminal. To open a terminal in Ubuntu
- Right-click
- open a terminal here
OR
- go to Show Applications found in the bottom left corner
- search for Terminal
- click on Terminal
In this, I am using the default terminal. You can use any terminal of your liking.
Step 2: Updating and upgrading your packages
Once your terminal is opened, update and upgrade your to keep all the packages up to date.
sudo apt update && upgrade
Enter your machine’s password and press enter.
Step 3: Installing Wget utility (If not installed)
Chrome cannot be downloaded with the command, so hence as an alternative; we will use the command
wget --version
sudo apt install wget
Step 4: Download .deb Package for Chrome Installation
Now install the setup file for Chrome using the command:
wget https://dl.google.com/linux/direct/google-chrome-stable_current_amd64.deb
Step 5: Install Google Chrome using dpkg command
Now install Google Chrome with the command. Enter the below command.
sudo dpkg -i google-chrome-stable_current_amd64.deb
Step 6: Launch Chrome via Terminal
Hooray! Google Chrome has been installed successfully. Now all you have to do is launch Google Chrome.
Tick or untick the boxes according to your requirement and click OK
Устанавливаем Google Chrome в Linux
Далее мы предлагаем ознакомиться с двумя различными методами установки рассматриваемого браузера. Каждый будет наиболее подходящим в определенной ситуации, поскольку у вас имеется возможность выбрать сборку и версию самостоятельно, а потом уже добавлять все компоненты в саму ОС. Практически на всех дистрибутивах Линукс этот процесс осуществляется одинаково, разве что в одном из способов придется выбрать совместимый формат пакета, из-за чего мы предлагаем вам руководство, основанное на последней версии Ubuntu.
Способ 1: Установка пакета с официального сайта
На официальном сайте Google для скачивания доступны специальные версии браузера, написанные под дистрибутивы Linux. Вам нужно только загрузить пакет на компьютер и провести дальнейшую инсталляцию. Пошагово эта задача выглядит так:
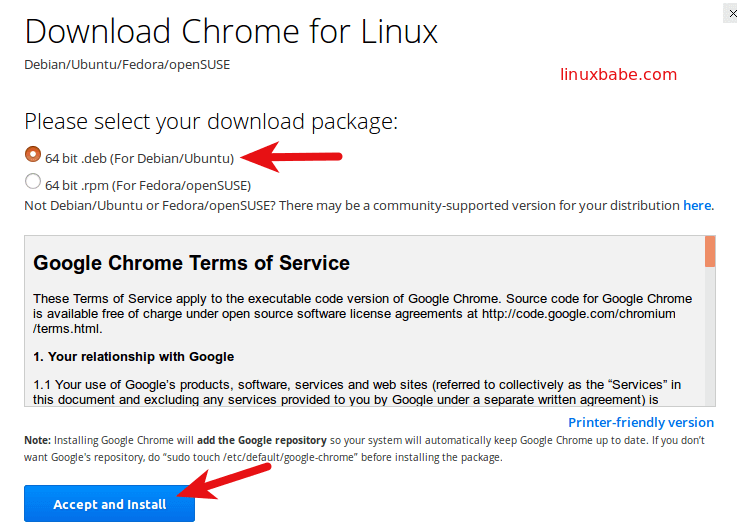
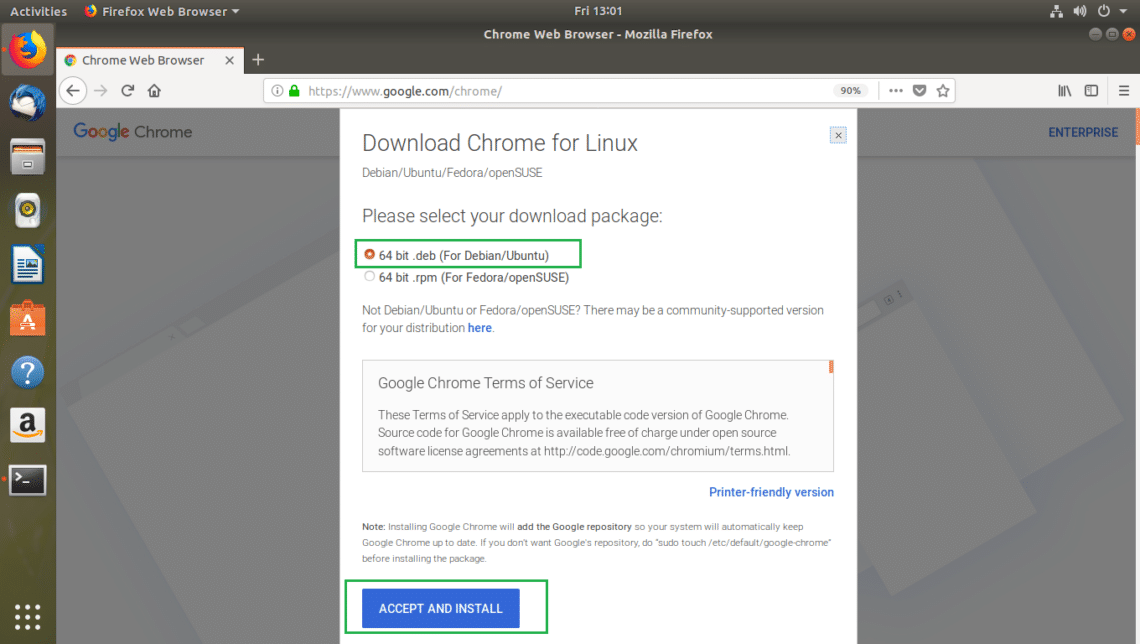
- Перейдите по указанной выше ссылке на страницу загрузки Google Chrome и нажмите на кнопку «Скачать Chrome».
- Выберите формат пакета для загрузки. В скобках указаны подходящие версии операционных систем, поэтому с этим сложностей возникнуть не должно. После этого щелкните на «Принять условия и установить».
- Выберите место для сохранения файла и дождитесь завершения загрузки.
- Теперь вы можете запустить скачанный DEB или RPM-пакет через стандартное средство ОС и кликнуть на кнопку «Установить». По завершении инсталляции запускайте браузер и приступайте к работе с ним.
Детально ознакомиться с методами установки DEB или RPM-пакетов вы можете в других наших статьях, перейдя по указанным ниже ссылкам.
Подробнее: Установка RPM-пакетов / DEB-пакетов в Ubuntu
Способ 2: Терминал
Не всегда у пользователя имеется доступ к браузеру или получается найти подходящий пакет. В таком случае на помощь приходит стандартная консоль, через которую можно загрузить и установить любое приложение на свой дистрибутив, включая рассматриваемый веб-обозреватель.
- Для начала запустите «Терминал» любым удобным образом.
- Загрузите пакет нужного формата из официального сайта, задействовав команду , где .deb, может меняться на , соответственно.
- Введите пароль от своей учетной записи для активации прав суперпользователя. Символы при наборе никогда не отображаются, обязательно учитывайте это.
- Ожидайте завершения загрузки всех необходимых файлов.
- Установите пакет в систему с помощью команды .
Вы могли заметить, что в ссылке содержится только приставка amd64, а это значит, что скачиваемые версии совместимы только с 64-разрядными операционными системами. Такая ситуация сложилась из-за того, что Google перестали выпускать 32-битные версии после сборки 48.0.2564. Если вы хотите получить именно ее, нужно будет проводить немного другие действия:
- Потребуется загрузить все файлы из пользовательского репозитория, а делается это через команду .
- При получении ошибки о неудовлетворении зависимостей пропишите команду и все будет работать нормально.
- Альтернативный вариант — вручную проставьте зависимости через .
- После этого подтвердите добавление новых файлов, выбрав соответствующий вариант ответа.
- Запускается браузер с помощью команды .
- Откроется стартовая страница, с которой начинается взаимодействие с веб-обозревателем.
Инсталляция разных версий Chrome
Отдельно бы хотелось выделить возможность установки разных версий Google Chrome рядом или выбора стабильной, бета или сборки для разработчика. Все действия все так же выполняются через «Терминал».


![How to install google chrome on ubuntu linux [gui & terminal]](https://miggim.ru/wp-content/uploads/f/5/2/f52dc66a5ef95f5cd39301a8bc6dd59c.png)
- Загрузите специальные ключи для библиотек, введя .
- Далее скачайте необходимые файлы с официального сайта — .
- Обновите системные библиотеки — .
- Запустите процесс установки необходимой версии — , где google-chrome-stable может быть заменено на или .
В Гугл Хром уже встроена свежая версия Adobe Flash Player, но не у всех пользователей Linux она работает корректно. Мы предлагаем вам ознакомиться с другой статьей на нашем сайте, где вы найдете детальное руководство по добавлению плагина в саму систему и браузер.
Как видите, приведенные выше способы разные и позволяют выполнить установку Google Chrome в Linux, основываясь на своих предпочтениях и возможностях дистрибутива. Мы настоятельно советуем ознакомиться с каждым вариантом, а потом уже выбрать наиболее подходящий для себя и следовать инструкциям.
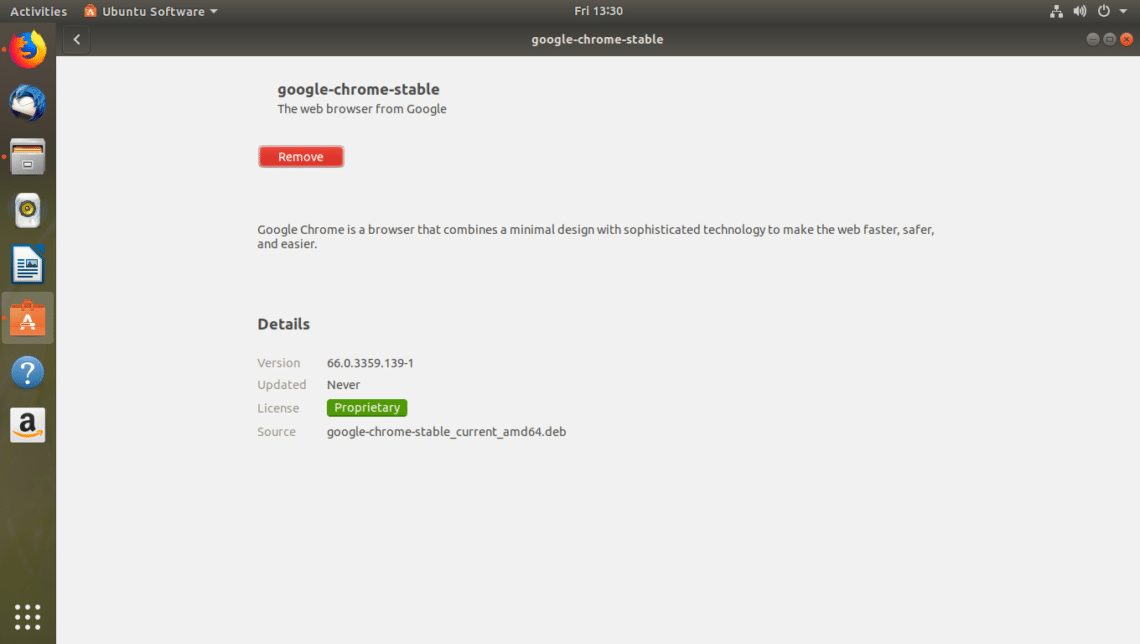
Деинсталляция Google Chrome
- Через командную строку
- Через графический интерфейс
Через командную строку
Чтобы удалить Google Chrome, выполните следующие команды в терминале:
Эта команда удалит установку Chrome
Эта команда удалит пользовательские настройки, например, плагины, которые вы установили для Chrome.
Через графический интерфейс
Чтобы удалить Google Chrome через графический интерфейс Ubuntu, выполните следующие действия:
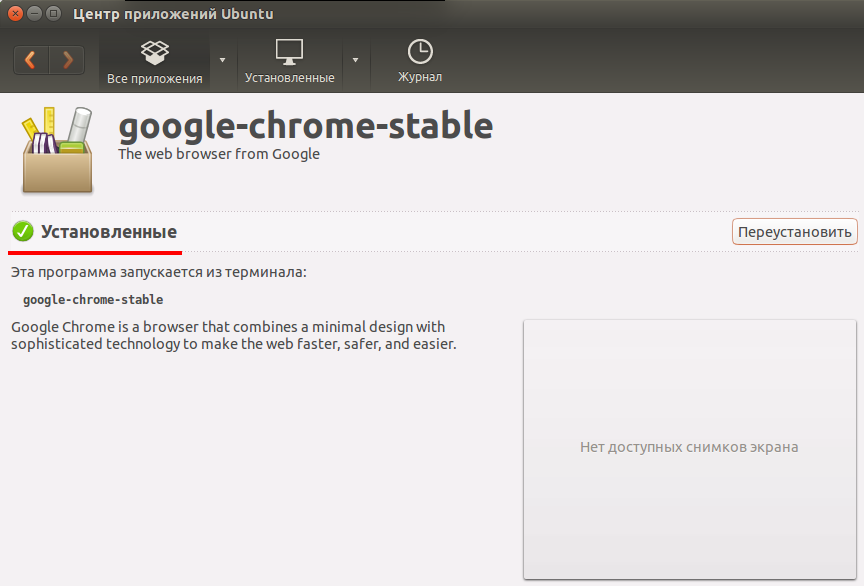
Откройте менеджер пакетов Synaptic из Ubuntu Dash. Установите его через, если он еще не установлен в вашей системе.
Вам будет предложено пройти аутентификацию, так как только суперпользователь может удалить программу на Ubuntu.
Найдите Google Chrome через кнопку поиска следующим образом:
В результатах поиска вы сможете увидеть запись google-chrome-stable, выделенную зеленым цветом.
Выберите google-chrome-stable, щелкните правой кнопкой мыши и выберите в меню пункт Пометить для полного удаления (Mark for Complete Removal).
Google Chrome будет выбран для удаления.
Теперь нажмите кнопку Применить, расположенную вверху.
Появится следующее диалоговое окно:
Нажмите кнопку Применить, чтобы полностью удалить Google Chrome.
Google Chrome будет удален из вашей системы. Теперь, очевидно, нам не нужно, чтобы наша система предоставляла нам обновления для него; выполните следующие шаги, чтобы отключить обновления для Chrome.
Откройте Software and Updates из Ubuntu Dash и перейдите на вкладку Other Software.
Выберите основную запись http://dl.google.com/linux/chrome/deb/stable и нажмите кнопку Удалить.
Укажите пароль для суперпользователя и нажмите кнопку Аутентификация.
Теперь вы удалили Google Chrome из системы и отключили обновления для него.
Мы убедились, что, в конце концов, установить и удалить Google Chrome из Ubuntu не так уж сложно. Достаточно выполнить несколько команд или воспользоваться удобным графическим интерфейсом, чтобы установить программу не из Linux.
Installation Through the Command Line
In order to install Google Chrome through the command line, please follow these steps:
Open the Terminal and enter the following command:
$ wget https://dl.google.com/linux/direct/google-chrome-stable_current_amd64.deb
Tip: You can also copy this command from this tutorial by selecting and copying it through Ctrl+c and then pasting it in the Terminal by right-clicking at the cursor location, and then clicking Paste from the menu.
You will be able to view the installation progress as follows:
Now the installation package is saved on your system in the current directory, i.e. /home/<username>
Enter the following command to install the downloaded package:
$ sudo dpkg –i google-chrome-stable_current_amd64.deb
Note: You need to be a superuser in order to run this command.
Google Chrome should now be installed on your system. You can launch it by following the steps described later in this article.
Note: If you have downloaded the installation package at any other location, you need to specify the entire path in the dpkg command.
Install Google Chrome on Ubuntu 16.04/17.10 the Graphical Way
Go to https://www.google.com/chrome. Click the button.
![]()
Then select the first option (64 bit .deb for Debian/Ubuntu), click Accept and Install.
![]()
When Firefox asks you how to open this deb file, choose the default option to open it in Ubuntu Software (formerly Ubuntu Software Center).
![]()
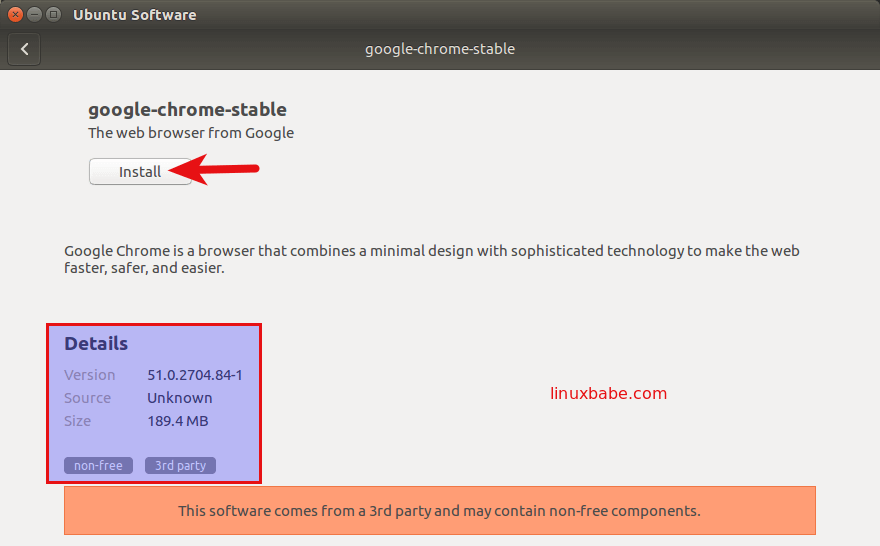
If you choose the first option, Google Chrome deb package will be downloaded to directory. Once the download is complete, Ubuntu Software will automatically open. Click the Install button to install google-chrome-stable to Ubuntu 16.04/17.10. The version and installation size information can be seen in the Details section. 189.4MB of disk space! That’s huge for a Web browser.
![]()
Because software installation on Linux requires root privilege, so you have to enter your password to authenticate.
![]()
Once the installation is complete, you can start Chrome browser in the Unity Dash or by typing the following command in the terminal.
google-chrome-stable
![]()
Installing Google Chrome on Ubuntu Graphically [Method 1]
If you are absolutely new to Ubuntu and Linux, this could be overwhelming for you and I completely understand that. This is why I am going to list each step with proper screenshots here.
![]()
You should keep in mind that Google Chrome is not available for 32-bit operating systems. You should make sure that you are using a 64-bit operating system. Read this article to find out if your system is 32-bit or 64-bit.
You need to have an active internet connection, of course.
Now go to Google Chrome’s website.
You’ll see a download link there. Click on this download button.
![]()
Click on Download Chrome
When you click the download button, it gives two options for downloading files. You have to download the .deb file which is suitable for Ubuntu.
![]()
Download the DEB file
In the next screen, you should opt for saving the file to the computer instead of opening it in software center for installation.
If you don’t do that and there were some issues from the software center, you’ll have to download the deb file again. It’s better to download and save the file itself.
![]()
Save the DEB file on your computer
Your downloaded deb file should be in the Downloads folder. Installing deb files is super easy. Go to this folder and double click on the deb file. You can think of these deb files as those exe files in Windows.
![]()
Double click on the downloaded DEB file
It will then open Ubuntu’s software center and you should see an option for installing Google Chrome now. Hit on the install button.
![]()
Click Install button
Troubleshoot: In Ubuntu 20.04, you’ll have to right click on the deb file and select top open with Software Center.
![]()
Right click on the deb file to select and open with Software Install
It will ask for your password before starting the installation. You should enter your account’s password. It should take less than a minute for completing the Google Chrome installation. You should see a remove option now which indicates that the software is installed.

![]()
Google Chrome installation finished
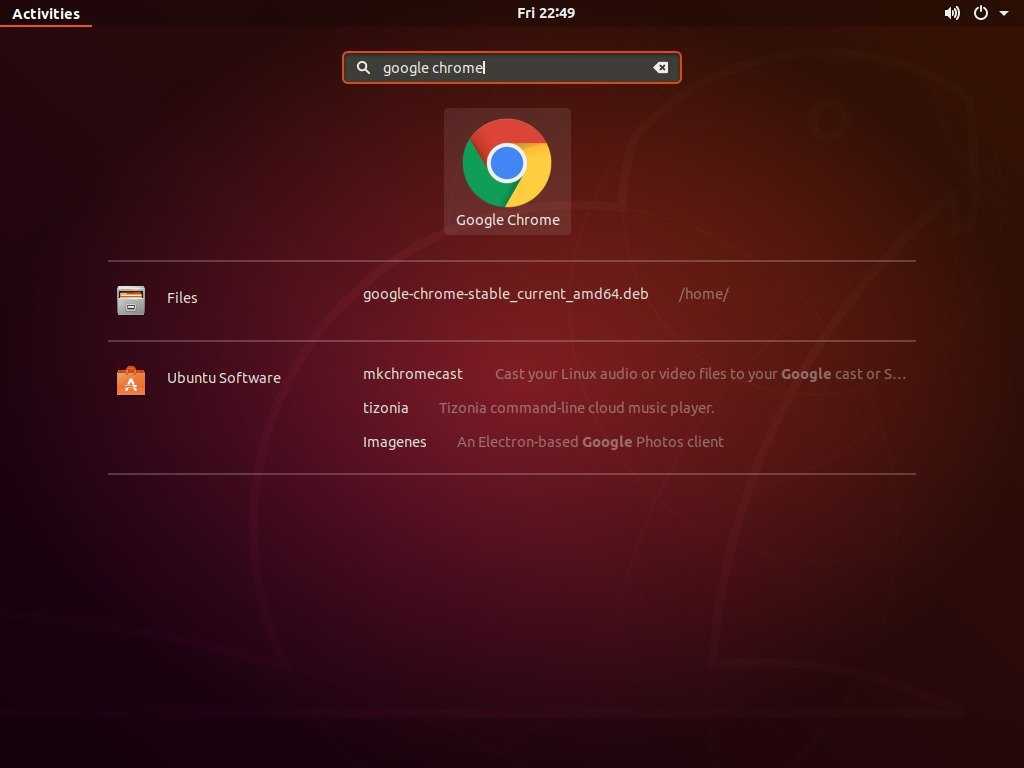
Once you have installed Chrome on Ubuntu, you can search for it in the menu. Simply press the Windows key and start typing chrome. Here are some other Ubuntu shortcuts you should know.
![]()
Search for Chrome in the menu
Click on this Chrome icon to start using Google Chrome.
![]()
Enjoy Google Chrome on Ubuntu
How to Update Google Chrome on Ubuntu
When you installed Chrome the official Google repository was added to your system.
You can check if the repository has been added by running the following command:
cat /etc/apt/sources.list.d/google-chrome.list
The output should be something like this:
Output
### THIS FILE IS AUTOMATICALLY CONFIGURED ###
# You may comment out this entry, but any other modifications may be lost.
deb  https://dl.google.com/linux/chrome/deb/ stable main
To update Google Chrome to the latest version, you can use the following commands.
First update our package index to ensure we have the latest packages available to install.
sudo apt update
Next run the command that will install Google Chrome. Since we updated our package index, the latest version will be installed.
sudo apt install google-chrome-stable
Additional Tips on using Google Chrome on Ubuntu
Here are some additional tips for you to set up google chrome easily and quickly.
Add Google chrome to Favorites in Ubuntu
If you use Google chrome often, then you can add Google Chrome to Favourites for quick access:
1. Start Google Chrome.
2. Right click on chrome icon on the app sidebar.
![]()
3. Click Add to Favourites.
Sync with your Google Account
If you use google chrome on various devices, you can easily sync all your bookmarks, settings, history, plugins and extensions by signing into your Google account from Google Chrome.
This will help you to setup google chrome quickly on Ubuntu.
Reset Google Chrome on Ubuntu
Note: Resetting Chrome will remove all bookmarks, settings, extensions and your browsing history.
If you want to reset the google chrome, you can do so without re-installing chrome on ubuntu.
Just delete the google-chrome config directory using:
If you feel unsafe while deleting the directory, then create a backup of the directory using the mv command:
The above command will move (rename) the “google-chrome” directory to another directory named “google-chrome-bak” in the same location. This will reset the chrome and you’ll also have a backup of your old chrome data.
Updating Google Chrome on Ubuntu
When you install Google Chrome on Ubuntu, the official chrome repository will be added to your /etc/apt/sources.list.d/ directory.
You can verify its contents using:
![]()
Because of this, Google Chrome will be updated along with the system updates provided by Ubuntu via the Software Updater.
Still, if you want to update chrome manually, you can do so using the following command:
Install Google Chrome Stable on Ubuntu Linux (Recommended)
Install System Packages
Google Chrome Browser is a straightforward install, but you may need the following packages to complete the installation. Most of these packages should be installed as they are reasonably standard packages that are highly used on most Linux distributions.
These are pretty generic dependencies that may be already installed. Run the command regardless if unsure, as many other installations require these on your system.
Import Google Chrome GPG Key
The first step in installing Google Chrome is to import the GPG key for the digital signature; without this, your installation will not be complete successfully.
Import the GPG key, use the following command:
Install Google Chrome – Stable
Now update the repository list using the apt update command, which is required as you need to update your APT sources lists so you can install Google Chrome directly from Google’s APT repository.
Next, install the Google Chrome stable edition, the recommended option for most users.
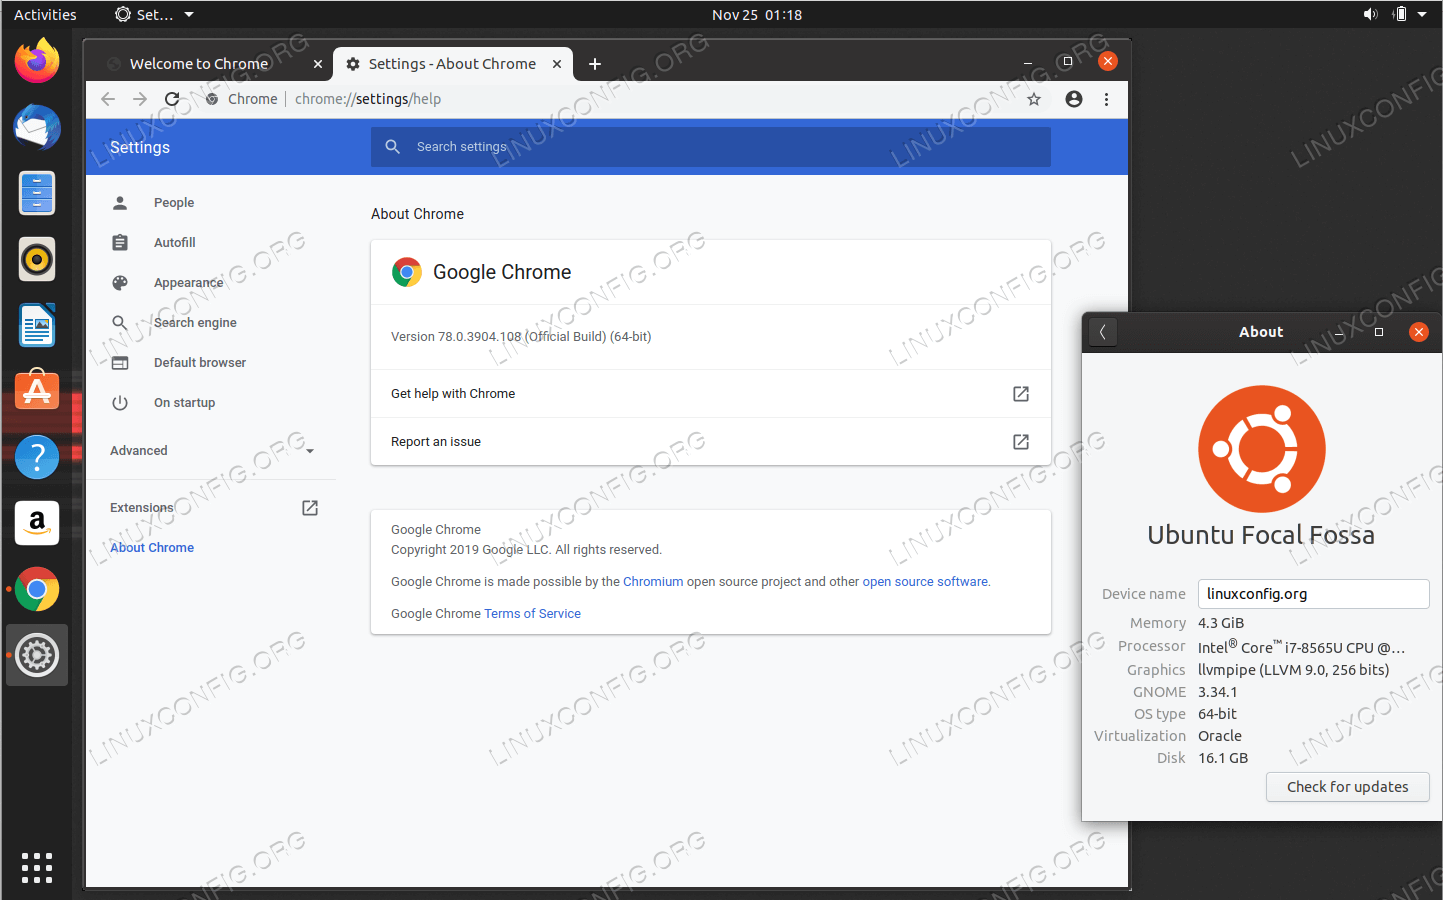
Once installed, verify the version of Google Chrome with the following command:
Example output:
Installing Google Chrome on Ubuntu
Method 1: Installing Google Chrome on Ubuntu using command-line via the Terminal App
Before starting in the installation process, you have to make sure that your system is updated using the following two commands.
sudo apt update
sudo apt upgrade
Step 1. We shall use the wget command to download Chrome from Google servers. Make sure that the wget is already installed using the following command:
wget --version
If the wget is not installed, you can install it:
sudo apt install wget
Step 2. Download the stable version of the Google Chrome browser deb file with the below command.
wget https://dl.google.com/linux/direct/google-chrome-stable_current_amd64.deb
![]()
Download Google Chrome Stable Release on Ubuntu
Step 3. Use the dpkg command to install the downloaded Google Chrome deb file.
sudo dpkg -i google-chrome-stable_current_amd64.deb
![]()
Install Google Chrome Using the DPKG
Step 4. After the Google Chrome installation is complete, you can open it from your terminal as follows:
google-chrome
![]()
Open Google Chrome From Terminal
Step 5. For the first time you launch the Google Chrome browser, you should get a prompt. Choose your favorites and click the Ok button.
![]()
Google Chrome For the First Time
Step 6. Welcome to your Google Chrome browser, you can now login with your Google account.
![]()
Welcome to Google Chrome
Method 2: Installing Google Chrome on Ubuntu Using the Graphical User Interface (GUI)
During this method, we will download and install the Google Chrome browser graphically.
Step 1. From your default web browser which is Firefox on a brand-new Ubuntu installation, launch the Google Chrome website and press the Download Chrome button.
![]()
Open Google Chrome Website
Step 2. Choose your download option then press the Accept and Install button.
![]()
Download Google Chrome Stable Release on Ubuntu GUI Method
Step 3. Save the Google Chrome download file.
![]()
Save Google Chrome Download File
Step 4. After your download is complete, open the downloads directory.
![]()
Press Show All Downloads
Step 6. Now double click on the downloaded Google Chrome file.
![]()
Double Click On the Google Chrome Downloaded File
Step 7. The Ubuntu software center will open, you can click the Install button to start installing the Google Chrome browser.
![Install google chrome on ubuntu [beginner’s tutorial]](https://miggim.ru/wp-content/uploads/e/c/c/ecc1e3a32eaea6a66a1c0d6f40037dcf.jpeg)


![]()
Install Google Chrome from Ubuntu Software Center
Step 8. As you can see, Google Chrome has installed successfully.
![]()
Google Chrome Installed Successfully
Step 9. From the top left of your desktop, click on the Activities tab.
Open The Activities Tab
Step 10. Search for the Google Chrome browser and launch it.
![]()
Open Google Chrome
Step 11. To add Google Chrome to your favorites bar, right-click on the Google Chrome icon, then select the Add to Favorites option.
![]()
Add Google Chrome To Your Favorites
That’s all about installing the Official Google Chrome browser on Ubuntu. I hope you have enjoyed the tutorial.
Install Google Chrome on Ubuntu 18.04 LTS from the Command Line
For those of you who like to practice their command line skills, here is how to install Google Chrome on Ubuntu 18.04 using terminal. Open a terminal window from applications menu.
![]()
Then enter the following command in terminal to create a source list file for Google Chrome browser. Nano is a command line text editor, which allows you to edit text files in the terminal.
sudo nano /etc/apt/sources.list.d/google-chrome.list
![]()
Next, copy the following APT line and paste it into google-chrome.list file.
deb http://dl.google.com/linux/chrome/deb/ stable main
![]()
To save the file in Nano text editor, press Ctrl+O, then press Enter to confirm. Next, press CTRL+X to exit out of this file. After that, run the following command to download Google’s signing key.
wget https://dl.google.com/linux/linux_signing_key.pub
![]()
Then use apt-key to add it to your keyring so the package manager can verify the integrity of Google Chrome deb package.
sudo apt-key add linux_signing_key.pub
Now update package list and install the stable version of Google Chrome.
sudo apt update

sudo apt install google-chrome-stable
If you want to install the beta or unstable version of Google Chrome, use the following commands:
sudo apt install google-chrome-beta

sudo apt install google-chrome-unstable
To start Chrome browser from the command line, run:
google-chrome-stable
Flash plugin is disabled by default and will be eventually removed from Google Chrome browser by 2020.
I hope this tutorial helped you install Google Chrome browser on Ubuntu 18.04 LTS, either from the graphical user interface or using command line. As always, if you found this post useful, then subscribe to our free newsletter to get new tutorials. Take care.
Google Chrome Graphical Installation
This process will tell you how to graphically install Google Chrome on your system. You will be using an already installed web browser to download the installation package. In our case, we will be using FireFox, the default browser for Ubuntu 18.
Download the installation package from the official Google download page.
Click the Download Chrome button.
The following page will open, asking you to choose a package to install.
Since we are installing Chrome for Ubuntu, we will choose the first option. You will also be asked to agree to the terms of services.
Click the Accept and Install button to proceed further if you agree to the terms of services.
The following dialog will open, asking you to either save the package or run it through the Software Install.
We recommend you to save the file and click OK.
The installation package google-chrome-stable_current_amd64.deb will be saved in the Downloads folder.
Open the installation package by double-clicking it from the Downloads folder.
The following dialog will open in the Software application:
Click the Install button.
You will be asked for authentication as only a super user can install a software in Ubuntu.
Enter your password and click Authenticate.
The installation process will now start and you will be able to see the progress in the following dialog:
Google Chrome should now be installed on your system. You can launch it by following the steps described below.