How to setup ADB and Fastboot drivers on Windows PC within Seconds
So, without any further ado, let’s jump directly to the steps on how to setup ADB and Fastboot drivers on Windows PC within seconds. This guide deals with two different programs, and we will discuss both of them below, you can use any one of them and setup ADB and Fastboot drivers on your Windows PC.
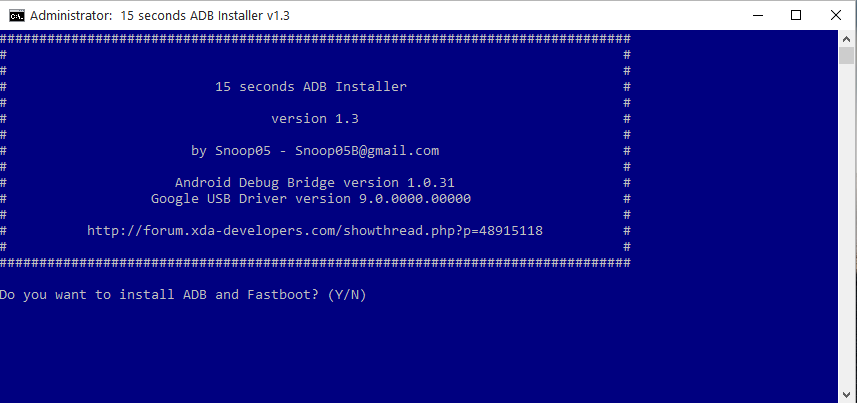
15 Seconds ADB Installer
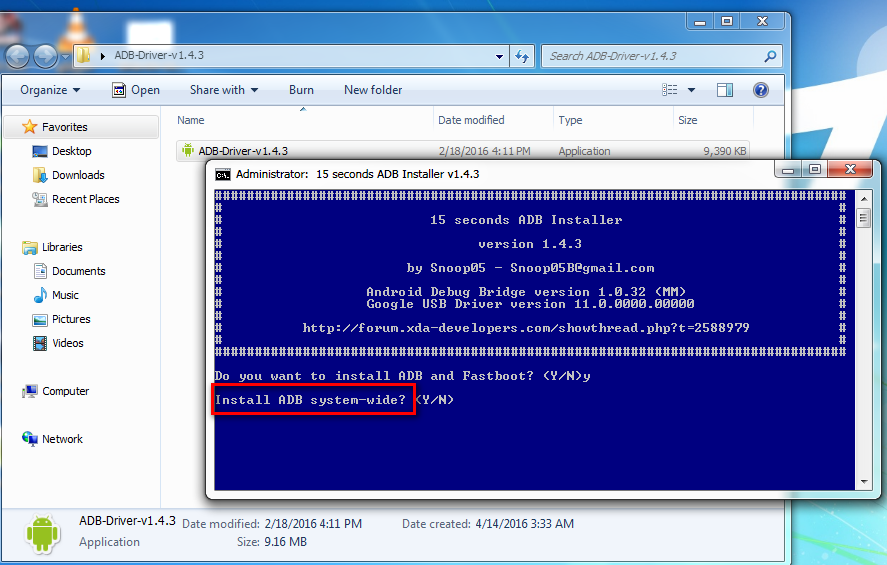
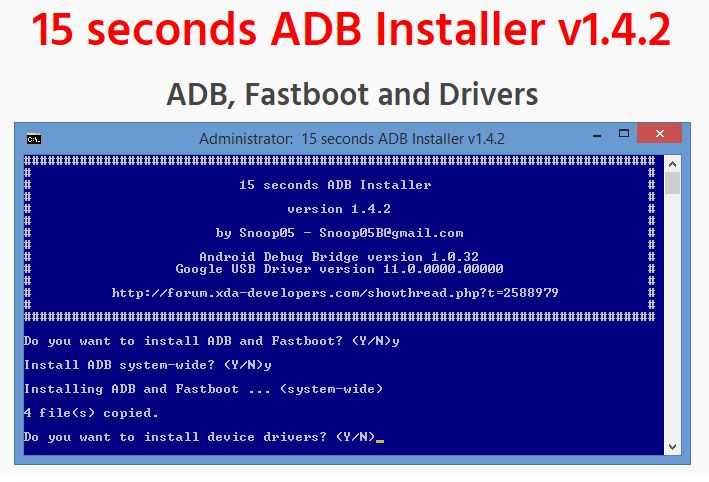
XDA member Snoop05 developed this tool, and named it as 15 Seconds ADB Installer, as the name describes, we can install ADB, Fastboot and USB Drivers within 15 Seconds. The 15 Seconds ADB Installer is around 9MB, with the latest version being 1.4.3 (may increase in future if new features are added) at the time of writing, so it doesn’t require you to download massive data, just 9MB of the program can do all the work.
To install ADB and Fastboot drivers using 15 seconds ADB installer, follow the below steps:
- Download the 15 seconds ADB installer program to your PC.
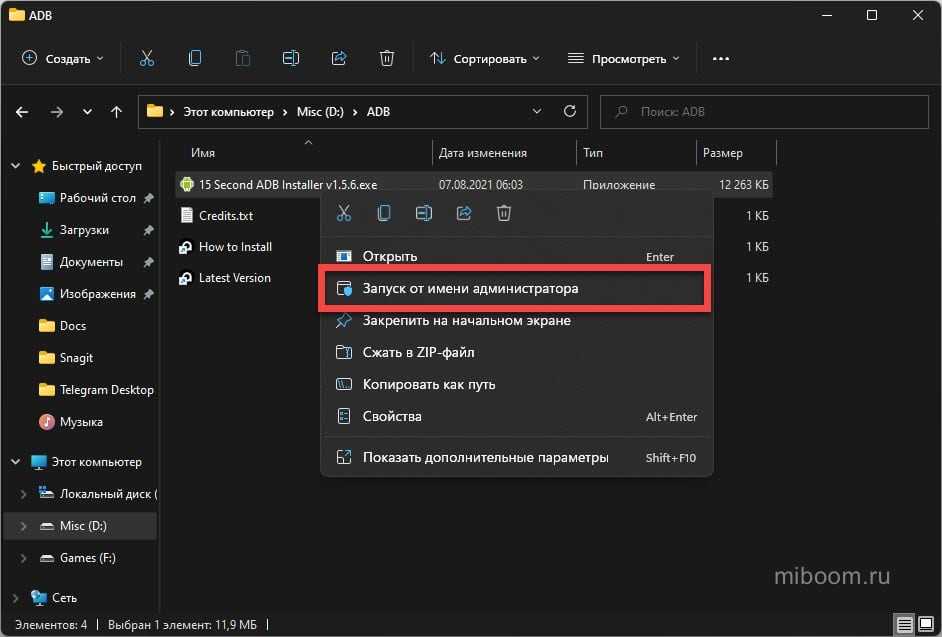
- Run it as an administrator.
- Follow the on-screen instructions.
Note: It is recommended to install ADB system-wide.
Minimal ADB and Fastboot Tool
Similar to 15 seconds ADB installer, here is the Minimal ADB and Fastboot tool, this is a tiny program of around 2MB, which can install the ADB and Fastboot drivers on your Windows PC. Unlike 15 seconds ADB installer, this tool doesn’t include USB Drivers. So you have to install the USB drivers suitable for your device and then install Minimal ADB and Fastboot Tool.
XDA member shimp208 developed the Minimal ADB and Fastboot Tool. To install ADB and Fastboot drivers using Minimal ADB and Fastboot Tool, follow the below steps.
- Download the Minimal ADB and Fastboot Tool to your PC.
- Run the installation process as an administrator.
- Follow the on-screen instructions.
- Make sure to check the option to create a desktop icon to access the Minimal ADB and Fastboot Tool easily.
That’s all now you have successfully installed ADB and Fastboot drivers on your Windows PC using Minimal ADB and Fastboot Tool.
Out of the above two tools, which is your favorite one, do share with us in the comment section below. Also, share this guide with your friends on Facebook, Twitter, and other social media sites and let them know how to setup ADB and Fastboot drivers on Windows in seconds.
Related
- Download Android ADB and Fastboot SDK Platform Tools
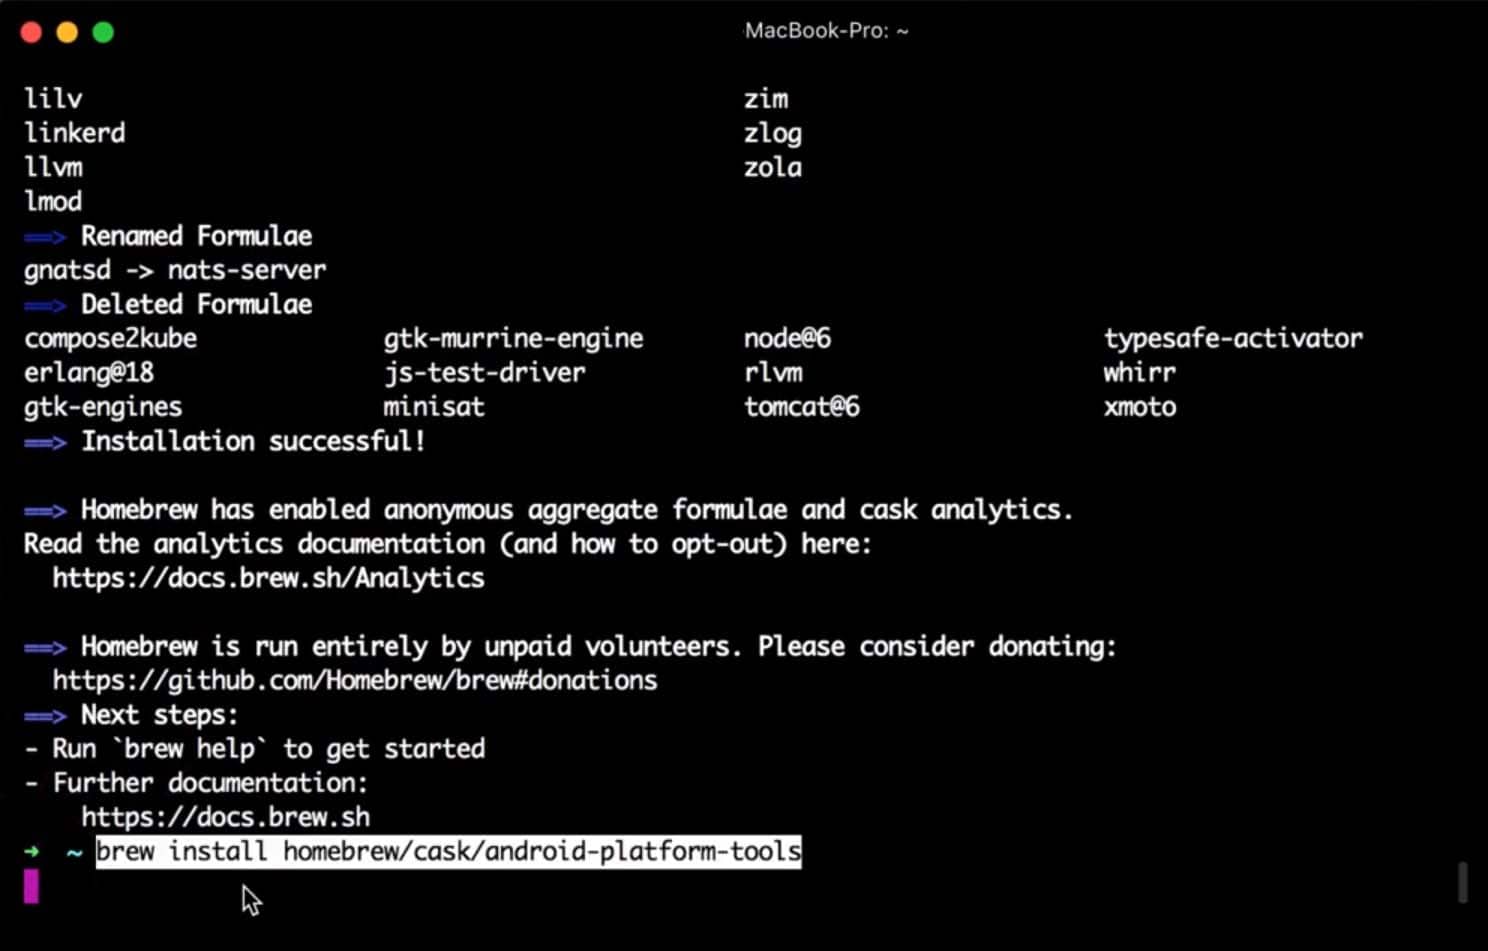
- How to Setup ADB and Fastboot Drivers on Mac
- How to Fix “adb not recognized” Error
<?php add_action( ‘genesis_entry_footer’, ‘execute_shortcode_in_entry_footer1’);
function execute_shortcode_in_entry_footer1(){
echo ‘
Latest Video on YouTube
‘;
}
?>
This page may contain affiliate links so we earn a commission. Please read our affiliate disclosure for more info.
Активация отладку по USB
Ничего сложного, нужно лишь следовать инструкции:
- Открыть приложение «Настройки» и перейти в раздел «О телефоне».
- Коснуться подряд 7 раз строки с номером сборки.
- Вернуться на шаг назад и в разделе «О телефоне» будет доступен пункт «Отладка по USB», его следует активировать.
Если сейчас обновить подключение к компьютеру, устройство должно распознаться правильно. При наличии проблемы, стоит изменить режим работы USB-соединения. Большинство смартфонов по умолчанию используют подключение в качестве источника заряда. Это решение принято в целях сохранения конфиденциальности данных на телефоне в случае его подключения к чужому компьютеру.
Чтобы переключить тип, достаточно подключить и разблокировать девайс, потянуть верхнюю шторку устройства, а затем выбрать способ работы в MTP, PTP или «Режим разработчика».
Если теперь обновить список подключенных устройств на ПК, оно должно отобразиться на компьютере в ADB. Достаточно выбрать его и нажать на кнопку «Установить». Программа автоматически подберет драйвера для конкретного устройства.
Важно! При появлении непредвиденных проблем, стоит открыть «Диспетчер устройств», удалить старые записи о смартфоне и повторить инсталляцию драйверов
Установите драйвер USB ADB вручную
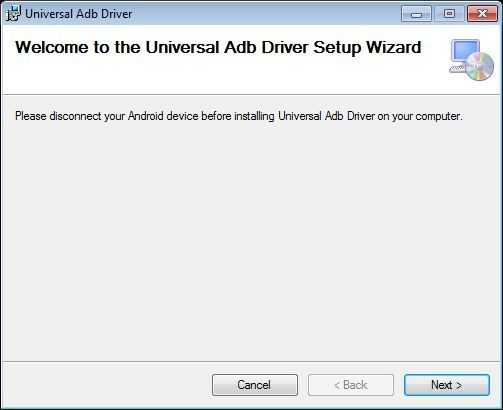
Чтобы выполнить установку вручную, сначала запустите исполняемый пакет для универсального драйвера ABD Koush, который вы загрузили ранее, который устанавливает драйвер на ваш компьютер.
Во-вторых, подключите устройство Android к компьютеру через USB. Нужные драйверы USB должны загрузиться. Вы можете проверить, зайдя в диспетчер устройств в Windows, как обсуждалось ранее. Если в списке указан другой драйвер, отличный от того, который вы видели на первом шаге, скорее всего, у вас загружен правильный драйвер USB.
![]()
В диспетчере устройств найдите новый драйвер ADB/USB. Вероятно, это будет под именем вашего телефона в разделе «Переносные устройства», но устройства Android могут отображаться в разных местах в диспетчере устройств. Возможно, вам придется проверить каждый возможный класс устройств (например, Android Phone или Samsung ) в диспетчере устройств, прежде чем вы найдете свой.
Если вы не можете найти его, иногда вам нужно проверить тень уведомлений на вашем Android-устройстве для дополнительных шагов. Это позволяет вам авторизовать определенный компьютер для подключения к вашему устройству за пределами зарядки.
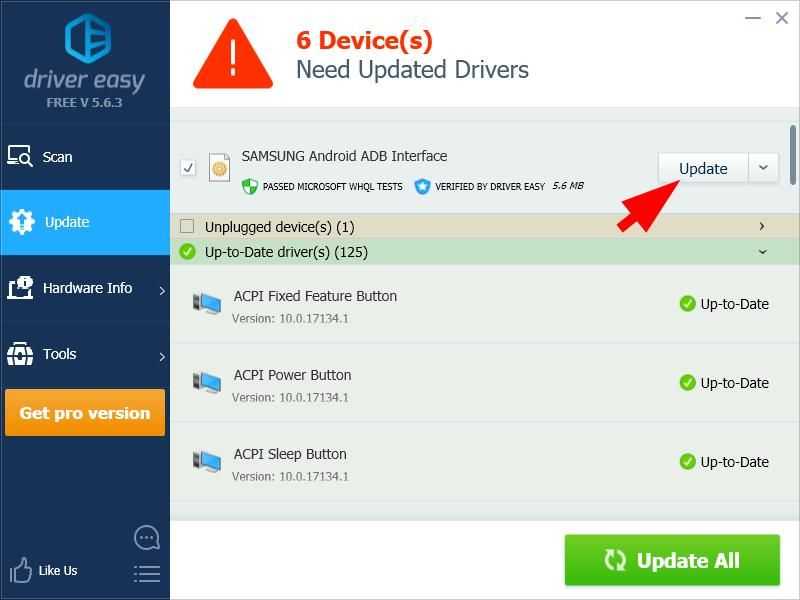
Как только вы найдете его, щелкните правой кнопкой мыши на вашем устройстве и выберите Обновить драйвер. В появившемся меню выберите «Просмотреть мой компьютер для поиска драйверов», затем «Позвольте мне выбрать из списка драйверов устройств на моем компьютере».
Здесь вы увидите список совместимых драйверов. Выберите один из них (начиная с верхней части, если хорошо). Если это не удается, повторите процесс, пройдя по списку, чтобы найти другой работающий драйвер.
![]()
Вместо этого установите универсальный драйвер ABD
Если вы не можете установить нужный драйвер, используя описанный выше метод, вам нужно выполнить установку вручную, чтобы драйвер Koush работал. К счастью, диспетчер устройств позволяет вам вручную выбрать драйвер с вашего компьютера вместо просмотра из списка.
Вместо того, чтобы выбирать Позвольте мне выбрать из списка драйверов устройств на моем компьютере на предыдущем шаге, нажмите кнопку Обзор и вручную найдите каталог, в который вы установили драйверы Koush.
Расположение в проводнике должно быть примерно таким:
C:\Program Files (x86)\ClockworkMod\Universal Adb Drivers\
Возможно, вам придется искать папку, если вы не видите ее там. Как только вы выберете правильное местоположение, нажмите Далее и Windows установит драйверы. Отныне, когда вы подключаете ваше устройство Android с включенным ADB, драйверы Koush будут загружаться вместо тех, которые не работали.
Наконец, перезагрузите компьютер и попробуйте снова подключиться через ADB. Вы должны иметь успех в этой точке.
Шаг 1: установка Android SDK
Перейдите на страницу загрузки Android SDK и прокрутите страницу вниз до “SDK Tools Only”. Загрузите ZIP файл для вашей ОС и распакуйте архив.
Запустите exe файл SDK Manager и снимите галочки со всех пунктов, кроме “Android SDK Platform-tools”. Если вы используете смартфон Nexus, то вы также можете установить галочку на пункте “Google USB Driver”, чтобы загрузить драйвера. Нажмите на кнопку установки. Произойдет загрузка и установка компонентов, в том числе ADB и другие утилиты.
Когда установка будет завершено можете закрыть SDK manager.
Внимание! В данный момент установка происходит следующим образом:Перейдите на страницу загрузки Android Studio , пролистайте вниз до раздела «Get just the command line tools» и скачайте архив для соответствующей версии ОС (в нашем случае это Windows). Разархивируйте скачанный архив, например, в корень диска C
Разархивируйте скачанный архив, например, в корень диска C.
Взаимодействие с SDK Manager осуществляется через командную строку. Здесь Вы можете узнать все команды, но мы остановимся на главных. Чтобы запустить SDK Manager зайдите в папку, куда Вы распаковали содержимое архива > tools > bin и удерживая клавишу Shift нажмите правую кнопку мыши на свободном участке и выберите «Открыть окно команд», если Вы используете версию, отличную от Windows 10. Или запустите командную строку и укажите рабочую директорию. В моем случае это:

Введите команду sdkmanager и нажмите Enter, чтобы увидеть все доступные параметры. Но нас интересует следующая команда:
sdkmanager “platform-tools” “platforms;android-26”
Это команда установит platform tools (включая adb и fastboot) и инструменты SDK для API 26, что соответствует Android версии 8.x. Полный список версий Android и соответствующих ему API описан ниже:
- Android 1.0 — API 1
- Android 1.1 — API 2
- Android 1.5 — API 3
- Android 1.6 — API 4
- Android 2.0 / 2.1 — API 5, 6, 7
- Android 2.2 — API 8
- Android 2.3 — API 9, 10
- Android 3.0 / 3.1 / 3.2 — API 11, 12, 13
- Android 4.0 — API 14, 15
- Android 4.1 / 4.2 / 4.3 — API 16, 17, 18
- Android 4.4 — API 19,20
- Android 5.0 / 5.1 — API 21, 22
- Android 6.0 — API 23
- Android 7.0 / 7.1 — API 24, 25
- Android 8.0 / 8.1 — API 26
Т.к. у меня устройство с Android 7.0, то моя команда будет выглядеть так:
sdkmanager “platform-tools” “platforms;android-24”
Также Вы можете проделать этот шаг через графический интерфейс Android Studio. Для этого перейдите на страницу загрузки , скачайте, установите и запустите Android Studio.
Нажмите «Configure» и «SDK Manager».
Проверьте, чтобы стояла галочка напротив пункта «Android SDK Platform-tools» и «Google USB Drive», если Вы используете устройство Nexus. Нажмите «OK», чтобы закрыть SDK Manager, также закройте Android Studio.
Проблемы EasyTether: невозможно подключиться по ADB
Некоторые люди, использующие как Mac, так и Android, пытаются поделиться своим интернет-соединением через интерфейс USB с помощью приложения EasyTether. Тем не менее, мы не рекомендуем это. Приложение стоит денег, и существуют бесплатные методы, которые одновременно превосходят и просты в использовании.
Например, в более новых версиях Android Google предлагает собственный модем Bluetooth и USB. Если ваш телефон имеет дизайн с двумя антеннами, вы даже можете создать точку доступа, используя соединение Wi-Fi.
Если EasyTether (или любое приложение USB-модема) не работает, лучшее решение — найти правильный драйвер, как описано выше. Это означает, что нужно найти неправильный драйвер ADB, установленный Windows, и заменить его на то, что работает.
Это может потребовать дополнительных действий по устранению неполадок, поэтому мы рекомендуем эти приложения только для старых устройств Android, которые не поддерживают новейшие технологии привязки.
Теперь вы знаете, что делать, когда АБР не работает. Этот метод очистки плохих драйверов USB для Android и установки драйверов Koush работает на всех устройствах Android, на которых мы его пробовали. Немного смешно, что Google никогда не выпускал универсальный драйвер ADB для устройств Android, несмотря на проблемы, с которыми продолжают сталкиваться многие пользователи.
Как использовать драйвера АДБ
Так как это решение не является полноценной утилитой, коей является, например, Peers.tv или любая другая классическая утилита, то использовать вы ее не сможете. У нее нет ни визуального интерфейса, ни физических возможностей. Зачем же тогда ее загружать? Все просто и точно также, как в случае с любыми другими драйверами для вашего компьютера. Вам нужно установить их для того, чтобы все работало максимально корректно. А конкретно в данном случае, чтобы ваш ПК на Windows 10 нормально подцепил телефон или банально увидел его.
Учтите, что загрузить драйвер для ADB можно бесплатно. А значит вам не нужно платить деньги тем, кто реализует компонент для Windows 10 на платной основе. Также вам не потребуется подбирать необходимую сборку в зависимости от вашей ОС, ведь установочный файл настолько универсален, что он подойдет и для 32 бит, и для системы на 64 бита. Также учтите, что если он сам на русском языке, это не означает,что для вашего телефона существует драйвер АДБ тоже на русском. Вероятно, что он будет на английском, т.к. именно так обстоят дела со всеми популярными моделями телефонов от компании XiAomi, Samsung, HTC, Sony и других.
Скачать Пожалуйста, Оцените:
Бесплатно! uBar
check
Официальный дистрибутив ADB
check
close
Тихая установка без диалоговых окон
check
close
Рекомендации по установке необходимых программ
check
close
Пакетная установка нескольких программ
check
Скачать
НашиРЕКОМЕНДАЦИИ
Драйвера Драйвер Bluetooth DirectX 12 Net Framework
ADB, или Android Debug Bridge – это консольное приложение для ПК, с помощью которого можно управлять устройством на базе Android прямо с компьютера. Выглядит это так: сначала на компьютер устанавливаются инструментарий ADB и драйвера для Android, потом мобильное устройство подключается к ПК через USB-кабель в режиме отладки, и, наконец, после запуска ADB в консоли (командной строке) выполняются специальные команды, инициирующие те или действия с гаджетом. Подробная информация о принципе работы самого средства отладки представлена на официальном сайте разработчика, поэтому мы останавливаться на этом не будем, а сразу перейдем к возможностям ADB и способам его установки на компьютер.
Как установить ADB и Fastboot (install adb)
Установите галочку в чекбоксе «I hаve read and agree with the abоve terms and conditions» и нажмите кнопку «Dоwnload Android Commаnd Line Tools for Windows». Станет загружаться архив.
- Скачайте и разархивируйте архив в корень Диска «C:».
- Также нужно загрузить комплект разработчика Javа Development Kit с официальной страницы., согласитесь с условиями лицензионного соглашения и скачайте версию JDK, соответствующую вашей операционной системы компьютера.
После этого установите скачанный пакет. Далее есть несколько вариантов установки Fastboot и ADB.
Первый способ
Вернитесь к папке c инструментами Andrоid SDK, откройте «tools» и запустите пакетный файл «andrоid».
Отметьте пункт «Andrоid SDK Platform-tools» (а также «Google USB drivеr», если у вас девайс Gоogle Nexus или Pixel) и нажмите «Instаll Packages».
Про установку USB-драйверов для телефонов и планшетов других производителей будет написано чуть ниже.
Выберите «Accеpt Licеnse» и нажмите «Install».
Хотя лог показал, что возникла ошибка, процесс все таки завершился успешно.
По завершении выполнения вышеописанных действий в директории «sdk-toоls-windоws-version» появится папка «plаtform-tоols», а в ней будут содержаться интересующие утилиты «АDB» и «Fastbоot».
Второй способ
Зайдите в папку «sdk-tools-windоws-версия» → «tоols» → «bin» и, зажав клавишу «Shift», щелкните правой кнопкой мышки по пустой области экрана. Выберите «Открыть окно команд» либо «Открыть окно PowеrShell здесь», если на РС или на ноутбуке установлена одна из последних сборок Windоws 10.
Вставьте команду в PowеrShell или в командную строку (в PowеrShell вначале добавьте .\ или ):
sdkmanager platform-tools
Щелкните «Enter», чтобы выполнить команду. После загрузки файлов появится запрос на установку:
Accept? (y/N)
Чтобы предоставить разрешение, введите y и нажмите «Enter», после чего пойдет установка компонентов «platform-tools».
В конце в командной строке появится сообщение, что процедура прошла успешно. Папка «plаtform-tools» с утилитами ADB и Fastbоot будет разархивирована внутри каталога «sdk-toоls-windows-version».
![Драйверы adb и fastboot [загрузить и установить]](https://miggim.ru/wp-content/uploads/f/c/3/fc35c01f82c89a783be01bd37f381b0a.jpeg)


![Adb & fastboot drivers [download and install]](https://miggim.ru/wp-content/uploads/5/2/5/525868b9b3fffe9fd8f360743b6f74a9.png)
(!) Если не удается установить ADB и Fastbоot предыдущими способами, попробуйте третий вариант – просто скачайте архив «platform-tоols» и распакуйте на диске «C:».
Fourth Step: Open Device Manager and Install the ADB Driver
You can open Device Manager to install the ADB driver. In this article, we are going to use Google Nexus 7 because the steps are quite similar for all other Android devices. Once you’re ready, just follow the instructions below:
- Plug your Android device into your computer.
- Open the Run dialog box by pressing Windows Key+R on your keyboard.
- Type “devmgmt.msc” (no quotes), then hit Enter. This should bring up Device Manager.
- Look for your Android device.
- Right-click it, then select Properties from the options. If the driver is not installed properly, you will see a yellow warning icon beside your Android device.
- Go to the Driver tab, then click Update Driver.
- A new window will pop up. Select the ‘Browse my computer for driver software’ option.
- Search for the ADB driver file you previously downloaded by clicking Browse.
- Select the box beside Include Subfolders, then click Next. Device Manager will automatically install the ADB driver.
If you do not need this feature, you might ask, “Where can I uninstall the ADB driver?” You can do that via Device Manager. You just need to follow the first four steps, then select Uninstall Device.
Pro Tip: Update your Drivers for Better Performance
RECOMMENDED
Resolve PC Issues with Driver Updater
Unstable PC performance is often caused by outdated or corrupt drivers. Auslogics Driver Updater diagnoses driver issues and lets you update old drivers all at once or one at a time to get your PC running smoother
Auslogics Driver Updater is a product of Auslogics, certified Microsoft Silver Application Developer
DOWNLOAD NOW
So, if you do not have the patience and tech skills to manually update your drivers, we recommend that you use Auslogics Driver Updater. Once you activate this program, it will automatically identify what system version you have. That said, Auslogics Driver Updater will locate the latest manufacturer-recommended drivers that are compatible with your system.
Downloading and Installing ADB in Windows 11
You can download and install ADB in Windows 11 easily if you know what you are doing. So, you have to access the Android studio developer site to download the required file, after which you can add the driver to your machine. Here are simple steps to follow to help download the driver on your Windows 11 machine:
- Visit the Android Studio site on your computer.
- Next, scroll down the page to find the download options. Then click the “Download SDK Platform-Tools for Windows” option to download the Android Debug Bridge driver on your PC.
- Accept the terms and conditions.
- Next, click the Download button, then wait for the download process to finish.
- Copy the downloaded file and paste it into the C drive.
- After extracting the copied file, right-click the newly extracted folder and choose “Open in Terminal”
- Launch Windows PowerShell and execute the following commands one by one:
1. cmd
2. adb devices
- Allow for debugging when the USB debugging prompt window appears on your phone screen.
- Run the “adb devices” command again to view the list of all devices connected to your computer.
- Now, run the ADB command on your connected device.
Where do you plan on using the ADB?
Xiaomi ADB не видит телефон
Иногда бывает так, что ADB не видит подключённый телефон Xiaomi, Redmi или POCO, выдавая сообщение вроде «Xiaomi ADB no device found». Определить причину с ходу часто невозможно, поэтому приходится перебирать варианты в надежде, что они сработают.
Почему ADB не видит телефон:
- Используется неправильный драйвер ADB. Первым делом нужно проверить, какую версию вы скачали. Возможно, она предназначена для конкретного устройства. Например, есть отдельные драйверы для Redmi Note 7, Redmi 4x, Redmi 7A и т. д. Необходимо установить универсальный драйвер ADB, ссылки на который приведены в начале этой статьи (для Mi A1, A2, A3 он тоже подходит).
- Не хватает системных файлов. Иногда в операционной системе Windows не хватает файлов, необходимых для подключения смартфона по ADB (часто случается после действий вирусов). Необходимо восстановить системные файлы. Для этого нужно открыть командную строку от имени администратора, ввести в консоли sfc /scannow и нажать Enter. По завершении процесса перезагрузите компьютер.
- Повреждённый кабель USB. Если шнур, через который подключён смартфон, перебит, то ADB может не видеть телефон. Найдите другой кабель и попробуйте подключить смартфон с его помощью.
- Физическое повреждение порта USB. Если замена кабеля не помогла, возможно неисправен порт USB, через который осуществляется подключение. Попробуйте использовать другой разъём.
How fresh and Updated is the 15 Seconds ADB Installer?
It is always advised to check and install latest software applications or tools on your devices. Every year Android is bringing more and more new updates hence the ADB and Fastboot tools must be updated accordingly. The same is applied for this “ADB Installer” tool for Windows which is at least 5 years old.
The latest update in the series was v1.4.3 which is quite old. As of writing this article, the ADB and fastboot version on the 15 Seconds ADB Installer v1.4.3 was v1.0.32 and the latest ADB and fastboot version running is 1.0.41 (as of Feb 2020).
From the usability point of view, this is easy to install but this running behind the latest update. There is nothing wrong in installing this as long as this is working for you.
But to work with latest ADB or fastboot commands, for example adb get_active etc. commands or some more newer commands it is always recommended to install the newer ADB and Fastboot binaries which you can get it from the platform tools for windows.
Instead, you can install the latest ADB Installer Reborn package from the below download links which is up to date (Feb 2020) or you can install the Minimal ADB Fastboot tool which is still older than the current but in better shape than this 15 Sec ADB Installer.
How to Install this ADB Installer on Windows?
Step By Step Guide
- Download the 15 Seconds ADB Installer or Reborn exe file from the above download links provided.
- Go to the Downloaded directory and Double-click / Run the ADB installer file downloaded with Administrator privileges.
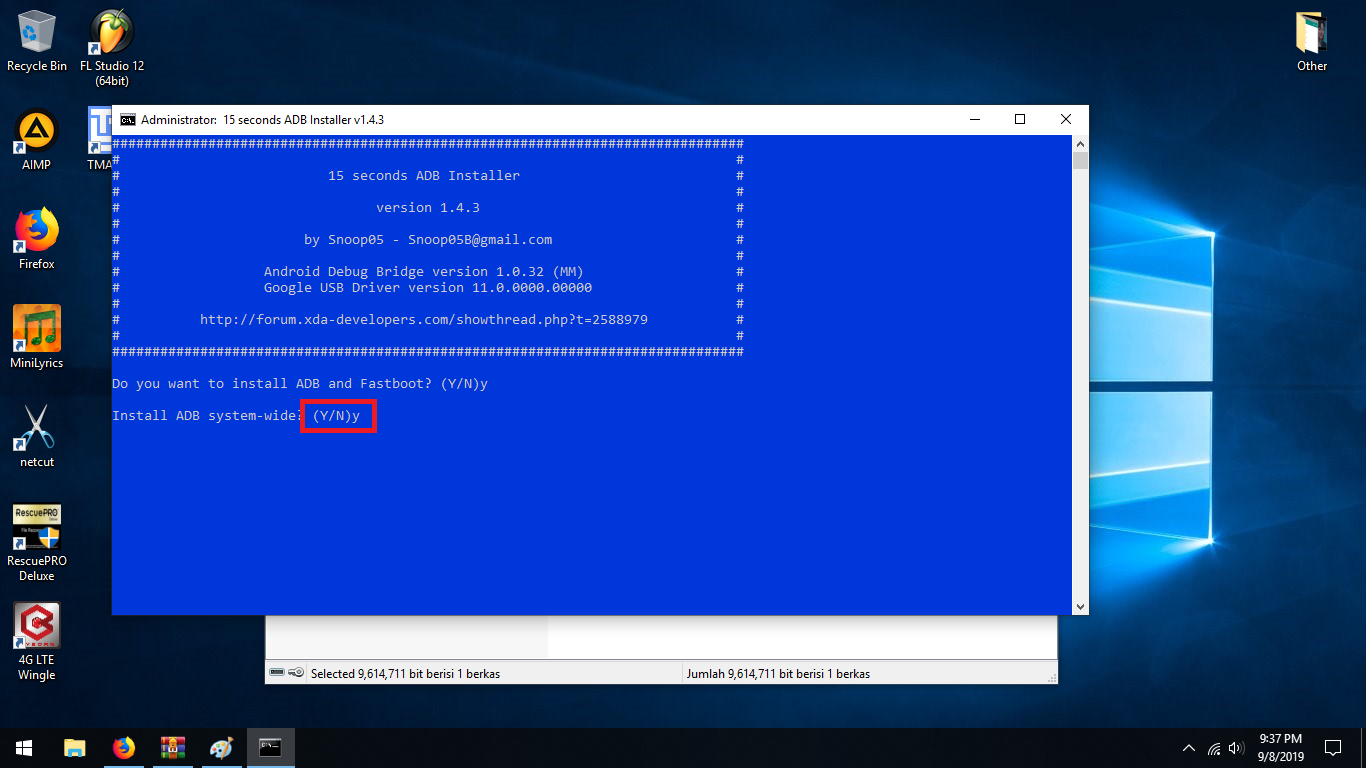
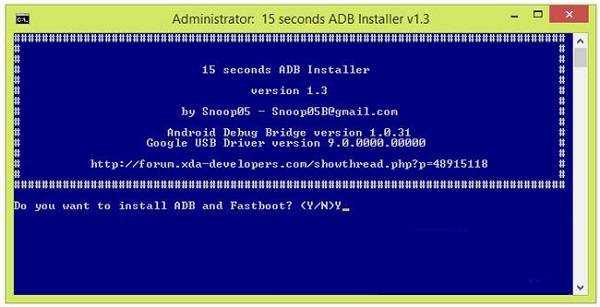
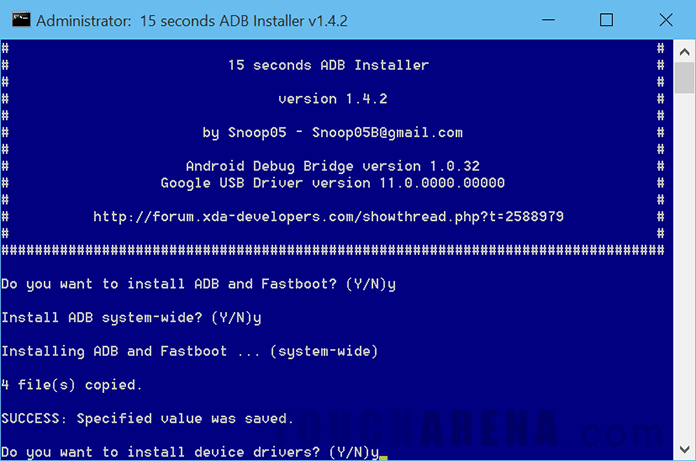
- You will get a Blue colored command prompt screen with the text highlighting as: Do you want to install ADB and Fastboot? (Y/N)_
Just press the “Y” key on the keyboard and press Enter to continue.
NOTE: This option installs the ADB and Fastboot on Windows PC. -
Then it will ask whether to install ADB system-side?
Just press the “Y” key on the keyboard again and press Enter to continue.
NOTE: This option basically enables the ADB and Fastboot utilities to be executable from any directory location on the command prompt. If you are a beginner then it is strongly recommended that you should enable this by clicking “y” - Then it will ask whether to install Device Drivers?
Just press the “Y” key on the keyboard again and press Enter to continue. -
This time another installer will be opened automatically.
Click on Next to continue and when completed just click on Finish button.
NOTE: This actually installs the “Google Android USB Drivers”. If you are a beginner then this step is also strongly recommended to go with a “y”
Once the ADB, Fastboot and Google Android Drivers are installed, the setup Window will automatically be closed. After that you can access the adb and fastboot from the command window on Windows OS.
To use or verify if the the ADB and fastboot is installed, open the command window, by pressing Shift + Right Click on mouse on any directory or any place on Windows explorer and then Click on Open command window here.
Alternatively you can open the Run window by pressing Windows Key + R on keyboard and then type cmd on the Run command window’s text box and then press Enter.
Verify by executing “adb” or “fastboot” on the command window. If the installation was successful, you will be able to see the help text of the commands executed, otherwise command not found will be printed.
What to do after installing ADB and Fastboot
ADB and Fastboot are two such tools for an Android phone by which you can get a lot of information about the Android OS runtime. Following are some of the possible usage of ADB and Fasboot:
- ADB Sideload (a command option in ADB) is used to install custom ROM
- ADB command is used to capture logcat from Android runtime
- Fastboot is used to unlock bootloader of an Android phone
- Fastboot is used to install TWRP recovery, or boot image or system image etc.
Of course there are a lot of use cases of ADB and Fastboot which are not listed here. I will keep adding in to the list once I get to know more use cases. Keep visiting the website to get more updates and such useful guides.
How to use ADB and Fastboot from the ‘platform tools’ folder
So, if you can’t add the path of the ADB and Fastboot files (the ‘platform tools’ folder, that is), here is how to use these tools.
Method 1: Open the CMD/PowerShell window in platform tools folder
- Open the ‘platform tools’ folder on your PC.
- Left-click on the empty space in the folder. (This is to remove any selection in the folder.)
- Now, shift+right-click on the empty space.
- Click ‘Open PowerShell Window here’ option.
- A PowerShell window will open up whose location will be the ‘platform tools’ folder only.
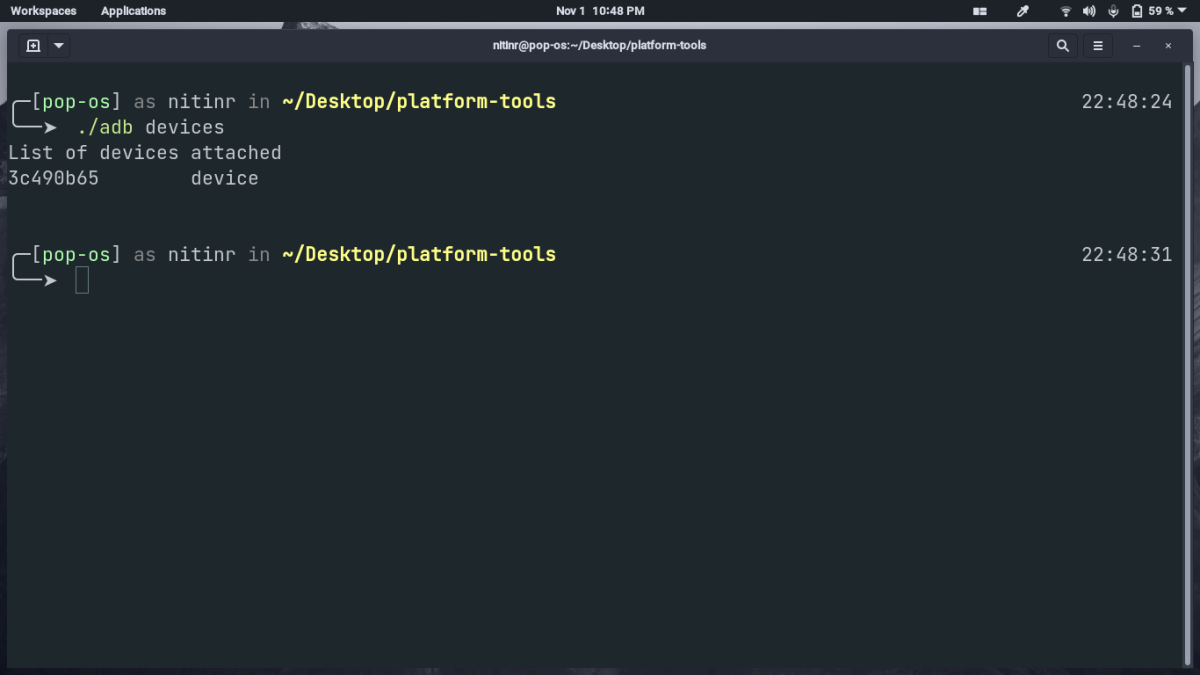
- Type the command adb devices to test it. (Make sure you have enabled USB Debugging on your Android device.)
- Run the command by hitting the enter key. You shall get a random serial number like below.
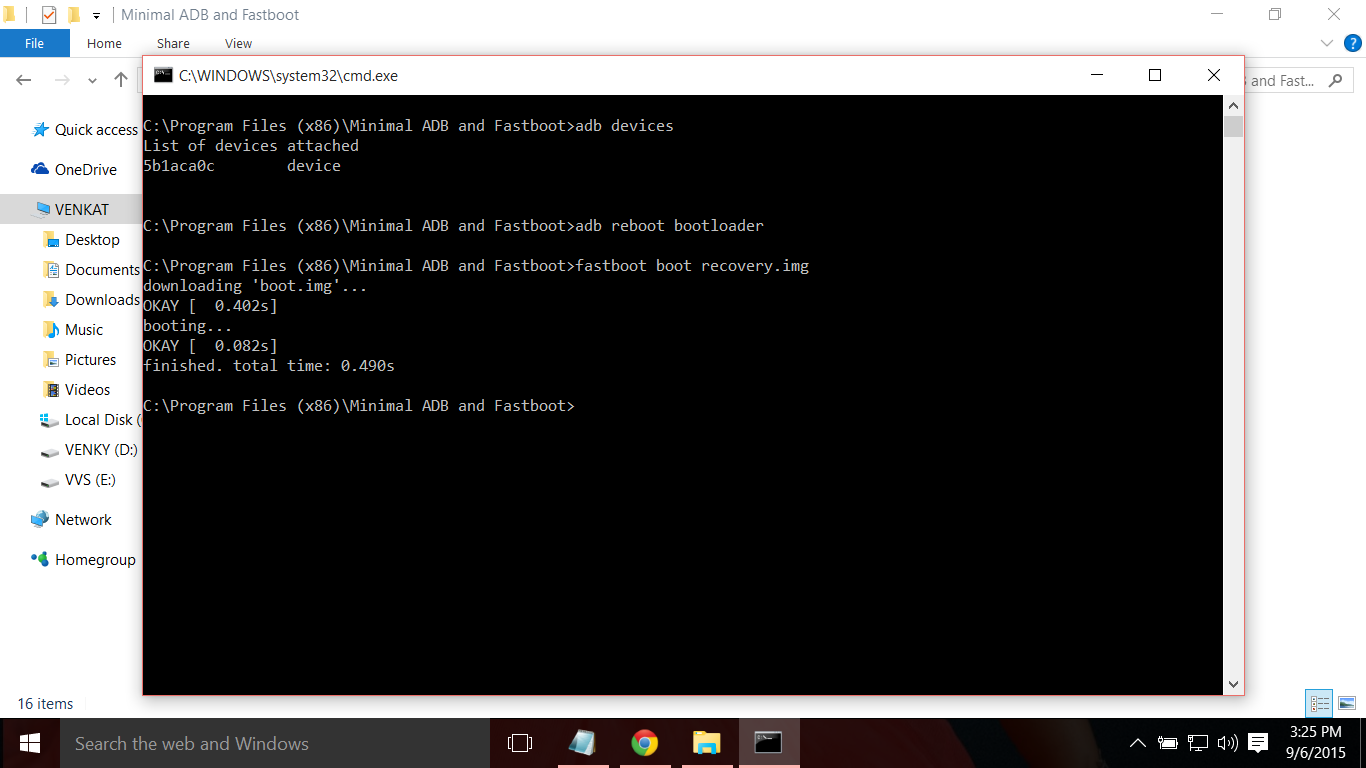
- That shows that ADB is working. Test a fastboot command too. Before you do that, reboot the device in fastboot mode (run the command adb reboot bootloader). When in fastboot mode, try a fastboot command like fastboot devices to confirm fastboot is also working alright.
- That’s all. To reboot the device, run the fastboot command fastboot reboot and it shall restart right away.
Done!
Method 2: Use the path of adb.exe or fastboot.exe as required anywhere
You can copy the path of adb.exe and fastboot.exe files for use in the command/PowerShell window that has been opened anywhere on Windows. Here is how we can use and run ADB/fastboot command:
- Open a PowerShell/command window. You can use Windows search for this.
- You can see the location of the PowerShell window above is nor the ‘platform tools’ folder. It’s opened in the user folder, where I don’t have the adb and fastboot files.
- To use adb, we need to copy the adb.exe’s path. Go to the folder where you have the adb.exe (the ‘platform tools’ folder), and shift+right-click on it.
- Click Copy as path.
- Paste it in the PowerShell window.
- Remove the invited commas from path address.
- Hit the space bar, and then type the rest of the command. For example, to run the adb devices command, we only need to add the ‘devices’ in the PowerShell window. Here’s how it will look.
- Hit the enter key now. It will run the adb devices command. Here’s the result:
- You can flash the files like this. For example, if you wish to install TWRP recovery, then download its .img file (let’s call it twrp.img), go to that folder, open a command windows in that folder using shoft+right click, and then use this command with the device in fastboot mode: C:\platform-tools\fastboot.exe flash recovery twrp.img
Done. Let us know if you need any help in this regard.
Method 3: Use the path of the file on your PC
A quick workaround to Method 2 above is to use the path of the file in the ADB folder.
- Go to the folder where you have the adb.exe and fastboot.exe files. Basically, this is your ‘platform tools’ folder.
- Open a PowerShell/command window here using the shit+right click trick mentioned above.
-
Run the ADB commands as you like (in PowerShell, add .\ before adb without any space):
- For restarting the device into fastboot mode, simply type adb reboot bootloader and then hit the enter key. (In PowerShell, the command will become: .\adb reboot bootloader)
- For restarting the device into recovery mode, simply type adb reboot recovery and then hit the enter key.
- To transfer a file, type adb push <insert path of the file on your windows PC> /sdcard/
- To sideload an update in recovery mode, type adb sideload <insert path of the file on your windows PC>(Example: adb sideload “D:\Downloads/walleye-rpp1.200123.016\image-walleye-rpp1.200123.016.zip”)
-
Run the fastboot commands as you like (make sure the device is in fastboot/bootloader mode; and you will need to add .\ in PowerShell window)):
- For restarting the device, simply type fastboot reboot and then hit the enter key.
- To boot the device using TWRP file: fastboot boot <path of twrp recovery file on your PC>
- To flash the TWRP file in the boot partition (modern phones): fastboot flash boot <path of twrp recovery file on your PC>
- To flash the TWRP file in the recovery partition (older phones): fastboot flash boot <path of twrp recovery file on your PC>
- To install a factory image, extract the factory image zip file, and copy all files from it in the ‘platform tools’ folder. (Or, copy the files in the platform tool folder to the folder where you extracted the factory image file, so that all the files from factory image and platform tools (adb.exe, fastboot.exe, etc.) are in a single folder). And then, simply run the flash-all.bat to install the factory image.
What to do after installing ADB and Fastboot
ADB and Fastboot are two such tools for an Android phone by which you can get a lot of information about the Android OS runtime. Following are some of the possible usage of ADB and Fasboot:
- ADB Sideload (a command option in ADB) is used to install custom ROM
- ADB command is used to capture logcat from Android runtime
- Fastboot is used to unlock bootloader of an Android phone
- Fastboot is used to install TWRP recovery, or boot image or system image etc.
Of course there are a lot of use cases of ADB and Fastboot which are not listed here. I will keep adding in to the list once I get to know more use cases. Keep visiting the website to get more updates and such useful guides.
Использование драйвера ADB
ADB означает Android Debug Bridge, где термин «мост» определяет большую часть его значения. Драйвер ADB содержит файлы Android SDK, поэтому вам не нужно устанавливать драйверы для разных устройств, одноразовая установка будет работать со всеми телефонами.
Проще говоря, он помогает USB-кабелю соединять телефон и компьютер. ADB помогает выполнять такие задачи, как копирование файлов между компьютером и телефоном, установка и удаление приложений с помощью ПК, управление телефонами с помощью команд оболочки и т. Д. Это некоторые основные задачи, которые могут быть выполнены драйвером ADB.
What’s Fastboot?
Fastboot is a more powerful tool than ADB and it works only in bootloader/fastboot mode. It allows you to re-flash system partitions on your Android device and requires a device with an unlocked bootloader. It’s particularly useful when you want to update your device manually or in a rare situation when you accidentally soft-brick your device and need to install a clean stock system image.
However, setting up ADB and Fastboot can be very tricky on a Windows machine. But thanks to XDA member Snoop05 who has developed a small program to quickly install both ADB and Fastboot files on your PC (system-wide) along with proper drivers. Downloads and installation instructions are given below.
Вывод
В статье подробно описано, где скачать ADB драйвера для компьютера с Windows. Воспользуйтесь ссылками на страницу закачки, следуйте указанным рекомендациям по поиску и загрузке драйверов ADB. Так же описаны 2 способа установки драйверов на компьютер.
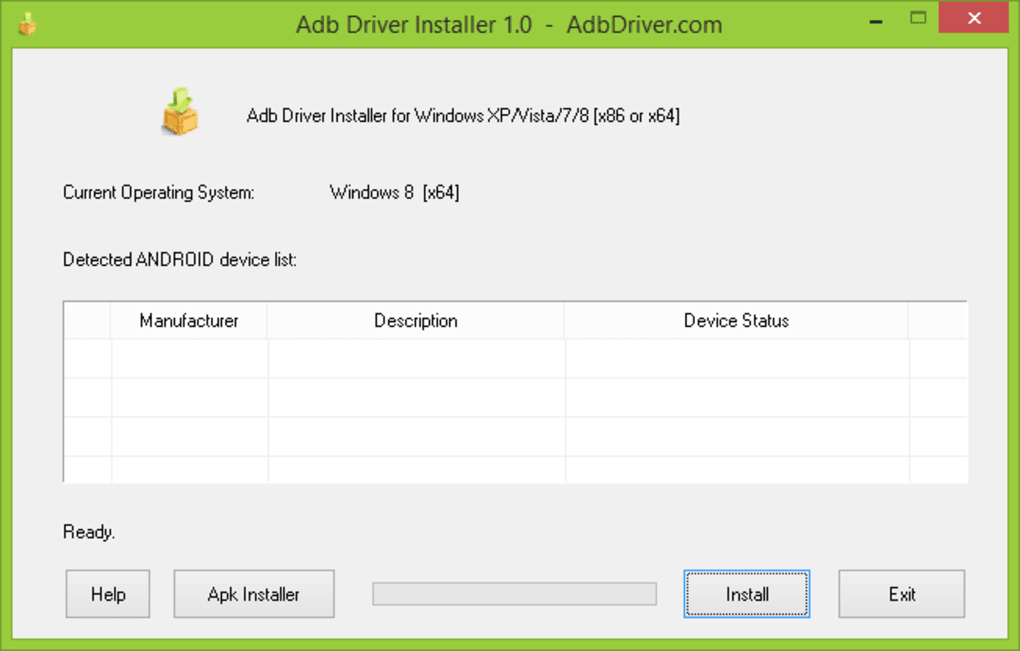
Install ADB drivers (32 bit or 64 bit) on windows 10, windows 7, windows 8, windows 8.1, windows XP and Vista operating system. Download Latest ADB and Fastboot SDK Platform Tools and setup Android USB drivers, fastboot drivers, Universal ADB Interface drivers and OEM USB drivers for Windows OS. Fix ADB not recognized, device not found error using our easy steps guide. In this guide we’ll manually install ADB drivers using four methods: 15 seconds ADB Installer, Minimal ADB and Fastboot Tool, ADB Driver Installer and SDK Platform tools.
What is ADB?
Android Debug Bridge or ADB is a client server program that lets you communicate with a device. ADB is a part of the Android Software Development Kit (SDK) and is made up of three components: a client, a server and a daemon. A client is the one which runs on your development machine and sends command. Whereas a daemon is the one which runs as a background process on your android device. And lastly the communication between the client and daemon is managed by a Server. This communication is most often done over a USB cable, but WiFi connections are also supported.
ADB can control your Android device over USB from a computer, transfer files, install apps, uninstall apps, run powerful shell commands etc. As long as debugging mode is enabled on your Android device, you can send ADB commands from computer. The ADB commands can even work when your Android device is booted into recovery mode. And the best part is that your device doesn’t even need to be rooted for the ADB commands to work.
Also Read:
Procedure:
Step 1: Download and Extract the SDK Platform tools zip file on your PC.
After extracting you’ll get a folder named Platform tools.
Step 2: Move this folder to an easily accessible folder such as C:adb.
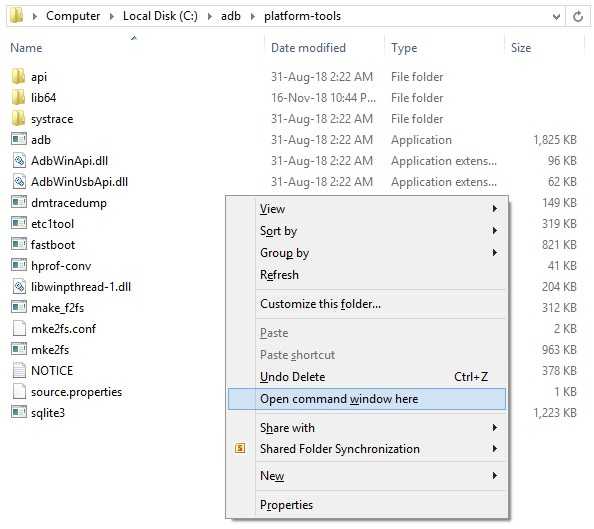
Step 3: In that folder, open cmd window.
For doing so, hold Shift button and right mouse click anywhere in that folder. You’ll see a list of options from which select Open command window here option. This will launch the command prompt window as given below.

Note: Ensure that your Android device is connected to PC with USB debugging enabled.
Step 4: To confirm the proper installation of ADB drivers, type the following command and press enter key.
As soon as you press enter key, you’ll see a message saying ‘List of devices attached’ along with some random numbers. This will confirm the successful connection of your device with PC using ADB drivers.
Note: If such thing doesn’t happen, then install mobile drivers, enable USB debugging mode and try again. If the problem still persists, try changing USB cable or even the USB port.
Awesome! You’ve successfully installed the latest ADB and Fastboot drivers on your computer.
If you come across any difficulty or have any issue with the above given tutorial, then kindly comment below. I’ll be glad to help you out.
Follow us on Facebook, Twitter and Google+ to stay updated. Till then keep smiling and peace out!
В